
If you own a MacBook, or any other Apple device that runs MacOS, then you probably know that the Finder is the core experience. It is the home to navigating your files, apps, and other things that you use on a day-to-day basis.
But did you know that you don’t have to stick with how Apple has set up Finder, right out of the box? Like many other things in MacOS, the Finder experience is actually highly customizable. We wanted to highlight some of the top tips for Finder, and how to make it more useful.
Change what new Finder windows show
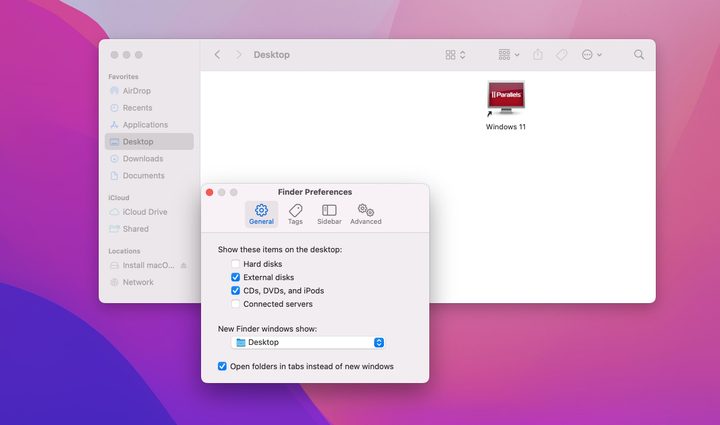
By default, new Finder windows like to show you your most recent files. This isn’t always convenient, as if you download a lot of files, or have a lot of documents, your Finder window will be a huge mess. That’s why you can swap out which folder new Finder windows show by default to something else, like documents, or desktop.
To do this, click a new Finder window. Then, visit the Finder option in the menu bar at the top of your screen. Choose Preferences and then under New Finder Windows show, pick the folder you want. This way, you can get access to the folder you want, and not see a list of files.
Enable hard disks on the desktop
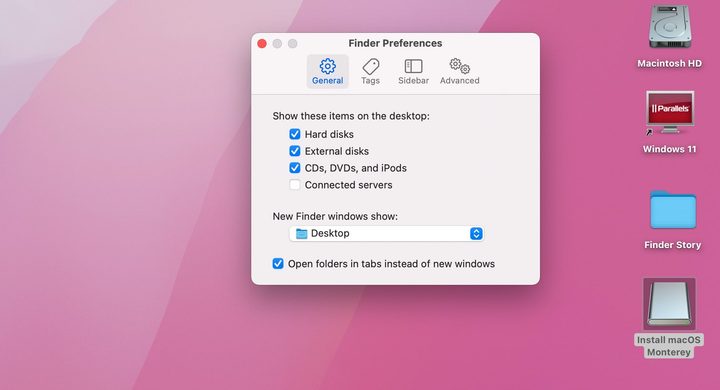
Next up, is a tip to avoid having to use Finder manually in a specific case. If you enable dark disks on the desktop, you can see all the disks that you have attached to your Mac. That includes network drives or external hard drives. This makes it easier than having to click to first open Finder and then click in the sidebar to get to disks.
Again, you just need to open a new Finder window. Then, visit Finder in the menu bar at the top of your screen. Choose Preferences. Make sure that the Hard disks option is selected under Show these items. You also might want to enable the other items in this list, too. These include external disks, CDs or DVDs or iPhones (you can sync your iPhone and Mac over USB), and servers.
Tweak the Sidebar to enable what you want to see
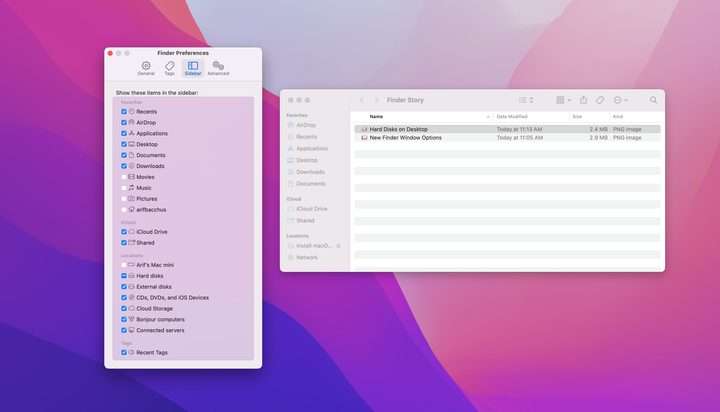
The sidebar in the Finder gives you access to common areas of MacOS like applications, downloads, documents, and more. If you don’t use some of those items and want to add other locations, though, then you can tweak those.
Just visit the Finder preferences, and then click on the Sidebar menu. There are a ton of items that you can add, like AirDrop, Movies, Pictures, iCloud Drive, and so much more! Click to check the ones you want to enable, and uncheck the ones you don’t need!
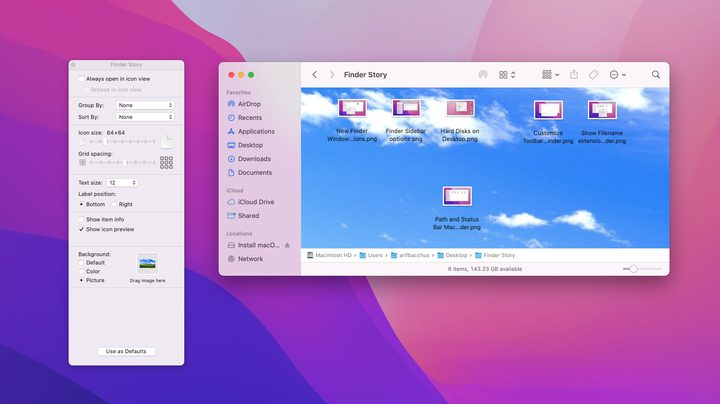
Show your filename extensions
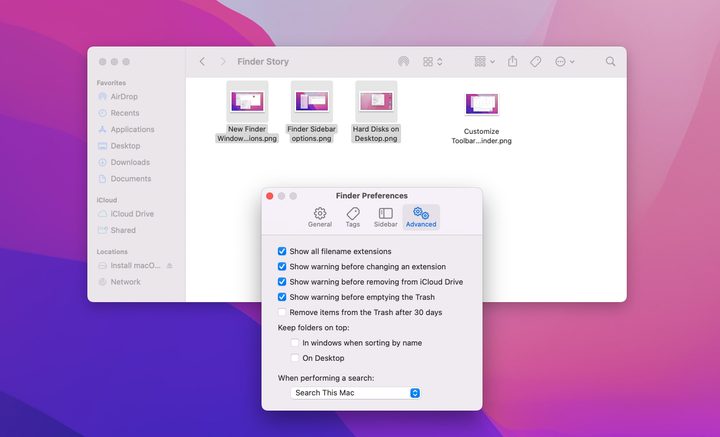
There’s probably a chance that you’re using a lot of different apps on your Mac. Each of those apps has different file extensions. Examples include .DOCX for Word documents, .PDF for PDF files, and .PSD for Photoshop. MacOS does a good job of showing you previews of those file types, but you might also want to enable filename extensions so you have a better idea of what you’re dealing with.
This setting option is found under the Advanced section of Finder Preferences. From there, you can enable filename extensions by clicking on Show all filename extensions. Once you do, the finder will change the way files are shown. It will now show you some of the examples and extensions we mentioned above whenever a file is listed.
Customize your Finder toolbar and add Airdrop
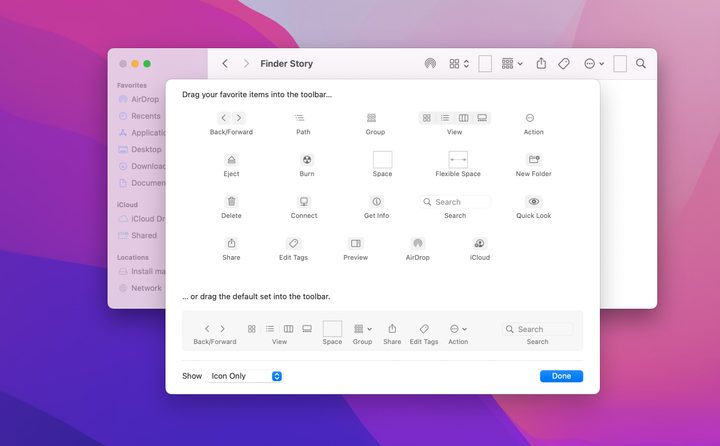
See the icons at the top right of new Finder windows? You can actually customize those and add different options, including a shortcut to Airdrop. This makes your life a lot easier when sharing files, but you also can add other quick actions like creating new folders, burning CDs or ejecting CDs, and more.
To tweak this Finder option, all you need to do is visit the menu bar after opening a new Finder window. This time, though, go to View and then Customize Toolbar. You’ll then see different icons you can enable. Click on the icons, and drag them into your new Finder window! Simple as that! If you want, you even can change the option under Show so that your view will include icons, as well as text, for a better understanding of what the icon does.
We do have a note on the AirDrop option, though. If you opt to drag it into your Toolbar, it only will actually work when files are selected. Otherwise, it will show gray. Once the files are selected, you can click the AirDrop icon and send your files over to an iPhone, iPad, or other Apple device. Just one of the ways in which you can use AirDrop on your Mac.
Add the Path Bar and Status Bar to navigate quickly

Do you often lose your place when navigating files and folders in Finder? Well, while it’s turned off by default, you can make your life easier by showing the Path Bar and Status Bar. To do this, just click on the menu at the top of your screen when Finder is open, and choose View followed by Show Path Bar and Show Status Bar. This brings up a directory of sorts at the bottom of your Finder. You’ll be able to see file storage and even change the icon for files. Pretty cool, huh?
Change view options and add wallpapers to folder windows
Our last Finder setting to tweak is actually one of the coolest. You can change your view options from within Finder to add different wallpapers to different folders in the Finder background. This can help you set folders apart more easily.
Like our other tips, this one’s easy, too. Just open a new Finder window, click to the top and choose View followed by Show View Options. From there, look under Background, make sure Picture is selected, and drag a file to use as a background. You also can change the color to a specific one, too. It’s simple and easy, and the possibilities for customization are endless.
Improving how you use the Finder is just one of many Mac tips and tricks you can use to be more efficient with your computer.


