Apple’s AirDrop is a terrific way to wirelessly swap files between the company’s devices, like from an iPhone to a Mac. Google began working on similar technology to replace its NFC-based Android Beam launched in 2011. Called Fast Share, it eventually appeared on Pixel phones in 2019 and then was renamed to Nearby Share when it became available to all Android 6.0 devices and newer in 2020.
This guide shows you how to enable and use Nearby Share on Android phones. We also show you how to enable this feature on Chrome OS so you can wirelessly swap files to a Chromebook, just like Apple users do between their MacBooks and iPhones.
Nearby Share requirements
Nearby Share uses several components. Bluetooth is initially used to pair two devices and then, according to Google, Nearby Share determines the best protocol for sharing files: Bluetooth, Bluetooth Low Energy, WebRTC, or peer-to-peer Wi-Fi. The protocol depends on what you’re sharing.
Here’s what you need for Nearby Share:
- Android 6.0 or newer
- Bluetooth toggled on
- Location toggled on
- Two devices within one foot of each other
Enable Nearby Share on Android
These instructions were verified using a Samsung phone with Android 10 and a Google Pixel phone with Android 11.


Step 1: Swipe down from the top to open the Notification shade and verify that Bluetooth is on. If not, tap the Bluetooth tile. You cannot use Nearby Share without Bluetooth.
Step 2: With the Notification shade still pulled down, verify that location is turned on. If not, tap the Location tile. You cannot use Nearby Share without Location services.
Step 3: With the Notification shade still pulled down, tap the cog icon. This opens the Settings panel.
Step 4: Tap Google.
Step 5: Tap Device Connections.
Step 6: Tap Nearby Share.
Step 7: Tap the Toggle next to Turn On to enable this feature.
Enable Nearby Share on Chrome OS (preview)

There are two Chrome flags that you need to enable: One to turn on Nearby Share and one to add it to the Share menu. Since this isn’t baked into a Stable build as of Chrome 88, it doesn’t work exactly as Google intended. The “sharesheet” aspect removes all sharable options except for Nearby Share.
That said, when you’re done experimenting with this feature, you may want to change the “sharesheet” flag back to Default, so your other sharing options reappear.
Step 1: Open the Chrome browser and type chrome://flags in the address field.
Step 2: Search for “nearby.”
Step 3: Change the setting from Default to Enabled.
Step 4: Search for “sharesheet.”
Step 5: Change the setting from Default to Enabled.
Step 6: Click the Restart button as prompted.
Step 7: Click the Quick Settings Panel (system clock) followed by the Settings cog on the pop-up menu.
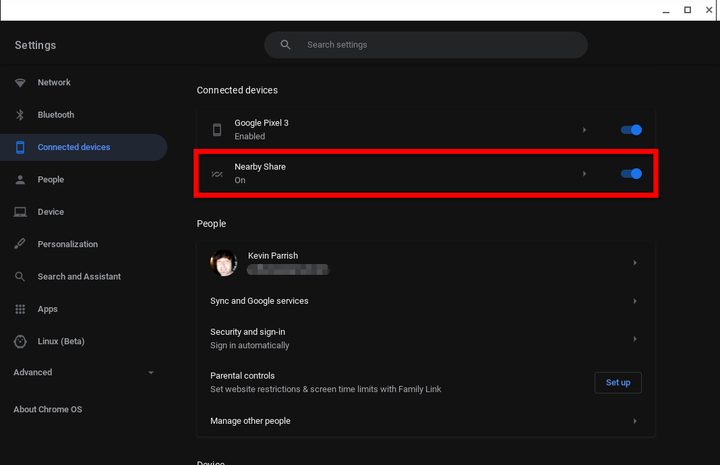
Step 8: Select Connected Devices on the left.
Step 9: Click the Toggle next to Nearby Share on the right to turn this feature on.
Step 10: Click on Nearby Share again to adjust the settings. See the “Edit Nearby Share settings” section below for more details.
Send and receive with Nearby Share
Here we switch between Google (sender) and Samsung (receiver) devices. The method also applies to Chromebooks.


Step 1: Open your content. In this case, we opened Google Photos to share a screenshot.
Step 2: Tap the Share button. Its location may depend on the app.
Step 3: Tap Nearby Share. If you don’t see it, tap the More button displayed under Share to Apps and then tap Nearby on the following screen, as shown above.
Note: The Nearby Share button should appear on the main Share to Apps strip after you use Nearby Share for the first time.


Step 4: The Nearby Share panel rolls up on the screen with a thumbnail of the file you’re sending. The Looking for Nearby Devices section should change to list nearby devices. Tap on the Receiving device.
Step 5: On the receiving device, tap Accept or Decline.
Share apps with Remote Share


Here’s how to send and receive apps using Nearby Share.
Send an app
Step 1: Tap to open the Google Play Store.
Step 2: Tap the three-line “hamburger” icon in the top left corner.
Step 3: Tap My Apps & Games.
Step 4: Tap the Share category at the top
Step 5: Tap Send.
Step 6: Tap Deny, Only This Time, or While Using the App on a prompt asking about the device’s location.
Step 7: Tap the box next to the app(s) you want to share.
Step 8: Tap the green Paper Airplane Send icon to finish.
Receive an app
Step 1: Tap to open the Google Play Store.
Step 2: Tap the three-line “hamburger” icon in the top left corner.
Step 3: Tap My Apps & Games.
Step 4: Tap the Share category at the top
Step 5: Tap Receive.
Step 6: Compare the pairing code displayed on both devices and tap Receive if they match. If not, tap Cancel.
A note about sending and receiving


By default, Nearby Share is based on your contact list. You can choose to share with all contacts or some contacts. If you choose the latter, you’re prompted to toggle each person in your Google Contacts list. This essentially prevents anyone from trying to send files to your Android device although you can set your device to Hidden too.
Typically, if everything is working correctly, the receiving device will see a pop-up window with the following message: Device Nearby is Sharing. Tap to Become Visible. Normally you don’t need to tap this notification if you know a file is incoming from a device associated with your Google Contacts. Instead, a slide-up prompt appears saying that a device is sharing. The user then taps the Accept or Decline options accordingly.
However, Android devices have a Nearby Share tile on the Quick Settings panel although you may need to edit this panel to add the tile (shown above). This tile is primarily used if you want to receive files from someone not on your Google Contacts list. Tapping this tile launches a slide-up panel showing that the device is now discoverable to everyone, including individuals not in your Google Contacts. Here you can tap the Cog icon to access the Nearby Share settings.
That leads us to the next section.
Edit Nearby Share settings


Step 1: Swipe down from the top to open the Notification shade and then tap and hold on the Nearby Share tile. Alternatively, you can use the same instructions we provided for enabling Nearby Share, listed above.
Step 2: Tap Device Name to change device’s identification, like Kevin’s Pixel, when sending and receiving, if needed.
Step 3: Tap Device Visibility to toggle between three modes: All Contacts, Some Contacts, or Hidden. If you select Some Contacts, you’ll see a darkened toggle next to each contact. Tap each Toggle to allow Nearby Share connectivity with these contacts.
Step 4: Tap Data Usage and change how you want to send data: Data for transferring small files over a mobile connection, Wi-Fi Only for using the local network, or Without Internet to use peer-to-peer sharing (likely Bluetooth). Tap Update if you made any changes.
Step 5: If you want to turn off Nearby Share, tap the Toggle next to On.