Zoom has never been more popular as employees of all kinds turn to the easy-to-use video and audio conferencing solution for swift chats with their peers. But as web conference users always discover, no matter how effective a video meeting is, you still need to share it with others who couldn’t make the meeting or need to reference details or training more than once.
Like all good video chat tools, Zoom allows for recording for this very purpose, and users need to know exactly how it works. We’ll teach you exactly how to do it. You can find more Zoom tips here, too.
Local recording to your computer drive
Local recording means recording right to your computer’s drive if you have the disc space to do so. This is an easy option that doesn’t require any cloud storage accounts to use.
Step 1: First, make sure that Zoom’s local recording is enabled. Log into Zoom from your browser, locate the Personal toolbar on the left and choose Settings (this option only shows up if you are the account administrator, which is necessary to enable recording). If you’re working from a business account, the settings section may be called something slightly different, like Account Settings.
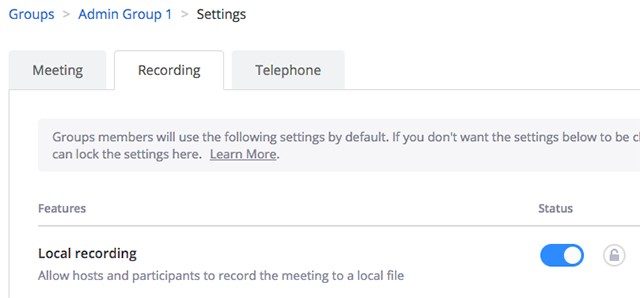
Step 2: In the Settings window, select the Recordings tab up at the top. One of the first options in this section should be Local Recording. Check the Status section to make sure Local Recording is enabled. If not, enable it. You can also lock this setting so it remains on for all users.
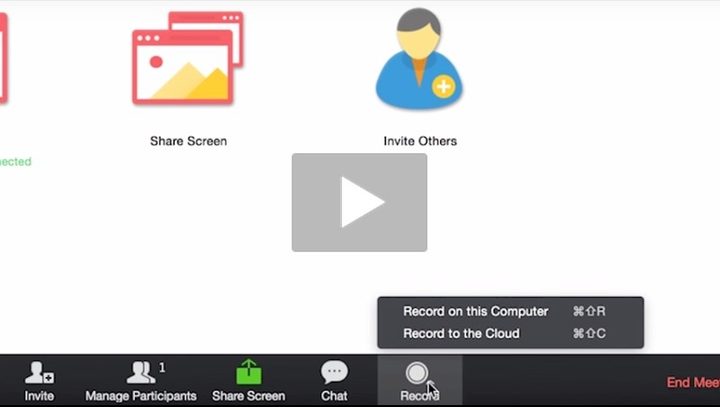
Step 3: Now, start a Zoom meeting as the host. Look at the tools at the bottom of the screen, and you will see a round icon called Record. Select it to start recording. Some versions of Zoom will immediately give you an option to Record on This Computer, which you should select for local recording. Now a notification will appear in the top left of all participant’s windows saying Recording… so everyone knows that it’s working. You can pause the recording as needed.
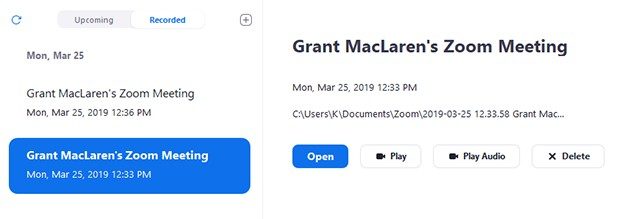
Step 4: You don’t need to do anything else until the Zoom meeting has ended. Once you stop the meeting, a notification will pop up that says Converting the Meeting Recording. When this finishes — and this is the important part — it will autosave an MP4 file and an audio-only M4A file on your computer in a Zoom folder under the name “Zoom_0.mp4,” and counting up from there for additional files. You can access these recorded files with the Zoom desktop client under the Meetings section, which is the easiest way to view them.
However, accessing the video files directly without the client is more complicated. You must go into the relevant folder, make sure the files have properly downloaded, and then rename them to the name/date of your meeting. If you don’t rename these files right away, it can become straightforward to lose track of which file is which and cause a lot of confusion later on.
It’s also important to note that the file will appear in this Zoom folder, even if the meeting hasn’t fully converted for viewing yet. This is handy if something interrupts the conversion process or if converting right after the session isn’t working for you because you can click on the file to start the conversion process over again.
Recording a video to the cloud

Recording a video to the cloud is another option, but it only works for licensed users with the Zoom desktop client or app who have enough cloud space in your plan. For reference, this typically is around 1GB per user, so not a whole lot. This means you can’t automatically record to popular cloud storage services like Dropbox. If you plan to do any regular recording, you are required to pay for a Zoom cloud storage plan. These plans begin at $40 per month for an additional 100GB.
If you don’t mind all of that, enabling cloud recording itself is actually quite simple. Back in the Recording tab, where we showed you how to enable local recording, there should be an option further down to enable Cloud recording. Make sure it’s turned on.
Then, when you select Record during a meeting, choose Record to the Cloud when the options appear. When the meeting is over, Zoom will have the video recording ready for transfer to Zoom’s cloud, alerting you with an email when it has completed the recording process.
Recording a video on iOS or Android
In case you were wondering about Zoom’s video recording capabilities, both iOS and Android mobile systems support meeting recordings, but there are a few stipulations. Firstly, you cannot record locally on a mobile device. This means Zoom’s cloud recording option is your only option. The host must also be a licensed user for mobile recording to work.
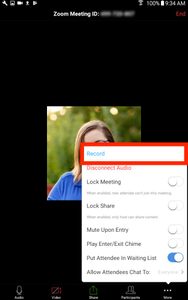
No matter which mobile operating system you use, the Zoom meeting display has an identical format on both while you’re on a video call, including a More option on the lower part of the video screen. Select More, and then select Record or Record to the Cloud to begin.