
So you want to print the digital photos you took with your camera, and you want to print them nice and large. Heck, maybe you want to blow them up and turn a blank wall into a mini gallery. Before you start printing, you need to make sure your images are suitable. Here are a few things to keep in mind.
Megapixels Matter
Just because an image looks sufficiently big onscreen doesn’t mean it’ll translate the same way on paper. A 2-megapixel-resolution image, for example, will only go as large as 4 x 6 while keeping the best quality intact, even though that image might look great on your monitor. If you try to print an image larger than allowed, you’ll get something that’s pixelated and unusable.
It’s easy to determine the number of megapixels of an image and how large you can print it. First, find the dimensions of the image. You can find that through a program like Adobe Photoshop or the properties menu of the image file. Next, multiply the height and width, and you’ll have the answer. For example, an image that measures 4608 x 3456 equals 15,925,248 (in pixels), which is roughly 16 megapixels (one megapixel equals one million pixels).
Now, to figure out the print size, divide the width and height dimensions by 300. Why 300? That’s the number of pixels per inch (ppi) (also a type of resolution) that’s suitable for high-quality printing. From our last example, a 4608 x 3456 image will yield a 15 x 11 print. A 640 x 480 image then, well, you can forget about printing it larger than 2 x 1 inches.
Some places may refer to ppi as dots per inch (dpi). Although they are technically different, many places use them interchangeably. It’s a confusing topic, but just remember to keep it at 300 where you see dpi or ppi; if your image has a 72 dpi resolution, you will need to increase it with photo editing software (make sure you deselect the “resample image” box). If your software doesn’t offer such fine-tuning (some just offer “best” or “normal” as options), just remember the math we mentioned and you’ll know how large you are supposed to go.
If you are willing to sacrifice a bit of quality in order to gain a larger print size, you could cheat and lower the resolution, but check the final print quality to see if it’s to your liking. The lower the resolution, the larger the print size, but quality suffers.
So, you can see why megapixels matter. Simply put, the larger the megapixel, the larger you can print your images.
Keep Your Images Large When Photographing
You can set your digital camera to record in various sizes from large to small, or high to low. Some will even shoot high quality, uncompressed RAW images (versus the standard compressed JPEG). Saving your photos as small as possible takes up less room on a memory card, but with high-capacity memory cards available for cheap, why would you? Use all the megapixels your digital camera can muster. As we just mentioned, the more megapixels in an image, the higher the resolution, the better the photo will look.
Don’t Use ‘Image Resize’ to Enlarge a Photo
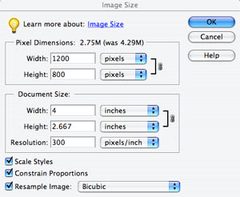 Photo editing software like Adobe Photoshop let you resize an image. It’s fine to make a photo smaller, but you should never use this feature to make a photo larger. Doing so will only turn your photo into something heavily pixelated.
There is software, however, that’s specially designed for photo enlargement purposes. One is SmillaEnlarger, an open-source application that’s available for free. It has many happy users, so give it a shot. It won’t cost you anything to experiment.
Use a Scanner to Enlarge
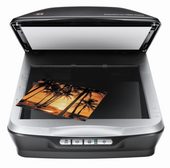 If you have a flatbed scanner or if there’s one built into your multifunction printer, you could enlarge an image by scanning it. This is ideal for enlarging old photographs or digital images that are too low-res. Before you begin the scan process, adjust your settings to scan at 600 dpi and save it as a less-compressed TIFF file (versus JPEG). You now have a higher-resolution image that you can print larger than the original.
If you are enlarging a digital image, print it out first at the highest resolution and at the maximum size (see above) on good quality paper, and then scan it.
Use a Commercial Service
Okay, this might be the lazy way to enlarge a photo, but it’s convenient and practical, especially if you don’t have the equipment to do it at home. Plus, it’s handy if you want to print a photo larger than what your home printer can output (large-format like a poster or canvas print, for example). Whether it’s your local Costco, Walgreens, or FedEx Office, or an online service like Shutterfly or Snapfish, you should make sure the image file you’re giving them is at the highest quality.
Share your photo printing tips in the comments.


