MacOS Big Sur is chock-full of new features, from an all-new Control Center that makes customization a breeze to big overhauls to Messages, Safari, and more (and that’s not to mention the beautiful new redesign). One new feature that has not received so much attention is the addition of Guides to Apple Maps, but this lesser-known tool can have a big impact on how you use Maps on your Mac.
Guides are essentially collections of places grouped around a central theme — the best cycling trails in your area, for example, or great free experiences in your city. Best of all, you can create your own Guides in MacOS Big Sur to gather together your favorite places or locations you want to visit. Doing so is easy, and we’ll show you how in this tutorial.
Step 1: Add a new Guide

On the left-hand side of Apple Maps is a sidebar (if you do not see it, click the button to the left of the top toolbar in Maps, next to the name of your location). Under the My Guides header, click the + button. This will add a blank Guide. Right-click it and click Edit Guide, then give it a new name. You can add your own cover photo by clicking Change Key Photo, but Maps will automatically assign one as you add places to your Guide.
Step 2: Add some places
There are two ways to add locations to a Guide. The first is to right-click the name of the Guide, then click Add New Place. In the window, that appears you can search for a location or scroll through the list of recently viewed places. When you have found somewhere you want to add to your Guide, click the place name or the + button next to its name. Do this with as many places as you like. When you are done, click Cancel.
The second method is to use the map view. Many popular landmarks are already labeled on the map. In those cases, click and drag their icon from the map onto your Guide. A + icon will appear, indicating you can add it to the Guide.
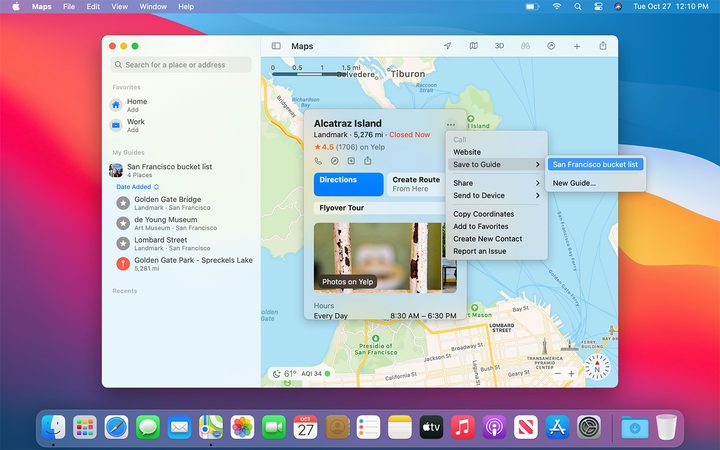
This also applies to custom locations you mark on the map yourself. Once you have dropped the red custom marker pin on the map, just drag and drop it to the Guide, or click the button on its information card and click Save to Guide, then choose where to add it.
Step 3: Tweak your Guide to perfection
Click the arrow next to your Guide’s name to expand it and show its list of places. Under the Guide title, click Date Added. Here, you can reorder the places in your Guide, either by name, distance from you, or the date on which they were added.
If you are not happy with the key photo Apple Maps has chosen, right-click your Guide’s title and click Edit Guide, then click Change Key Photo and choose a picture from your library.
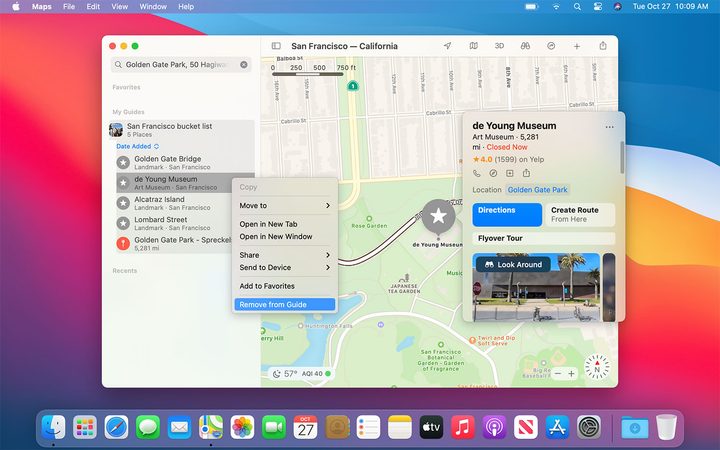
To delete a place from your Guide, right-click it and click Remove from Guide. You cannot rename existing landmarks added by Apple to Maps, but you can rename your own custom locations. Simply right-click one, then click Rename, enter your desired name, then click Save. This is a good idea if you have added lots of custom locations to your Guide, which would otherwise be confusing.
Step 4: Share your work

There are a couple of ways to share your Guide once you are finished. First, right-click your Guide and click Share, then choose an option. The default options are Mail, Messages, AirDrop, Notes, and Reminders.
Alternatively, right-click the Guide and click Send to Device. Any Apple devices associated with your Apple ID should show up here; click one to send the Guide on its way.
You can also share via the File menu bar item. Make sure you have clicked the Guide first (rather than an individual location within the Guide) to share the whole thing.
Bonus: Use the Editors’ Picks
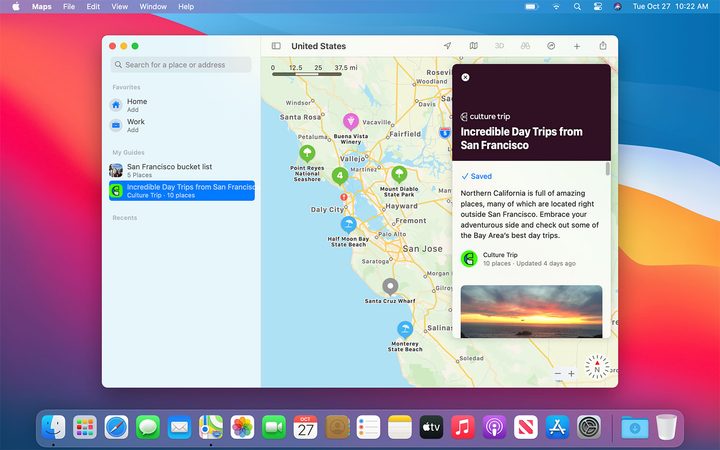
Various outlets, from magazines to popular websites, have created their own Guides that you can browse within Maps. To find one, click the search bar in the top-left corner of Maps, then scroll down to the Editors’ Picks header (note that you have to be in or near a place that has a Guide to see the Editors’ Picks). Alternatively, they also appear on a city or location’s information card, provided Guides have been created for it. Click one of the Guide cards to view it. Click See All in the search bar or See More on a city’s information card to view the full list of Guides.
If you clicked See All, you can now browse Guides by location. Click the drop-down arrow next to Editors’ Picks on the right-hand side, then select a new location from the list. You can now choose from a list of Guides tailor-made for that place.
When you find a Guide that you want to save for later, click its card, then click Add to My Guides. It will appear under the My Guides section on the left-hand side of Maps, ready for you to use.