 We’re not all professional videographers. Hell, many of us can’t even figure out how to use the video camera on our cell phone, let alone capture video footage using a real camcorder. Things we should take into account – lighting, focus, and shutter speed – sometimes fall to the wayside when trying to capture that quintessential concert footage or panning landscape portrait of the great outdoors. Unfortunately, orientation is often another forgettable pitfall, one that will likely lead to kink in your neck when you try to watch your precious video at home on another device.
While modern, video-capable devices won’t have trouble automatically adjusting to the flick of your wrist, that’s not always the case. Luckily, there’s a way to fix the issue after the fact. Here’s our guide on how to rotate a video using free, standalone programs like Windows Movie Maker and iMovie. We can’t guarantee your video is going to look any better, but at least your neck will thank you for it.
Choose your method:
- Rotate using Windows Movie Maker on Windows
- Rotate using iMovie on Mac OS X
Rotate using Windows Movie Maker (Windows)
![]() Microsoft’s freeware Windows Movie Maker is becoming easier and more simplified with each rendition of the software. We can’t say it’s the best video editing software available for the operating system – ahem Adobe Premiere Pro – but it will perform the basic rotating function within a matter of clicks. It’s also capable of handling a variety of formats, from MOV to MP4, and comes bundled with most versions of Windows. Alternatively, head over to the Microsoft site to download the program.
Microsoft’s freeware Windows Movie Maker is becoming easier and more simplified with each rendition of the software. We can’t say it’s the best video editing software available for the operating system – ahem Adobe Premiere Pro – but it will perform the basic rotating function within a matter of clicks. It’s also capable of handling a variety of formats, from MOV to MP4, and comes bundled with most versions of Windows. Alternatively, head over to the Microsoft site to download the program.
The exact process may differ slightly depending on which Windows Movie Maker edition you’re using, but it’s essentially the same process no matter the version you tackle the rotating process with. For our purposes, we’re using Windows Live Movie Maker running on Windows 7.
Step 1: Open Windows Movie Maker. To begin, click the Start menu icon and select Windows Movie Maker from the All Programs list accessible at the bottom of the drop-down menu. Alternatively, click the Windows movie maker icon from your dock or desktop (it resembles a film strip adorned with bright orange flowers).
Step 2: Add video. Assuming you have the video you want to rotate on your computer, click the Add videos and photos icon below the main WMM menu. Afterward, navigate to and choose the desired video file you wish to rotate.

Step 3: Rotate the video. Click the rotation icons housed in the Edit panel below the main WMM menu – each arrow click will rotate your video 90 degrees – until your satisfied with your new orientation.
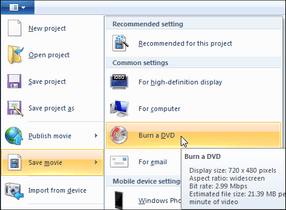 Step 4: Save the video. Click the Save movie icon in the upper right-hand corner of the WMM window before choosing the recommended save format or selecting a differing format from the drop-down menu (high-definition, Windows phone, etc.). Alternatively, you can click the blue project menu icon in the upper-right hand corner of the WMM and select Save movie from the drop-down menu.
Step 5: Enjoy. That’s it! Your new video should be saved and exported in the correct orientation and format. Watch and enjoy.
Next Page: How to rotate using iMovie on Mac OS X.
Rotate using iMovie (Mac OS X)
![]() Apple has a knack for turning out easy-to-use, quality software for every device it releases on the market. They’re not always the most robust or capable – Final Cut can perform leaps and bounds above iMovie – but they are simple tools that the everyday user can pick up and learn within minutes. Apple’s innate video editing software, iMovie, is no exception. It can rotate video in almost every common format, sans 3GP, and comes bundled with every Mac so there is no need to download or purchase additional software.
Apple has a knack for turning out easy-to-use, quality software for every device it releases on the market. They’re not always the most robust or capable – Final Cut can perform leaps and bounds above iMovie – but they are simple tools that the everyday user can pick up and learn within minutes. Apple’s innate video editing software, iMovie, is no exception. It can rotate video in almost every common format, sans 3GP, and comes bundled with every Mac so there is no need to download or purchase additional software.
The exact process may differ slightly depending on which iMovie edition you are using, but it’s essentially the same process no matter the version you tackle the rotating process with. For our purposes, we’re using iMovie ’09 running on Mac OS X Mountain Lion.
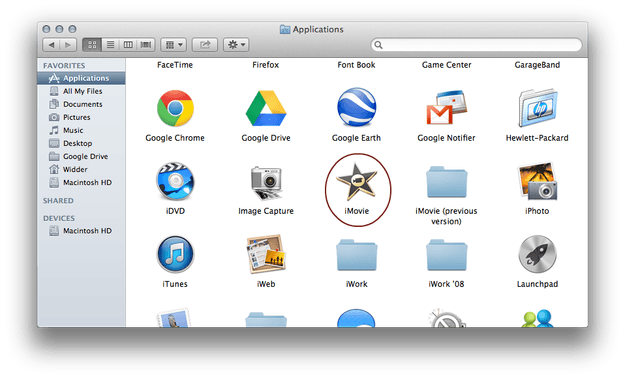
Step 1: Open iMovie. To begin, click the Finder icon in the dock and select iMovie from the Applications folder accessible on the left-hand column. Alternatively, click the iMovie icon from your dock or desktop (it resembles a gray star with a camcorder inside).
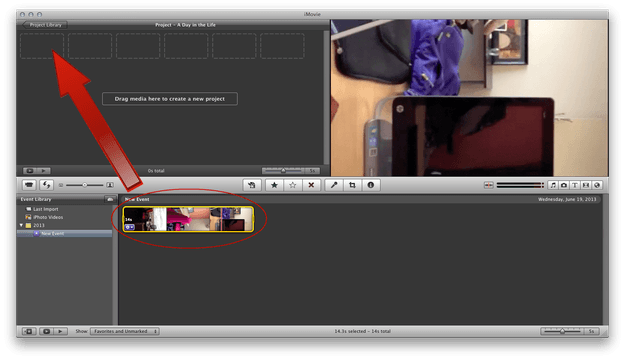
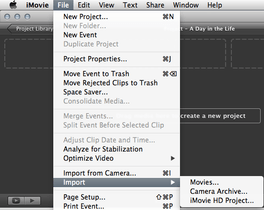 Step 2: Import the video to the Project Library. Assuming you have the video you want to rotate on your computer, click File from the main iMovie menu, select Import, and then Movies from the bottom of the drop-down menu. Choose your desired video file and wait for iMovie to analyze the file. A thumbnail of the newly added clip will appear in the event field at the bottom of the iMovie window. Afterward, select the entire duration of the clip and drag it to the upper-left hand corner of the Project Library.
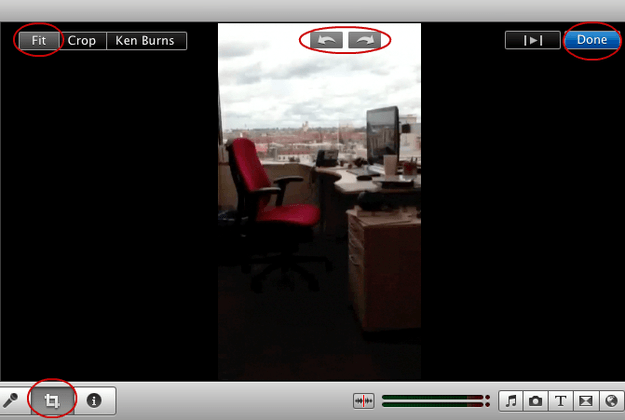
Step 3: Rotate the video in the Crop menu. Select your video clip from the Project Library and click the Crop menu icon located near the center of the iMovie window, nestled between the Voiceover microphone and Inspector buttons. Next, click the rotation arrows displayed at the top – each arrow click will rotate your video 90 degrees – ensuring the Fit button in the top left is highlighted when doing so. Click the blue Done button when satisfied with your new video orientation.
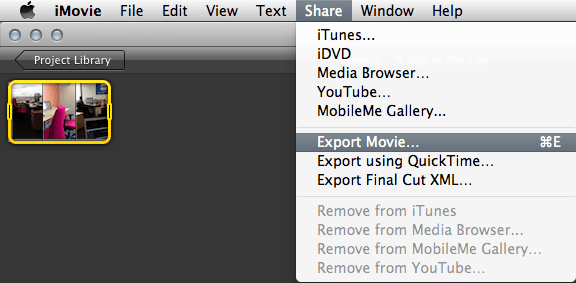
Step 4: Export the video. Click Share from the main iMovie menu and select Export Movie from the drop-down menu. Title your export, choose the appropriate file size (Tiny, Medium etc.), and designate a save location for the resulting file. Click Export in the bottom right-hand corner of the window and wait for the export process to complete.
Step 5: Enjoy. That’s it! You’re new video should be saved and exported in the correct orientation and format. Watch and enjoy.
What did you think of our guide on how to rotate a video? Piece of technological cake, right? Let us know if you have any issues in the comments below.