Brought to life by an incredibly successful Indiegogo campaign, the original Loupedeck introduced a bespoke hardware interface for Adobe Lightroom. The console used a host of buttons and dials for performing common and advanced commands that otherwise would rely on often esoteric keyboard shortcuts and slow mouse maneuvers. In our review, we found it to be a useful accessory for photographers needing to edit a large number of photos. Now, there’s a new version out: the Loupedeck+.
With it has come a price adjustment to the original: Introduced at $299, it can now be found for just $180, while the Loupedeck+ sells for $230. So how does the Loupedeck+ improve on the original, and will it win over any photographers who may have taken a pass on it?
Dialing up the customization
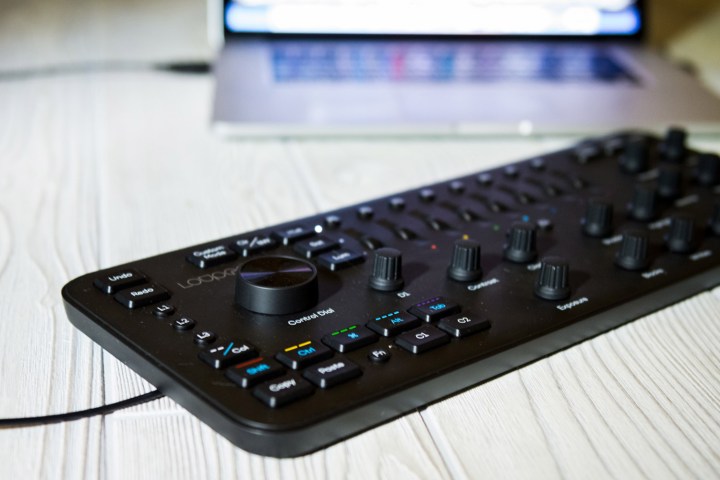
The Loupedeck+ features a very similar control layout to the original Loupedeck, but has turned up the customization options considerably. A new custom mode button will switch the function of the 11 pre-programed dials that control different elements of exposure, color, and white balance. That means you can switch the contrast dial — and ten others like it — to a different control by tapping a shortcut button on the upper left. That custom mode is helpful for users who need more than those 11 dials or simply want to better tailor the experience to their editing style. Beyond Lightroom, the Loupedeck+ also introduces support for Skylum Aurora HDR.
Custom mode aside, the Loupedeck+ has several new controls designed specifically for custom settings while leaving all the pre-labeled tools intact. While the original had one D1 dial, the update has two. We set these two to control sharpness and noise reduction.

Along with the original’s two custom buttons in the center, the Loupedeck+ adds two more to the right and a set of three on the left. The three left “L” buttons are preset to tools like the brush and radial dial but, they can also be adjusted to control different options. The rotate/crop dial on the original is also renamed as a control dial, which can be custom set for two different actions, one for turning the dial and another for a press of the dial.
The color and flag keys used for culling images also double as a “keyboard mode.” Holding Fn and tapping the button to toggle between star and color labels turns those five buttons into shift, control, command, alt, and tab keys — they function just like the keys of the same name on a typical keyboard.
Each color channel has a wheel and three buttons swap between whether you’re adjusting hue, saturation, or luminance.
Like the first generation, the Fn button doubles the controls, working sort of like control key on a typical keyboard to expand key commands by pressing both. For example, in our setup, we used this to toggle our aforementioned noise reduction dial to color noise reduction, giving us full control over both parameters of noise reduction in one dial.
Perhaps our favorite feature on the original Loupedeck, the individual controls for each color channel, remain intact here, as do the dials for exposure, contrast, and white balance. For photographers who often make adjustments in the hue, saturation, and luminance (HSL) panel, this is where the Loupedeck can really start to save some time. Each color channel has a wheel and three buttons swap between whether you’re adjusting hue, saturation, or luminance. The actual efficiency gains can probably be measured in milliseconds for any one command, but it adds up over multiple commands and photos.
As with the first Loupedeck, as you make an adjustment, the Lightroom control panel will scroll to that adjustment on the screen. This makes sure that you always get visual feedback of the control your adjusting, although it doesn’t work perfectly. With noise reduction, for example, it scrolls to the top of Sharpness panel, which may leave the noise reduction sliders out of view on some monitors.
Along with the additional customization options, the Loupedeck+ feels sturdier. It is also heavier, but the keys feel a bit nicer under to the touch. We didn’t find anything wrong with the original build quality, but there is a noticeable improvement in the second generation. The Loupedeck+ also ditches the silver edge for an all-black design.
One of our few complaints about the original Loupedeck was the crop dial, which could only straighten the horizon. On the Loupedeck+, that dial can be customized to other options, such as scrolling through the image library, but you’ll still need to reach for the mouse when cropping an image. We still feel the crop dial could do more for actual cropping; even being able to use it select different aspect ratios would be nice.
Lower prices across the board
As with the original, the Loupedeck+ brings speed improvements that range from modest to meaningful depending on your editing workflow and workload. It is undeniably, however, a more fun way to work inside of Lightroom, rather than relying on a mouse, keyboard, and software sliders. We’d still like to see a wireless option — another complaint we had with the original — but most photographers will use it close enough to their computers that a USB connection won’t be an issue, so long as you have an open port.
Overall, this is an excellent tool for photographers who use Lightroom or Aurora HDR on a regular basis.
Rather than replacing the original, the Loupedeck+ serves as a flagship version, priced about $50 more. If you want more custom controls, the Loupedeck+ is the better option, but otherwise the original is a great buy at $180. The closest competitor is the Palette Gear, which is modular and customizable, but only includes two buttons, three dials, and two sliders in its $299 configuration.
But perhaps our favorite thing about the Loupedeck+ is simply that it costs less than the launch price of the first one ($230 compared to $299). That means both options are much more approachable, particularly to non-professional photographers who may not be able to justify the expense as easily.
Overall, this is an excellent tool for photographers who use Lightroom or Aurora HDR on a regular basis. Like any tool designed to save time, the fewer photos you tend to work with, the less important an accessory like the Loupedeck becomes. However, thanks to the price drop, more photographers will find the Loupedeck to be a worthwhile investment.


