 Apple’s long-awaited new mobile operating system, iOS 5, is finally available for download for iPhone 4 and 3GS, iPad and iPod touch (third and fourth generations). And boy, is this one a doosey – with more than 200 new features, iOS 5 is the most significant mobile OS update from Apple since iPhone OS 3 in 2009. New notifications, iMessage, wireless syncing, faster camera, deep Twitter integration, the list goes on and on. Luckily most of what’s new about the new iPhone 4S can be had on the iPhone 4 or 3GS just by upgrading to iOS 5. So, without further ado, here is my hands-on walk-through and first impressions of the new iOS 5.
Note: This review of iOS 5 is based on use with an iPhone 4. Some performance details may differ depending on your device.
Getting started
Of course, the first thing you must do is install iOS 5 on your device. Installing iOS 5 should work the same as any previous iOS update. But there are somethings you should know. First, you must update to iTunes 10.5 (Click here to do so.) Next, make sure you back up your device before performing the update, as all your apps, music and personal data will be completely deleted from your iPhone during the update process. The rest is exactly the same as any other iOS update, just click “Check for updates” under the “Summary” tab in iTunes, and a prompt should allow you to download iOS 5 and update your device.
If you receive any error messages, and the update fails, click here for possible solutions to the problem.
Once iOS 5 is installed, you will be asked to go through the new Setup Assistant to customize a number of settings for your new OS. You’ll first be asked to pick a language, and choose whether to enable location services (which can be customize for each app later). Next, you’ll be asked to choose whether to connect via Wi-Fi or choose to connect to your computer to turn on. (Wireless syncing is one of the big new features of iOS 5.)

Once your connection is setup, click next and your phone activation will begin. You can then choose to set up your iPhone as a new device, or to restore from backup. The latter option will reload all your contacts, apps, music and other personal files.
Other Setup Assistant options include enabling iCloud, which will backup your data to Apple servers, rather than your local computer. If you decide to enable iCloud, your device will be backed up regularly when it’s not in use. As with location services, you can decide later which data to backup to iCloud and which to leave out. You will also be asked if you want to turn on Find My Phone, as well as if you want to send diagnostics info to Apple. This explicitly includes sharing some location information, which is what got Apple in some trouble a few months back.
Notifications
One of the most significant new features of iOS 5 is how it handles and displays notifications. And I have to say, it really is a breath of fresh air compared to the earlier versions of Notifications, which were first introduced in 2009.

The new notification system allows for your notifications to display in two different ways: the old pop-up message, similar to past iOS versions (but with an updated design); or the all-new drop-down “banner” style, which appears at the top of the screen. You can also decided whether or not to have alerts appear in the Lock Screen, as well as the new Notifications Center (we’ll have more on that later). And, of course, iOS 5 allows you to turn off notifications for each app altogether.
Notification settings
Under the Notifications settings, you can customize how each individual app displays alerts. All apps installed on your device that include an alert function will be listed here. Click on the app you want to set, and you’ll find a number of settings options, which differ depending on the app.
From here, you can turn on or off alerts appearing in the Notification Center, choose the alert style, and decide whether you want alerts from that particular app to appear on the Lock Screen. Another handy feature is the ability to turn off “badge icons,” the little red circles that appear on the app icon when you have an unread alert, as well as sound options.
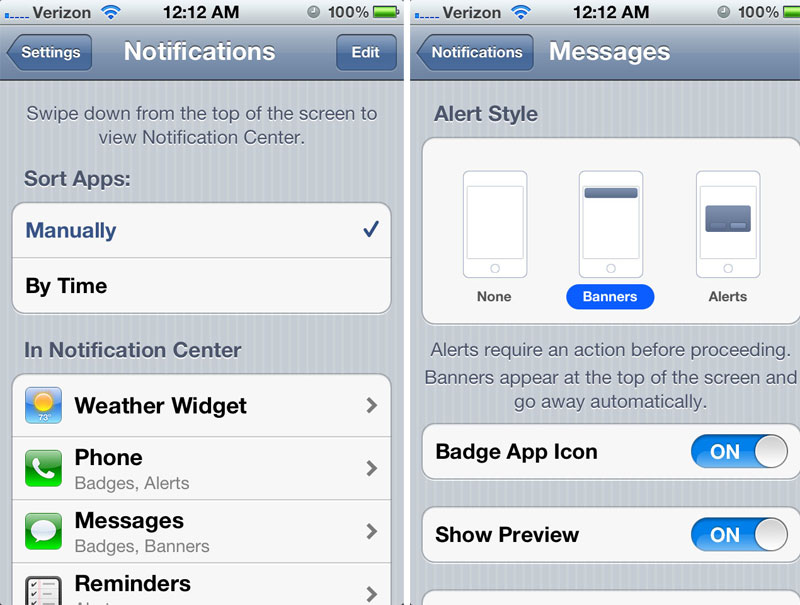
I found all of this extremely straightforward and easy to set up. I’d highly recommend using the new “banner” style notification display option, as it is far less intrusive than the old “alert” style option. That said, I was happy to still be able to choose the “alert” style for certain notifications that I didn’t want to miss, like calendar appointments and other key alerts. The drop-down “banner” alert is just a little too easy to ignore, for better or worse.
Notification Center
In addition to completely redesigning how alerts are displayed, Apple has created the Notification Center, which serves as a central hub for your messages and other alerts. The alerts of any app that has the Notification Center option turned on will display here, as will a number of app widgets, like Weather and Stocks.
The Notification Center is accessible at all times. To open it, simply tap the menu bar at the top of the screen, or swipe down from the top. It doesn’t matter if you’re in the middle of an intense game of Angry Birds – if you want to access the Notification Center, it’s always right there. To close the Notification Center, simply swipe upwards from the bottom of the screen.
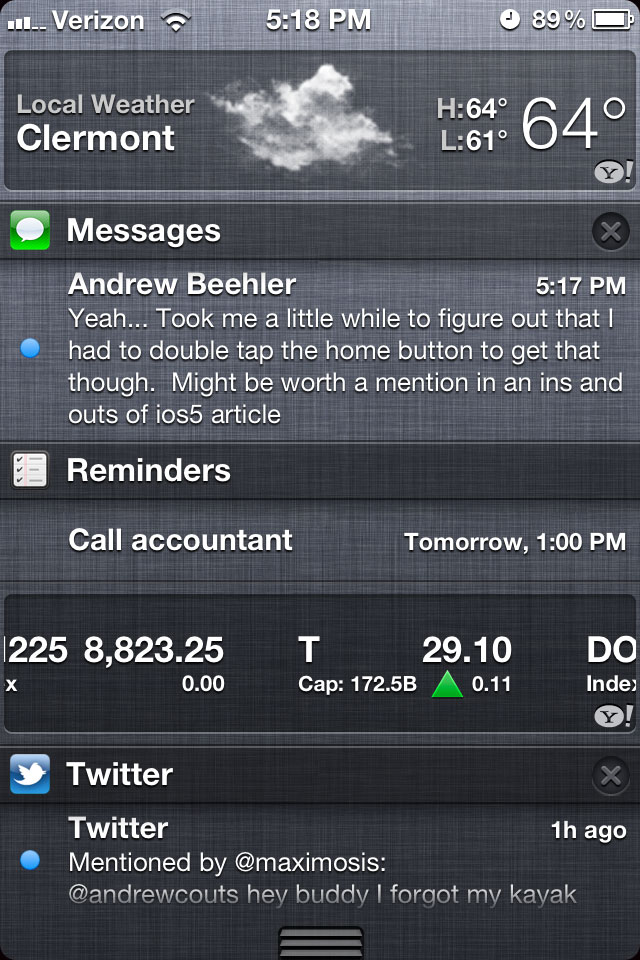
Tap on an individual notification, and it will open in the corresponding app. So, if you get an email, tapping on the message in the Notification Center will take you to the message in the Mail app. Unread alerts can be dismissed and cleared away by tapping the “X” that appears next to each unread alert.
Depending on how many apps for which you receive alerts, and how many emails, phone calls, text messages, Twitter mentions, etc, you receive will likely influence which apps you choose to display in your Notification Center, and which you leave out. I like to make sure I’ve at least seen all the alerts that come through to my device, so I’ve enabled all but a handful to display in the Notification Center.
As expected, the Notification Center works as advertised, and I haven’t yet run into many hangups. If you’re a converted Android user, you’ll feel right at home with both the new alert display styles and the Notification Center, as similar features have been available on Android handsets for some time.
Lock Screen
As I mentioned before, you can decide whether or not to have alerts from each app display on your Lock Screen. If you do, an alert will pop up in a bubble that looks somewhat similar to the old “alert” style notifications. Unlike older iOS versions, however, more than one notification can appear on the Lock Screen at once. And if you want to read the full notification, simply tap the alert, and it will open in the corresponding app. Once again, this is a vast improvement over the earlier notification system, and has worked seamlessly on my device.

iCloud
At its most basic, iCloud allows you to use your iPhone without ever having to connect it to a computer. If you’ve decided to enable iCloud, everything from your contacts and calendar to your music, photos and documents can be backed up to Apple’s servers, making them accessible anytime you have a connection.
iTunes
A major element of iCloud is iTunes and the App Store. Any music or TV show you download from iTunes, either through your iOS device or your computer, can be saved to iCloud. Those songs and shows can then be re-downloaded to any of your other (enabled) computers or iOS devices. Any song or TV show you’ve purchased in the past will already be available on iCloud through iTunes.
To access purchased items from your iOS device, open the iTunes app, and click the “Purchased” option at the bottom of the screen. You can then choose either “Music” or “TV Shows.” If, for example, you click “Music,” you can view all the songs you’ve ever purchased through iTunes (as you can see, I haven’t purchased many – thanks Pandora!). And you can also see any purchased items that are not currently on your device.
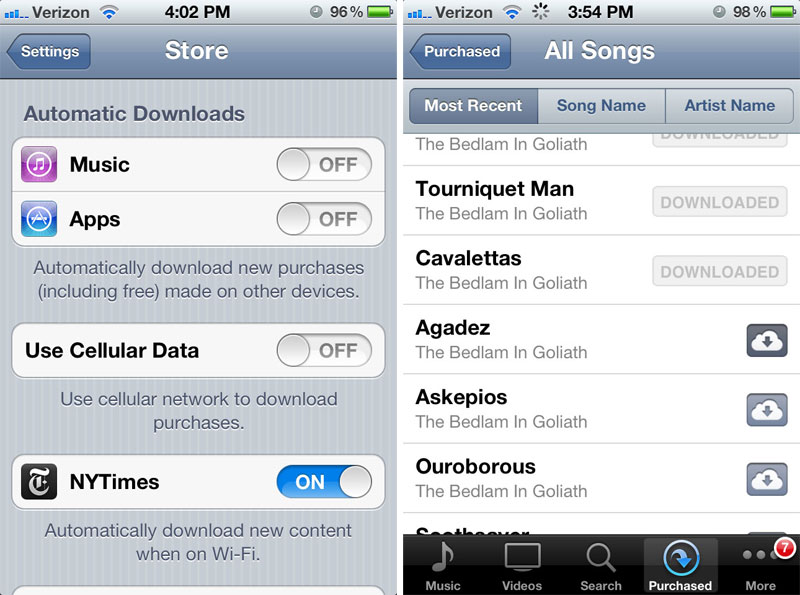
Re-downloading music to my iPhone worked impressively well. To do so, simply click on the small iCloud icon that appears on the right side of each song. A small animation shows the song going into the “more” option at the bottom of the screen. If you click “more,” you can see a number of options, including “downloads.” Click that, and the download status of each song becomes visible. Downloading over Wi-Fi was as fast as you’d expect – about 20 songs in less than 5 minutes; the functionality and experience of downloading from iCloud was easier than I’d expect, and I was already optimistic going into it.
Apple also makes it possible to automatically download music and app purchased made on other iOS devices that are connected to your Apple ID, or your Apple ID-connected computer. Smartly, Apple has enabled this option to be on, while not allowing the automatic downloads to happen over your cellular network, so you don’t have to worry about overages on your data plan. This setting is accessible in under Settings > Store. From here, you can turn on a similar automatic download option for individual apps that have this feature
App Store
The App Store works much the same way as iTunes does for music and TV shows. Under the “updates” section of the App Store app, you can view all your purchased apps, and re-download them, if necessary, free of charge. I found that small bit of its functionality to be extremely useful, as it allowed me to recover all of my apps easily, even though they’d been deleted during my update to iOS 5. I do, however, wish it were possible to download all apps not currently on my device in one fell swoop. But for now, the current functionality provides the next best thing.
iCloud & your data
As I mentioned before, iCloud isn’t just for iTunes and App Store purchases; you can also choose to store all types of personal data – message, emails, contacts, Reminders, Safari bookmarks, Notes, and more – on iCloud. By turning on the new Photo Stream option, you can also automatically back up as many as 1,000 photos taken with your iPhone or iPad – a truly great feature for those of us who quickly fill up the internal storage with snapshots, and want to have access to older pictures at all times.
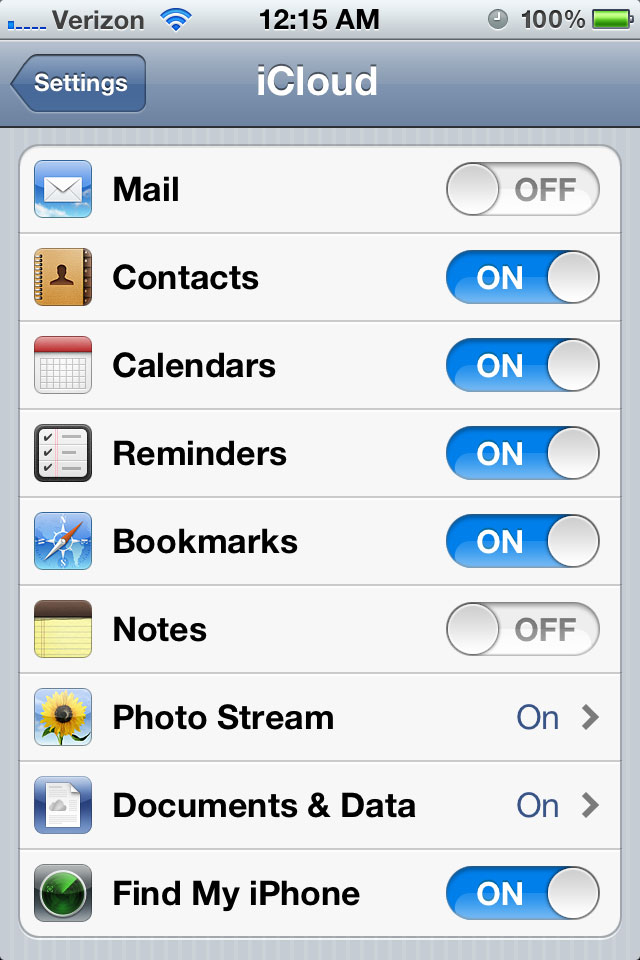
Under the iCloud option in Settings, you can turn on or off iCloud backup for all those items listed above. From this screen, you can also turn on or off Find My Phone, as well as backup everything on your device to iCloud. Apple automatically gives all iOS 5 users up to 5GB of free storage, which is only used for personal files, not for music, apps or TV shows purchased through iTunes. If you upload music to iCloud that was not purchased through iTunes, you’ll use up your space pretty quickly. You can also upgrade to a paid iCloud plan directly from your iOS device. Plans are: 10GB for $20/year, 20GB for $40/year or 50GB for $100/year.
Photo Stream
Like I said, Photo Stream is a great part of iCloud if you take more photos than you want to have stored locally on you device all the time. To access images stored to your Photo Stream, simply click the Photos icon, and your Photo Stream will appear directly beneath your Camera Roll.
All-in-all, Photo Stream works exactly as you’d expect. From Photo Stream, you can edit pictures, send them via email or MMS, tweet them, set as background or contact image, print, or save to camera roll. You can also play images saved to Photo Stream as a slide show.

Unfortunately, Photo Stream has a major downfall – it’s impossible to delete individual photos from the Photo Stream. That means if you have Photo Stream upload turned on, and you take a picture of something private, illegal or embarrassing, it will be on your Photo Stream unless you delete your entire stream. Not cool, Apple. Not cool. You know, not that I’m taking a bunch of pictures of illegal and/or embarrassing things, but someone definitely is. And it’s going to get them in trouble one day.
iMessage
The third major update to iOS 5 is iMessage, Apple’s new iOS-to-iOS messaging system. iMessage
allows anyone with an iOS 5 device to message one another for free. That means even Wi-Fi-only iPads and iPod touches with iOS 5 can get in on the conversation. It’s basically Apple’s answer to BlackBerry Messenger, and it works fantastically.
Rather than being a stand-alone app, iMessage is incorporated directly into iOS 5’s Message app, and it works just like sending a text message. If the person you want to contact has a device running iOS 5 – something iOS 5 automatically detects – then you will send that person a free iMessage message rather than an SMS text message. The only real way to know whether you’ve send an iMessage or a standard SMS is that it will says “iMessage” in the background; text messages say “text message.”
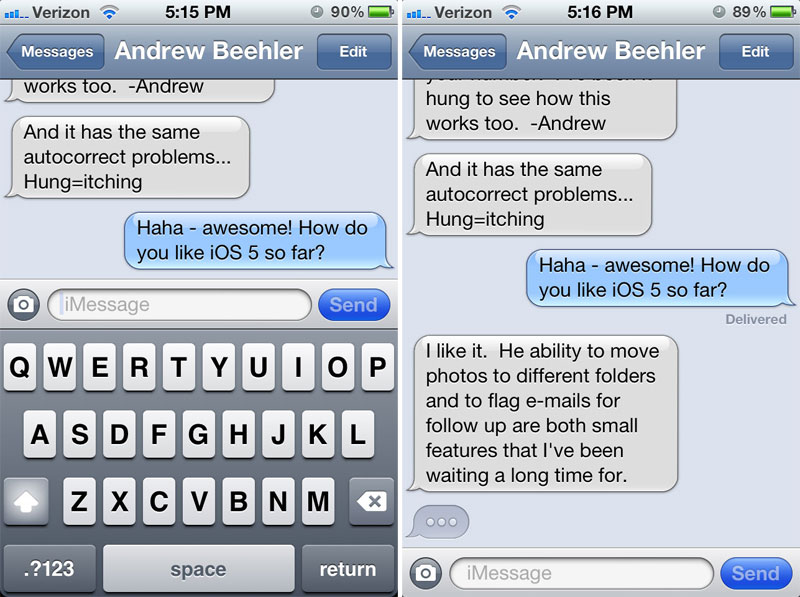
With iMessage, you can also see whether or not the person has already read your last iMessage, and if the person is actively typing a new message to you, an ellipsis (…) appears on the screen, much like an instant message service.
As with SMS and MMS, iMessage allows for group texting. But if one of the people in the group doesn’t have iMessage, then all the messages go through as SMS, which is kind of lame.
Overall, iMessage works great – at least, it did on my iPhone 4. I can’t say what the major differences are on an iPad or iPod touch, which don’t have a phone number contact, but instead just have email. Now, there are other third-party apps, like Viber, that do essentially the same thing as iMessage, and don’t require the use of iOS 5. True – but none work with so little effort. And the other apps require that everyone has those, too. So I call the issue moot.
Camera
The last major change to come with iOS 5 is some significant updates to the Camera app. And for me, there are two key changes: the ability to access the camera from the Lock Screen, and the ability to snap photos using the volume-up button.

To quickly get to the camera from your Lock Screen, just double tap the home button when the phone is locked. A small camera icon will appear next to the unlock slider. Hit the icon, and the camera will open. It took about one second, literally, for the camera app to open and be ready to go – far faster than the start-up times of most point-and-shoots.
My second favorite feature is the ability to snap pictures by pressing the volume up button. So instead of trying to take your Facebook vanity shots while blindly pressing the screen, you can now hit an actual button to engage the shutter. Hit the volume-down button to autofocus.

Other updates include the ability to lock your camera by implementing a PIN on your device (which also locks other personal data). In-phone editing, like red-eye removal, are also there, and you can now turn on and off HDR and the grid overlay under options.
As we all know, Twitter has received special treatment from Apple with its service integrated into iOS 5 at the deepest level. This means you can easily tweet photos, web pages from Safari and videos from YouTube through iOS 5. If you want to read tweets, however, you’ll have to download the Twitter app, or one of its clones.

If you’re a heavy Twitter users, this feature is fantastic, and makes it fast and easy to tweet from your iOS device. I found sending web pages and and photos the most useful.
You can add one or multiple Twitter accounts to iOS 5, and can update your on-board contacts with your Twitter contact, including profile pictures.
Reminders
New to iOS 5, the Reminders app is a glorified to-do list. It enables you to set alarms for certain tasks. And, most notably, you can set location data with each task, so that Reminders notifies you to do whatever you need to do when you’re near the place you need to do it.
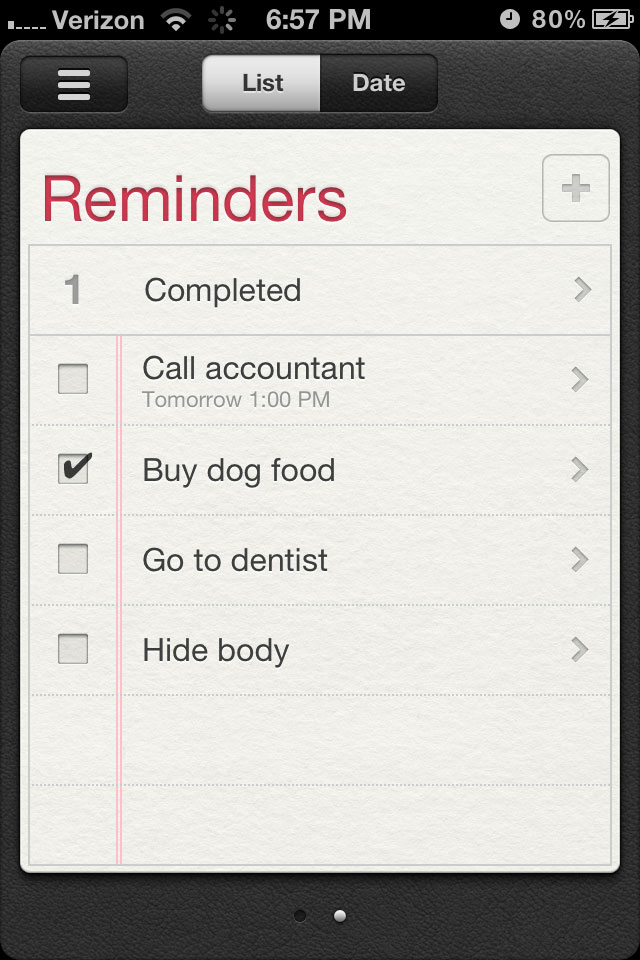
Unfortunately, the location part of Reminders lacks a necessary functionality – the ability to enter a location that is not stored in your contacts. Rather than just being able to type in any address, the only location data you can attach to a reminder is that which is saved in your contacts. So, if you want to remind yourself to get milk, you’ll have to add the grocery store to your contacts list. That’s so obviously ridiculous, I’m just crossing my fingers that Apple fixes this, as it’s one of the weakest parts of iOS 5, after the whole Photo Stream deletion nonsense.
Safari
Only a small number of updates are included for Safari with iOS 5. Of these, the most significant is the addition of Reading List, which is like a built-in Instapaper, and allows users to save web pages for later reading. To add a web page to your Reading List, just tap the action button in the bottom-middle of your screen, click “Add to Reading List,” and you’re done.
I can’t be sure, but Safari also feels a bit zippier, and didn’t seem to lag nearly as much as with iOS 4. Twitter integration, as discussed above, is the only other change to Safari that’s really worth going into. Moving along…
Small, but notable additions
-
Mail: Email flagging and basic font customization (bold, italics, underlined) bring the iOS mail functionality up to par.
-
Newsstand: Have all your magazine and newspaper apps in one place, and purchase new ones through the Newsstand-specific App Store interface
-
Autocompletion: Customize your auto-complete settings so your most-common phrases are easier to type out. (Settings>General>Keyboard>Shortcuts>Add new shortcut)
-
New vibration patters: Create custom vibration patterns (Settings>General>Accessibility>turn on custom vibrations; to edit custom vibrations go to Settings>Sounds and scroll to the bottom.)
-
New sounds: Hear them at Settings > General > Accessibility > AssistiveTouch Custom gestures.
Conclusion
In the spirit of full disclosure, I was excited for this update, as I’m sure many of my fellow iPhone users were. And, overall and in a great many ways, iOS 5 delivers the goods. Of course, there are a few things that can be improved upon, but that’s always the case with new software. In short, go download iOS 5 right now. It’s a vast improvement to iOS 4. Enjoy!