
Mapping a network drive — also known as “mounting” a drive — allows you to create an easy access point to specific data on a network server using your own computer. If you frequently need to consult folders and documents that are held on a server, instead of on your computer or in the cloud, mapping a drive is a timesaving activity. It’s particularly ideal for schools that hold documents on their servers, or businesses with similar practices.
Thankfully, Windows 10 makes mapping very easy. The process is a little more involved in MacOS, but you can still map drives using Apple’s desktop operating system in just a few steps. Here’s how it’s done!
Note: You’ll need the necessary passwords and access information to open a mapped drive. If you’re doing so at your office, you may want to double-check your security policies for guidelines on mapping drives and best practices for mapping in your business environment.
Windows 10

Step One
Head over to File Explorer. If you aren’t sure where it is, you can find it in the Start menu or by searching for it in the search bar. Once there, select This PC in the sidebar on the left.
Step two
Among the menu tools in the upper portion of the window,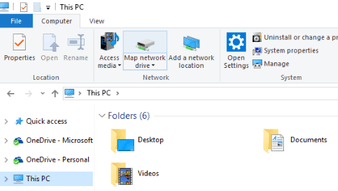 you should see an option for Map Network Drive with an icon of a storage drive. Select this, and then choose Map network drive from the drop-down menu.
Step three
Windows will ask you several important questions about the drive that you want to map. First, it will ask you to assign a letter to the drive. Any letter should do — as long as you aren’t already using it for another drive — but if your company or school has a particular naming convention for drives, it’s smart to stick with it.
Step four
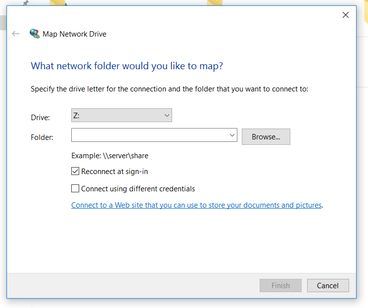 You will also need to choose the exact network folder that you want to map to your computer. If you have the precise name handy, you can copy and paste it, but it’s probably easier to choose Browse and locate the network folder that you’re interested in or make a new folder. Here, you can also choose to have your computer automatically reconnect when you sign in, or connect with different credentials if you need to use an administrator login.
Step five
With the right folder selected, click OK and select Finish. You can now find the drive exactly where your other drives are — that is, within the This PC section of File Explorer. You may also want to create a shortcut to the appropriate folder for quicker access.
MacOS

Step one
You can save some time if you find and copy the exact server address that you want to connect with. This path typically looks like “smb://networkcomputer/networkshare” or something similar. The latest iteration of MacOS can handle AFP, SMB/CIF, NFS, and FTP formats, so you probably don’t need to worry about server compatibility as long as you have an accurate address. Once you have that data, copy it and move on. If you can’t find the exact address, don’t worry, we’ll cover that too.
Step two
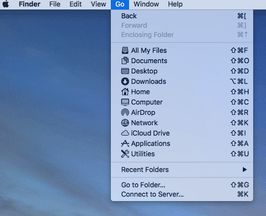
Open Finder and select Go from the application menu. Then, choose Connect to Server, which should be at the bottom of the list. You can also select the Finder window and press the “Command” and “K” keys to do the same thing.
Step three
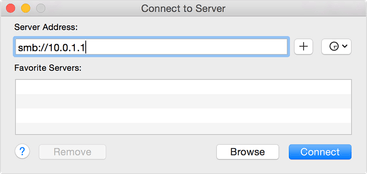
 In the Connect to Server window, you’ll see a text field beneath Server Address — you’ll want to paste your exact server address here. If you weren’t able to find the address, you have a couple of additional options. You can click the clock icon on the right side of the window and reconnect to any server you’ve recently used, which is handy if you’re trying to find a driver you used in the past but can’t remember the details. You can also choose Browse, which will open a Network list in your Finder window and allow you to choose from any available network folder (you must be connected to the network for this to work).
Step four
 You’ll have to use the necessary login information and passwords to connect at this point, so make sure you have them handy. After connecting, make sure you add the server to your favorites list with the plus button to make it easier to connect next time.
Step five
Once the connection is successful, you may be prompted to choose a specific folder. Simply choose the appropriate folder and select OK. The folder will open, and a folder icon linked to the network drive that you have chosen will appear on your desktop — at least until you disconnect, at which time the folder will vanish.
Troubleshooting
Did your attempt at mapping fail? This can happen due to network issues, security issues, and a number of other causes. We suggest that you contact your system administrator or a related position and explain the issue. In the meantime, check to make sure that the folder you want is on the network you assume. Many organizations are often juggling computer-to-computer connections, access to server data, and multiple cloud services at the same time. This can make things confusing, so a little confirmation can often go a long way if you’re looking to home in on the underlying issue.


