Take a stroll through your favorite DIY website and you’ll find all sorts of bottle openers, from vintage to sports-themed. You’ll even find ones with little cups that sit below to catch the caps, which is both clever and convenient. But catcher cups don’t have any flair — so to make the uncapping even more magical, this project harnesses the power of rare-earth magnets
Rare-earth (neodymium) magnets are insanely powerful, widely available in all sizes and shapes, and perfect for all sorts of maker projects. In this case, we buried one in the back of a board, where it reaches through the wood and grabs the falling beer caps. Your drunken friends will marvel at the cluster of caps hanging in mid-air.
On the front side, where the caps gather, it make sense to place a sticker of some kind, or a laser-burned pattern, or whatever. If your favorite logo, or Chinese character, or ironic picture of a reviled political character doesn’t quite fit, we trust you will shape the board accordingly.
This project is so quick, easy, and useful that you’ll probably make a stack of them as gifts. Everyone needs another bottle opener somewhere. By the way, this is one of many simple but stylish projects in my new book, Build Stuff with Wood. Here’s how to build it!
Make it with basic tools
The only cutting tool you’ll need here is a jigsaw, which is an inexpensive and underappreciated tool that can cut curves and straight lines. The secret is putting a better blade on the saw — one designed for making clean cuts in hardwoods. A bandsaw will work even better here if you gave access to one.
The only other power tool you’ll need is a drill, armed with a cool bit called a Forstner bit. Forstner bits specialize in drilling smooth holes with flat bottoms, which is exactly what you’ll need to hold the magnet.
As for the hardware (aside from the big magnet) you’ll need to pick up a classic Starr X opener for the front, and a couple keyhole hangers for the back. Just drive two small-headed screws into the wall, and these hangers will grab them firmly when you lever a bottle down to pop off the top.
Tools and Materials
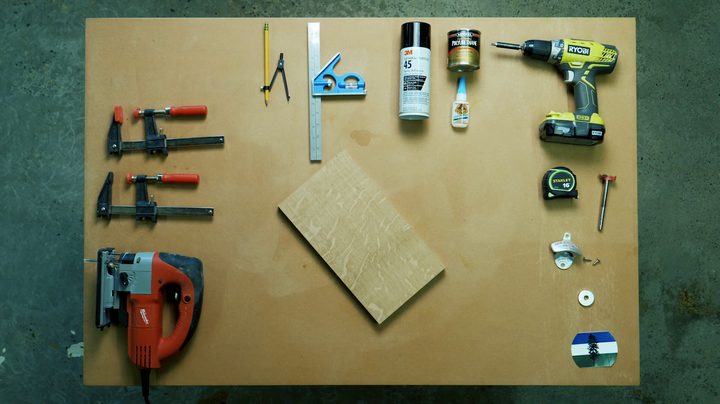
- Jigsaw
- Cordless drill
- Forstner bit, 1-3/8 in. diameter
- Compass
- Starr X bottle opener
- Rare earth (neodymium) magnet, 35 mm (1-3/8 in.) by 5 mm, with countersunk hole
- Keyhole fitting – double, 9/16 in. x 3 in.
- Wood board, approx. 3/4 in. thick and at least 12 in. long by 6 in. wide.
- Sanding block and sandpaper
- Polyurethane, oil-based, satin, quick-drying
- Superglue
- Foam brushes
Step-by-step instructions
Pencil the layout
- Start with any nice board, at least 12 in. long by 6 in. wide, and mark center lines on the front and back, down the length of the board. These will help you center the curves, the magnet, and the bottle opener.
- Mark two arcs with a compass. The smaller one goes at the top of the board, and the other radius should be 1 in. bigger than bigger than your logo sticker, so the wood ends up bordering it nicely.
- Connect the curves with straight lines to complete the perimeter layout.
- One more arc. This circle is just a hair bigger than the sticker, to help you center it when you stick it on. Draw this arc lightly so it’s easy to erase.
Cut and smooth the board
- Cut out the perimeter. Clamp down the workpiece, and stay just outside the line when cutting. Use your inside hand to hold the base of the jigsaw flat on the wood.
- Sand it smooth. Use any wood block wrapped with 80-grit paper to sand the edges and to the line. Then switch to 120-grit paper to smooth them. Feel with your fingers to see if the curves are even and smooth. Smooth the face of the board now too, and then sand a little bevel on the top and bottom of the edges.
Add the magnet and sticker
- Mark the center point. This is the same center point you used on the front of the board, just on the back this time.
- Fire up the Forstner bit. You’ll need a 1-3/8 in. bit, just a hair larger than the 35-mm diameter magnet. Start with a light touch until the bit is fully engaged in the wood. The deeper you go, the better the magnet will work, but check the depth frequently to make sure you don’t drill through to the front of the board! The goal is leave about 1/4 in. of wood at the bottom of the hole.
- Drop in the magnet and then run a bead of super glue around the upper edges to lock it in place.
- Stick on the sticker. A lot of vinyl stickers are designed for glass, so they might not be sticky at all. In that case, just spray the back first with contact cement, also called spray adhesive or craft spray. Then use that light circle you drew to apply the sticker in the right spot.
- Locate the hardware. Place the bottle opener on the centerline wherever it looks best, and mark the centers of the screw holes. Then flip over the board and place the little hanger plate right behind the bottle opener, marking its holes, too.
- Pre-drill. First use a small nail to make a small dent at each mark for the drill to follow. For these pilot holes, choose drills a bit smaller than the screws, and add a little tape flag to help you avoid drilling through the board. When the flag brushes the chips away, stop drilling. This is the best trick ever.
Finishing up
- Before brushing on the polyurethane finish, erase all the pencil marks and wipe off the dust.
- Get some oil-based satin polyurethane, stir it well, and brush it on smoothly with a foam brush. Do the top and edges, let it dry, and then flip the board and finish the back too.
- Sand and repeat. Using 220-grit paper, sand the wood areas lightly—not the sticker—wipe off the dust with a paper towel, and brush on one more coat.
- Screw on the hanger and bottle opener. You’ve already got your pilot holes drilled, so this goes fast.