When we last spoke with Joe Reifer, he talked about his experience in photographing abandoned places and night scenes. But Reifer is also a pro at shooting VR panoramas – interactive photos where you can navigate a full 360-degree field-of-view. Here, Reifer tells us how he goes about capturing his spectacular 360 panos. (Be sure to click on the photos for a more spectacular view.)
Tell us about the equipment and setup you use.
Joe Reifer: Panoramas in 360 degrees can be shot with anything from an iPhone app to a digital SLR. The most common way to get a nicely blended, 360 panorama with reasonable resolution is to shoot with a DSLR and fisheye lens on a panoramic head. Wide-angle lenses can also work well if you don’t have a fisheye, but usually require shooting and stitching more images. While handheld 360s are possible, using a panohead on a tripod or monopod makes stitching the resulting images a lot easier.
I shoot 360 panoramas with a mix of equipment from Nodal Ninja and Really Right Stuff. I’m currently using a Canon EOS 6D with the Canon 8-15mm fisheye, which is a very sharp and versatile lens.
Panoheads and Calibration
Panoheads for shooting 360s are available from manufacturers including Nodal Ninja, Really Right Stuff, 360 Precision, Bushman, and more. Good panoheads start around $350. The Nodal Ninja RS-1 or Nodal Ninja 4 are great starter packages.
Calibrating your equipment is important to make sure everything stitches together nicely. A panohead keeps the point where light enters the lens, called the no-parallax point, consistent between shots. This allows special panorama software to merge your images together into a full 360-degree sphere. I recommend using the grid method for finding the optimum settings on your panohead. I use a cookie cooling rack for calibration.

Leveling and Rotating
In addition to a calibrated panohead, it’s a good idea to keep the camera level as you rotate around to take your shots. This can be done with a leveling base such as the Nodal Ninja EZ II, Acratech, Really Right Stuff, and various others. Another way to level the axis of rotation is to use a panning clamp on top of your ballhead, such as the RRS PCL-1, Benro PC-0, or Sunwayfoto DDH-02. Yet a third option is using an inverted ballhead design like the Acratech GP or Arca Swiss p0. While these panning clamp and ballhead options are great for occasional panoramas, using a leveling base in conjunction with a click stop rotator will save you a lot of time for higher volume 360 work.
Shooting
Using a full-frame camera in the portrait position with a 15mm fisheye lens, you’ll need 6 shots around, 1 up (called the zenith), and at least 1 down (called the nadir) to make a full sphere. On a crop sensor camera you would use a 10mm fisheye for this same shooting sequence.
If you don’t mind a little bit less resolution, you can use an 8mm fisheye on a crop sensor or 12mm fisheye on full-frame and shoot 4 shots around with the camera at 5 degrees up. This method doesn’t require a zenith shot, and you can just patch the tripod area in Photoshop. The Nodal Ninja R1 panohead is great for this technique. The R1 is small, light, and easy to calibrate. This ring mount-style panohead works really well when shooting panos on a carbon fiber pole, too!
When framing the shot, what are some things to keep in mind or to look out for?
Normally when composing a photo, we decide what to include and what to exclude. Composing for 360s can be challenging because everything is included. The key to a successful 360 is where you stand. The pieces of the compositional puzzle need to fall into place both horizontally and vertically. A fisheye lens also puts a lot of space between you and the subject – so how close you get is important. Shooting 360s will push your visualization skills, and help you see in a new way.

When it comes time to take the shots, how do you start the process? Are there specific camera settings we should use, that you haven’t already mentioned earlier? What are some things to be aware of?
Developing a consistent shooting sequence will help prevent mistakes. I recommend shooting in RAW format with the camera in manual mode. Take note of any strong light sources in the shot, such as the sun, moon, lamps, or streetlights. I try to align the sequence of shots so that any bright light sources aren’t in an area where the shots will overlap when stitching. You also want to assess where any tripod shadows are falling, to make sure they’ll be reasonably easy to remove. Use a cable release, and review your shots on the LCD to make sure they’re sharp.
After shooting, how do you stitch them?
Process your RAW files with the same settings, and output them as TIFFs. Then you’ll need panorama software to stitch them together. The two top stitching programs are PTGui and Autopano Pro. I’ve been using PTGui for a long time – it’s quite good once you learn a few tricks. Autopano is more automated, and has come a long way in the last few years. There are also free options from Hugin and Microsoft ICE.
Once the images are stitched together, you’ll need a way to present them online. Pano2VR and krpano are interactive panorama viewers that offer lots of options for both Flash and HTML5 output. Or you could just upload your finished panorama to 360Cities.
Doing basic stitching and output can be learned in a long weekend. Getting professional level stitches and solving problems like patching tripod shadows can take quite a bit of work to perfect. You can also use longer focal lengths to create gigapixel panoramas. The good news is that the software keeps getting better, and the online pano community is very helpful.
Any special challenges shooting 360s at night?
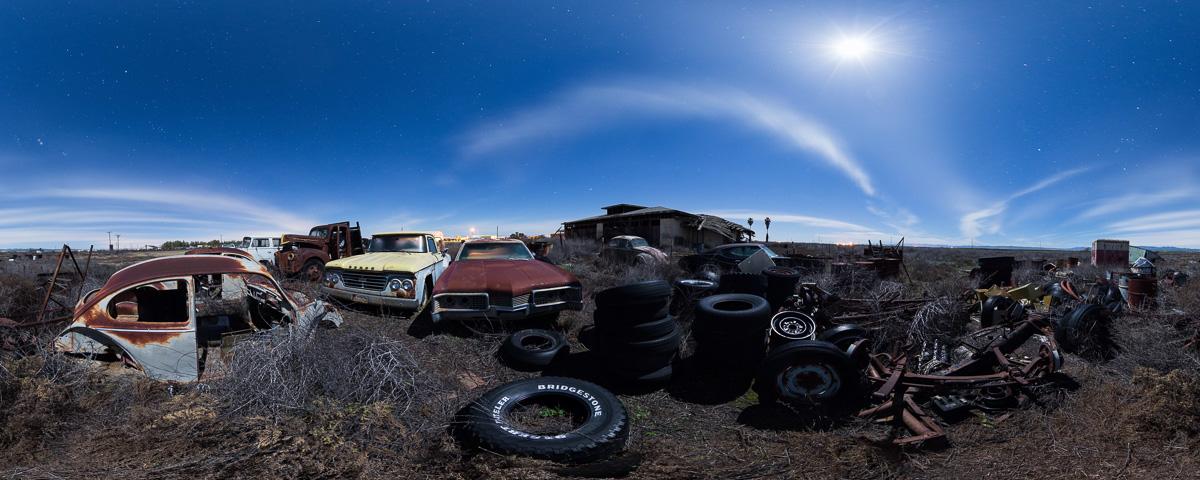
The moon, stars, and clouds are all moving – so stitching together multiple shots can be a challenge. Sometimes I use different blending plugins for PTGui such as Smartblend or Enblend. For 360s that are lit by moonlight, I usually bump the ISO to 800, and shoot 90-second exposures at f/8. I recently did a 360 at an abandoned ski resort where I shot 6-minute exposures at each camera position, and the star trails turned out great!
I’ll be demonstrating how to shoot simple night panoramas at the night photography workshop that I’m teaching this November at a historic World War II air base called Eagle Field. You can view more 360 panoramas on my blog, and here are some resources for learning more about creating 360 panos:
- Panoguide
- International VR Photography Assocation
- Panoramic Photographers on Facebook
- From Paris Tutorials
- John Houghton Tutorials
- Rosauro Photography Tutorials
(Copyright images via Joe Reifer)