
White balance is a term you’ll come across often while taking photos. To help you better understand what white balance is and isn’t, and how to set white balance, we’re breaking down the basics so you can snap better photos in whatever lighting conditions life throws your way.
What is white balance?
Before diving into what white balance is, let’s get straight what it isn’t. Sometimes the term white balance is used interchangeably with color temperature, but they’re not the same. Color temperature is the measurement, expressed in kelvin (K), of the color characteristics of a given light source — specifically, how warm (yellow/orange) or cool (blue) a light source is. White balance, on the other hand, is a setting within your camera and post-production software designed to ensure the colors in your images look as natural as possible — a difficult task to achieve, as cameras see the world different than we do.
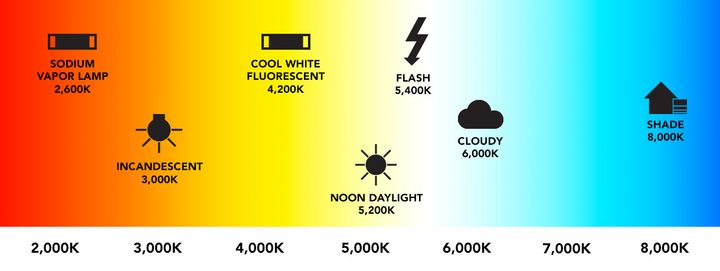
For a little context on where certain light sources fall on the color temperature scale, candlelight measures in at roughly 1,500K while a clear blue sky will register somewhere around 9,500K.
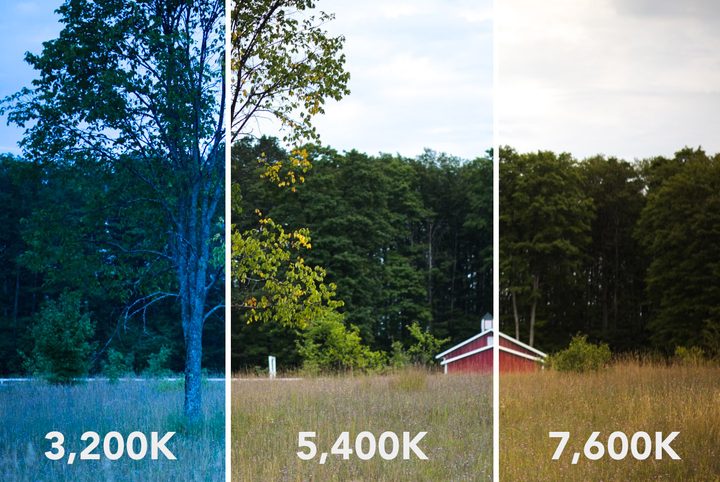
Like any other aspect of photography, there’s no definitive right or wrong choice as to how your white balance should be set. It’s all up to personal preference and can be tweaked to better fit the mood of a particular image or scene. For example, a shot under the changing leaves of fall might be better suited for a warmer tone, while a late-night shot of the blue ocean might be better suited with cooler tones.
That said, there are some basic elements that will help guide you in the right direction so your photos aren’t too extreme in one direction or another.
Camera white balance settings
You may have noticed your camera has a barrage of various white balance modes. The most common are: Auto, Tungsten, Daylight, Cloudy, Flash, Shade, Fluorescent, and Custom. Below, we’re going to run through each of these modes, explaining what temperature they tend to be based on and how they act in various scenes when selected.
Auto (AWB) — As the name suggest, AWB will automatically adjust the color temperature using data pulled in by your camera’s sensors. AWB is a good option if you want versatility or plan on going from one lighting environment to another quickly, but rarely will it get you exactly where you want to be. For those times, you might find a more specific setting more appropriate.
Tungsten — Also referred to as “Indoor” by some manufacturers, Tungsten leans toward cooler tones, except for when used inside when only artificial light is illuminating the scene. Even then though, it can come out a bit cooler than you’d like, but it should get you closer to what you want. Tungsten tends to set the color temperature around 3,200K.
Daylight/Sunny — If you’re shooting anytime the sun is shining bright, be it outdoors or indoors (such as through a window), Daylight mode is your best bet. It’s considered the most neutral of the settings in terms of being on the kelvin scale. Daylight measures in at roughly 5,200K.
Cloudy — Considering cloudy days tend to have slightly cooler tones, the Cloudy setting on your camera will likely add a slight bit of warmth to your images. Cloudy assumes a temperature of approximately 6,000K.
Shade — Like the flash setting, Shade tends to warm the scene up to compensate for the cooler, blue tones that subjects tend to have when hidden away from the sun.
Flash — Whether it’s built into your camera or an external unit, flashes and strobes tend to err on the cooler side of things. It’s for this reason that the Flash preset will warm images up a bit to compensate for the cooler tones of the flash. The flash setting is usually set to somewhere around 6,000K.
Fluorescent — Fluorescent light is one of the more complicated lights to work with, as there are multiple types of bulbs — each with a slightly different color output, and change as they get older. In general, fluorescent bulbs tend to give off a cooler light, so the Fluorescent mode will add a little warmth to your images at around 4,000K.
Custom — Different camera manufacturers have different means of adjusting the custom white balance settings on cameras. Some opt for selecting a specific temperature while others rely on +/- scales on a spectrum. If you’re working in a stable, controlled environment, this is likely your best bet to achieve the most accurate colors possible. Note: Not all cameras offer this option.
For more detailed accounts for each camera manufacturer, be sure to check out the resources available. Sony, Nikon, and Canon offer dedicated sections regarding their respective approach to white balance settings, icons, and adjustments.
Using a gray card
One of the most proven solutions to getting accurate white balance is to use what’s called a gray card. As the name suggests, a gray card is a little piece of paper or plastic that’s 18-percent gray. Along the same lines, you can use a color chart to more accurately assess the white balance and colors in your photos.
They can cost as little as a few dollars (like this from Movo) and will vastly improve your workflow if you plan on editing white balance in post production, which we will explain a bit more below.
Using a gray card is simple. Once you have your card, take it along with you on all of your photo adventures. When you come to a location you plan on shooting, hold the card out in front of the camera, or have a subject hold it in front of themselves. Snap a photo of the card being used and you’re good to go for the rest of the shoot. Just be sure to take another photo with the card in the event the light changes or you switch locations.
How to set white balance
Getting white balance correct in-camera isn’t always easy, regardless of what mode you’re shooting in. Thankfully, white balance can be adjusted when editing images. In fact, even the most basic post-production software is capable of making the required changes, including the hundreds of apps available for download on both iOS and Android devices.
It’s worth noting that the accuracy of the screens and monitors on your devices is of great significance here. If your monitor isn’t calibrated, what looks a bit yellow might actually be more neutral and vice versa. Check out our monitor calibration guide for a rundown on how to get the best colors from your screens.
If you shoot in a RAW format, even on your smartphone, changing the white balance in post-production becomes even easier, as you can actually edit the temperature using kelvin, without losing any quality in the image. JPEG can also be changed, but you start at a central point and can only make it warmer or cooler, not set a specific temperature.
Regardless of whether you’re editing your photo on a desktop program or in a mobile app, the process of changing the white balance will essentially be the same — move a slider left and right to give the color cooler or warmer tones, respectively.
The slider used to adjust white balance will most often be referred to as “white balance.” But there are exceptions. For instance, Instagram calls its white balance setting “Warmth,” while Apple’s in-app photo editor refers to it as “Cast.”
As mentioned above, a gray card can further simplify the process. Most photo-editing programs can automatically change the white balance of an image when a dropper is placed over a black, gray, or white part of the scene. Using a gray card ensures you have a perfectly gray source from which to select the sample point from.
Once you have the correct white balance from the gray card image, you can then bulk edit the remaining images from that particular scene, as odds are it has the same white balance across the board.
A quick tip for perfect white balance
White balance, like many settings in photography, is just as much about personal preference as it is about getting it “right.” Some photographers prefer cooler tones, while others lean toward warmer tones.
If you’re struggling to get the white balance just right in editing software without the help of a gray card, here’s a little trick used by photographer Kirk Mastin. Change the white balance slider as far as possible in one direction. From there, slowly adjust the slider until you reach what you consider to be a natural balance. By seeing the extremes, it helps to isolate the most natural-looking option.
If you want a more advance rundown of white balance and how it affects your images, Pye Jars of SLR Lounge has a wonderful 25-minute video on YouTube. To better understand the other settings on your camera, be sure to take a look at our thorough guide of the buttons and settings available on your DSLR.


