Backing up your iPhone will come in handy if you ever lose your phone or need to transfer contacts to a new device. Your iPhone probably contains thousands of pictures of places you visited, the moments you shared, and adorable pet photos you captured.
Backups are also a good way to restore your phone if something happens to iOS, or you’re sick of dealing with a buggy beta. We recommend creating regular backups of your phone to avoid losing pictures, contacts, and any important files that you’ve downloaded.
Thankfully, backing up an iPhone is easy, and you can update your backup automatically. This guide shows you how to back up an iPhone using Finder, iTunes, and iCloud.
MacOS Catalina or newer: Use Finder
Apple did away with iTunes as we know it on MacOS Catalina. In its place is a new Music app with the iTunes logo. However, it’s not used for iPhone backups. Instead, Apple moved that functionality to Finder.
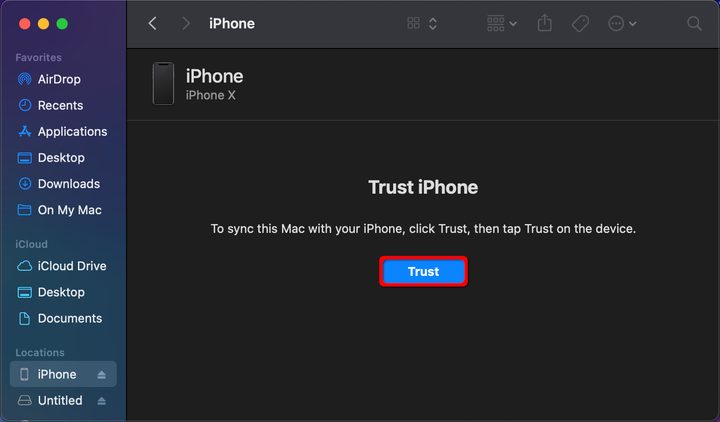
Step 1: Plug your iPhone into your Mac running MacOS Catalina or newer. Note that on modern MacBooks, you’ll need a USB-C adapter or a USB-C-to-Lightning cable.
Step 2: Open Finder and select the iPhone listed on the left.
Step 3: Click the blue Trust button displayed on the right.
Step 4: On the iPhone, a Trust This Computer prompt appears. Tap Trust and enter the passcode to continue.

Step 5: Back in Finder, click the Back Up Now button under the General tab.
A status bar along the bottom will show the backup progress. This may take some time, so go grab a snack during the wait. Take note that Finder also provides tools to encrypt the local backup (enabled by default), restore an iPhone from a backup, sync all media to the Mac, and so on.
MacOS Mojave and earlier, or Windows 10: Use iTunes
While Apple is phasing iTunes out, it still works on Macs running MacOS Mojave and earlier, and Windows 10 PCs. It can act as a great backup utility for your iPhone’s most important memories. The following instructions are based on iTunes for Windows 10.
Step 1: Connect the iPhone to your Mac or Windows 10 PC’s USB port. You may need a USB-C adapter or a USB-C-to-Lightning cable, depending on the PC.
Step 2: Open iTunes and click Continue on the prompt. It merely asks if the computer can access the connected iPhone.
Step 3: On the iPhone, a Trust This Computer prompt appears. Tap Trust and enter the passcode to continue.
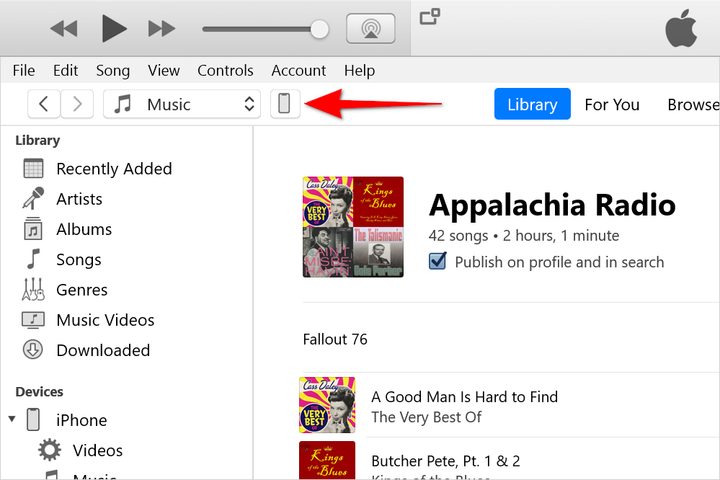
Step 4: In iTunes, click the little iPhone button near the top left corner, as shown above. If iTunes doesn’t appear to recognize your device, follow these Apple help steps.
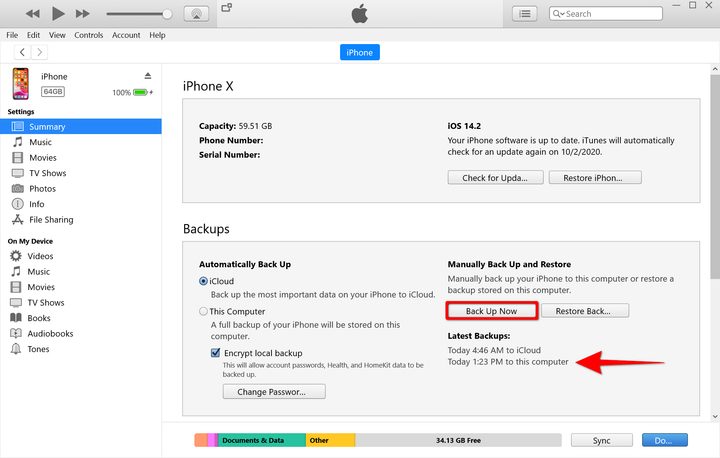
Step 5: Select Summary listed on the left.
Step 6: Select Encrypt Local Backup, type a password, and then click Set Password if you want to encrypt the backup. Make sure to remember your chosen password or store it in a password manager.
Step 7: Click the Back Up Now button listed under Backups.
When the backup process is complete, look for an entry under Latest Backups to confirm whether the backup was successful.
How to use iCloud
Apple’s iCloud service can control backups manually or automatically while quickly transferring your files to a remote cloud server. When you enable this particular feature, you don’t have to stress about losing your images and other essential data if one of your iCloud-connected devices kicks the bucket.
If you have a free account, you’ll get only 5GB of data storage space. Chances are, that won’t be enough room to back up every single media file you have. Still, Apple offers three premium storage options that give you a maximum of 2TB of space.


Step 1: Open Settings and tap on your name (aka Apple ID).
Step 2: Tap iCloud. If you’ve never linked your iCloud, you can go into it now and choose what applications it will automatically back up.
Step 3: Scroll down and tap iCloud Backup.
Step 4: Tap the Toggle next to iCloud Backup to turn it on (green).
Step 5: To manually back up the iPhone now, tap Back Up Now.You’ll immediately get confirmation of the backup under the Back Up Now button. Check out our in-depth guide on using iCloud for more information on both iCloud and your iOS devices’ platforms and operating systems.
Safe and secure
Proper backups are a surefire method to secure your private information and make sure it remains safe and sound. Meanwhile, your heavy-duty phone case will guard your phone’s hardware against any potential damage. The only way you can be confident that you won’t lose all your precious cell phone —apps, music, images, videos, and more—is to back up your iPhone on a regular basis. If you’re interested in learning more, you can also read the handy guide we developed on how to reset an iPhone.
Editor’s Note: Verified accuracy on April 6, 2023.