Is MacOS driving you crazy with Safari notifications from websites you don’t want to hear from? These days most websites will at least drop a warning before creating a connection to your desktop and posting updates, but it’s still possible to rack up extra notifications.
No one likes unwanted messages pushed to their private desktop all the time, so you may be desperate to remove a few (or all). Here’s how to turn them off in Apple’s web browser.
Step 1: Head to Safari’s preferences

Make sure your Safari browser is open on MacOS. At the top left corner of your screen (your full screen, not the Safari window), look for the menu item “Safari” and select it.
One of the early options in the dropdown menu should be “Preferences.” Choose this to begin.
Step 2: Check website permissions
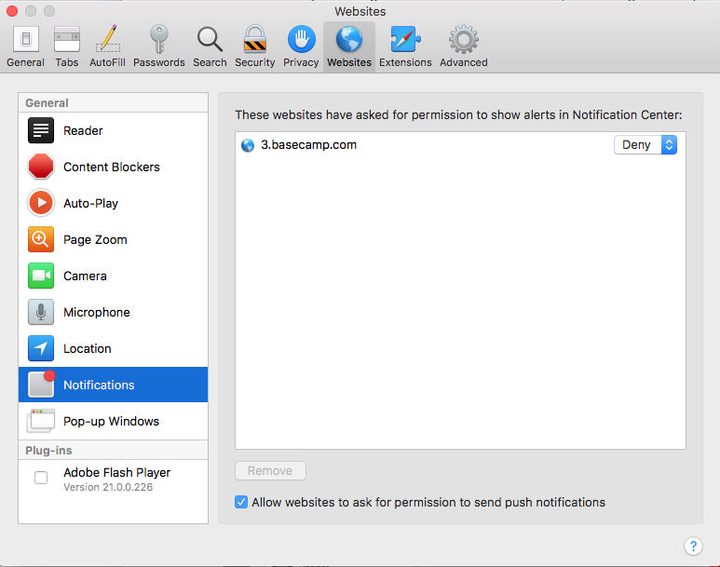
Preferences will open a new window with all the important Safari settings. There’s a lot you can change here, but to deal with notifications, look at the top of the window and choose the “Websites” option. Now look to the sidebar menu on the left, where you will see a lot of different options to control how websites deal with various MacOS features. Look down until you see an option for “Notifications” and select that.
Now, this will open up a section in the middle of the window that will show you all the websites that have asked for permission to push notifications to your operating system — which you don’t want to happen in most cases. It’s a good idea to check out these website to see if there are any notifications that you actually want to keep. Think about organizations you may be a part of, sites that are very important to you, and so on.
If you want to forget the whole notification thing as soon as possible, just uncheck the “Allow websites to ask for permission to send push notifications” at the bottom.
Step 3: Deny any permissions you want
You will notice that each website has, on the right hand, a little drop-down menu with options to “Deny” or “Allow” permission to send notifications. You can simply switch to “Deny” for any websites that you don’t want bothering you. Some sites may already be on “Deny” if you have blocked them. Going through the sites one by one is a great way to customize the notifications that you see.
This part may look a little different if you have an older version of Safari, but the process should work generally the same way. Note that Safari updates are no longer available on Windows, which will eventually compromise the safety of the browser on that operating system. You may want to consider switching to a different browser.
Step 4: Remove any websites you want
As you go through the sites, you may find some (or all of them) that you have zero interest in and never want notifications from. In this case, highlight the website by selecting it, and use the “Remove” button toward the bottom of the window to take it away completely.
Why should you leave websites in “Deny” mode and not remove them? Because sometimes you may want to switch notifications at certain times. There may be some sites that you want to monitor for deals during the holidays, or sites you want to turn on for news notifications during bad weather. However, you don’t need these kinds of notifications all the time, so switching them off is possible as well.
Extra tip: Just say no

Remember, most websites must give you an option to allow push notifications. Safari makes this option very obvious with a drop-down window when you enter a new website. Simply choose “Don’t Allow” to block the website from pushing anything.
If you do allow notifications, you may also have the option to deny the site from knowing your location, which accomplishes a similar goal. If you deny a website access that this point, it may not even show up in your website permissions. If you’re on the Windows side of things, our step-by-step guide details how to turn off notifications in Windows 10 as a whole.