Take a quick stroll through any maker-oriented website, and you’ll find no shortage of DIY laser engraver builds. There are a zillion of these things on the Web, but not all of them are created equal. Some are impossibly complex and expensive, while others are so low-budget and haphazardly cobbled together that they’re hardly worth the effort. But of all the homemade laser engravers we’ve come across, this one from Instructables user MichielD99 is definitely one of the best.

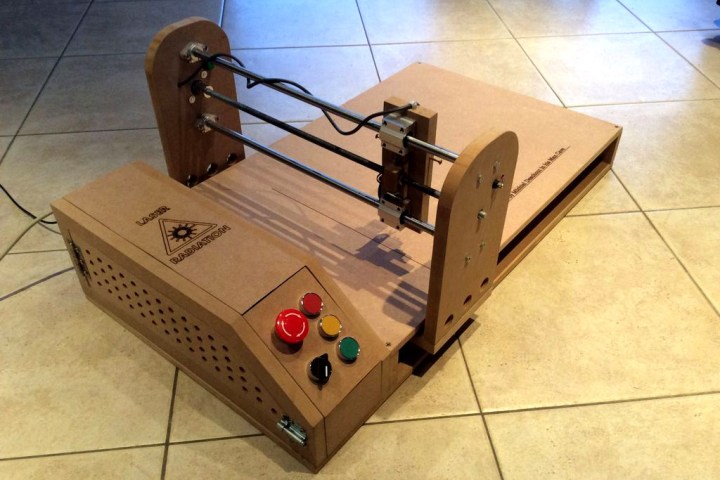
The great thing about this particular build is that it’s made from relatively inexpensive materials and electronic components, but it’s designed in such a way that the end product looks very clean and professional. It also has a fairly large engraving surface (500 x 380mm), and the tool head is designed to be interchangeable. If you swap the laser our for a Dremel, the machine suddenly becomes a CNC router. So, not only can you use this machine for things like engraving leather or cutting cardboard — you can also use it to cut super-precise shapes in, wood, foam, or plastic. The possibilities are only limited by your imagination.
And the craziest part? The whole thing was designed and built by a 16-year-old kid from Belgium, and it only took him about three months from start to finish. As an added bonus, MichielD99‘s building instructions are simple enough for just about anybody to follow, and the entire build can be completed with a relatively small number of tools. Here’s everything you’ll need to get started:
Tools:
- Drill press
- Jigsaw
- Dremel or other rotary tool
- Electric screwdriver
- Metric wrench/ratchet set
- Sander
- Tape measure
- pencil
Materials:
- NEMA 17 stepper motor
- Arduino Uno microcontroller
- Laser module heat sink
- Stepper motor drivers
- Power supply
- 12mm linear ball bearing
- Limit switches (buttons)
- Jaw shaft coupler
- Linear shaft L, 500mm (2)
- Linear shaft L, 700 mm
- Control buttons (6)
- 12mm shaft support (4)
- Ball bearing (4)
- Emergency stop button
- On/Off switch
- Laser driver
- 1.8W laser module + GLAS
- 12mm medium density fiber board
- 18mm medum density fiber board
- M10 threaded rod, 100mm (2)
- M10 nuts (4)
Once you have everything assembled, you’ll also need some special software in order to make designs that the engraver can understand. But not to worry — MichielD99 has you covered on all that stuff, too. Head over to Instructables to get the full build instructions, programming tutorials, and everything else you might need. Happy building!
The full instructions on how to build this laser engraver can be found here.