
How to respec in Palworld

Every time you level up in Palworld, you are given the chance to improve some aspect of your character. There isn’t necessarily a wrong way to build your character, but you only get so many points before you hit the level cap and might wish you had made some different choices when taking on the game’s tougher challenges, like catching the Legendaries. Some titles force you to live with how you spec your character, but Palworld is a little more lenient and does offer a way to redistribute all those points once you have a better idea of what you want. The process isn’t simple and will take some time and rare materials, so follow along to learn how to respec your character.

How to respec in Palworld

A memory wiping medicine in Palworld.
Pocketpair

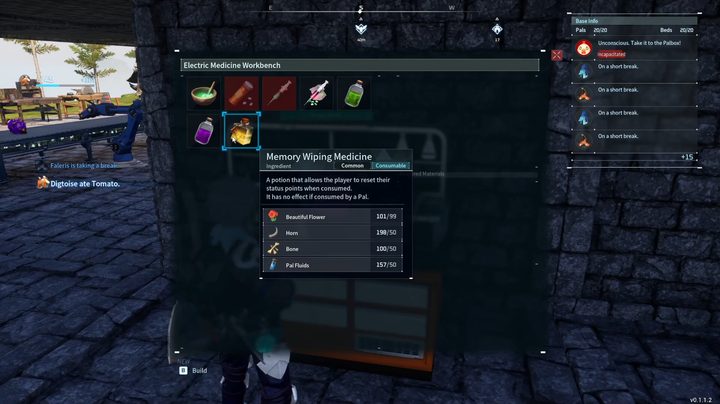
Respecing your Palworld character requires a special consumable called Memory Wiping Medicine, but there’s a big step you must take before you can craft one. First, you need to make an Electric Medicine Workbench, which requires you to hit level 43 and then find it in the Technology menu. This bench is made from:

  • 40 Refined Ingots
  • 10 Circuit Boards
  • 20 Carbon Fiber

If that sounds like a grind, just wait. Now that you can make the Memory Wiping Medicine, you need the following materials:

This is a one-time-use item, so make sure you’re sure you want to use it before chugging it down and wasting all those precious materials you spent making it. Also, note that this item doesn’t do anything if you feed it to a Pal except waste it, so don’t bother trying.

Editors' Recommendations

Jesse Lennox
Jesse Lennox loves writing, games, and complaining about not having time to write and play games. He knows the names of more…
All Baobab Tree locations in Tales of Kenzera
Zau fights a dragon in Tales of Kenzera: Zau.

While it wasn't marketed as being a particularly punishing game, Tales of Kenzera: Zau is by no means easy. You will have plenty of environmental challenges that can instantly sap your life, and the enemies you face -- especially the bosses -- are no slouches. When you first begin, it will only take a couple of bad hits to send Zau to the land of the dead himself. Alongside the Trinkets you can unlock through hidden challenges around the map, there are also Baobab Trees where Zau can stop to reflect on his journey thus far, have a short dialogue with Kalunga, and get a small addition to his health bar. Like everything in the game, these trees aren't prohibitively hidden, but you could easily pass one by and have no idea where it was when trying to backtrack. These are all the Baobab Tree locations so you can max out your health bar.
All Baobab Tree locations
There are six Baobab Trees to find in Tales of Kenzera: Zau and each adds a small segment of health to your total. When you collect them all, you will roughly double your HP bar. Here are each of their locations in the rough order you should naturally find them in. Most can be picked up on your first time through that area.
Ikakaramba

This one is very hard to miss as it is directly on your critical path. If you do, you can fast travel to the nearby campfire to grab it.
The Great Cliffs

Read more
All Trinkets in Tales of Kenzera: Zau, explained
The main character of Tales of Kenzera: Zau stands with two elemental items.

Your main upgrades in a metroidvania like Tales of Kenzera: Zau will always be your new abilities. These transform the way you move and fight, but there are other ways you can make Zau a more powerful shaman. Trinkets are introduced right away, but aren't given away as freely as you might think. Each one requires you to overcome a small trial that tests your platforming abilities off the main path. Technically, you can miss every single one aside from the one you begin the game with. Even though there are a few fast travel points, backtracking isn't a particularly fun experience. Here are all the Trinket locations in Tales of Kenzera: Zau, plus which ones you should equip.
All Trinket locations
You can see which zones have Trinkets on the map, and for the most part, you will be able to grab them as you navigate through them for the first time. Here are each of the Trinket locations roughly in the order you should naturally be able to get them.
Battering Stance
This is the Trinket you begin the game with and is equipped by default.
Lifted Spirit

The first Trinket is found in this side path trial in The Buluu Caverns.
Retaliating Spirit

Read more
How to start the Automatron DLC in Fallout 4
A man and a robot walking in the wastelands in Fallout 4.

Each piece of Fallout 4 DLC adds something substantial to the base experience. In the case of the Automatron expansion, an entire new questline pitting you against a robot army led by a figure known as the Mechanist. Starting it isn't as difficult as starting other DLCs like the Nuka-World expansion, but it-s still a bit cryptic. Buying the DLC doesn't automatically make it apparent how to actually start this new adventure, but we'll give you specific directions to find it in the wasteland.

Read more