WhatsApp (from Meta) may still be best known as a phone-first messaging app, but its browser version has become a lot more useful than it used to be. If you spend most of your day at a desk, typing out replies on a full keyboard is simply easier than pecking away on your phone screen. This is where WhatsApp Web comes in.
The service lets you access your chats from a laptop or desktop browser, giving you a larger view of your conversations and a much more comfortable place to type, send files, and keep up with group chats. It is especially handy when your phone is charging across the room, buried in a bag, or you just do not want to keep switching devices every few minutes.
WhatsApp Web has also improved the functionality offered on the browser version of the popular app. It got new features like video messages, self-destructing voice messages, the ability to edit sent messages, and much more. While earlier versions depended heavily on your phone staying online the entire time, multi-device support lets WhatsApp Web continue to work even if your phone goes offline for a while. But you’ll still need your phone for the initial setup.
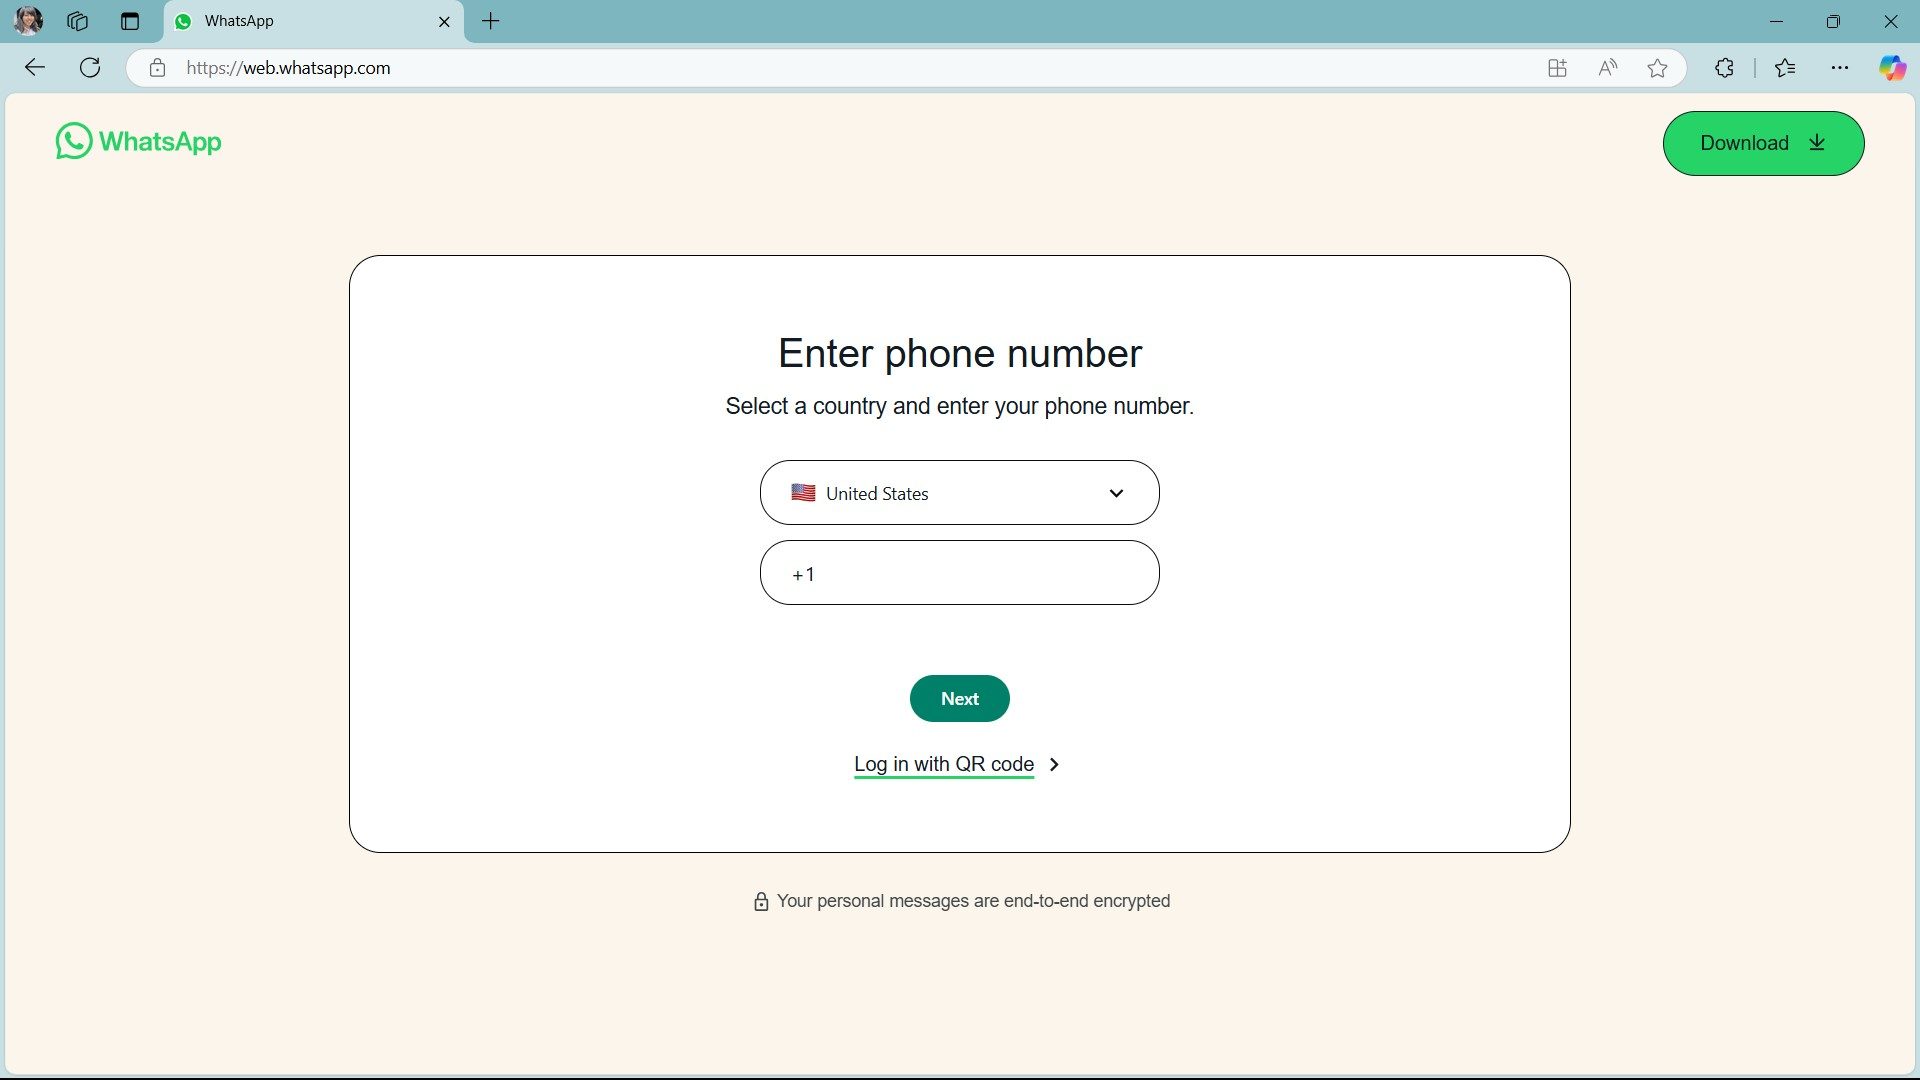
However, there’s still a tiny catch. Since WhatsApp accounts are tied to phone numbers rather than usernames and passwords, you cannot simply sign in to WhatsApp Web the way you would on most websites. You’ll need to link your browser to your account through the WhatsApp app on your iOS or Android device, which means scanning a QR code or offering a phone number login method.
The setup is fairly quick, and once you’re in, the web version feels a lot like the mobile app. You can send messages, share media, browse past chats, and tweak privacy settings without learning a whole new interface. Here’s how to get started.
Difficulty
Duration
What You Need
-
WhatsApp mobile app
-
iPhone or Android smartphone
-
Latest version of Chrome, Firefox, Microsoft Edge, Opera, or Safari
How to log in to WhatsApp Web from an iPhone
The process to get started with WhatsApp web using your iPhone is fairly straightforward. Head to WhatsApp Web in Chrome, Firefox, Opera, Safari, or Edge and scan the QR code on the computer with the WhatsApp mobile app from your iPhone. WhatsApp Web will then automatically launch in the browser and remain active until you log out of it on your computer or phone.
Step 1: In your PC browser, go to https://web.whatsapp.com.

Step 2: Launch WhatsApp on your iPhone.
Step 3: Select the Settings menu in your iPhone in the bottom-right corner, and then choose Linked devices.

Step 4: Hit the Link a device button and authenticate with Face ID or Touch ID if needed. The camera view will open in WhatsApp.
Step 5: Hold your phone up to the code on your screen to pair it up. The WhatsApp page in your browser should refresh immediately, log you in, and show your current list of chats.
How to log in to WhatsApp Web from Android phone
For Android, the steps are somewhat similar and just as simple. So follow these steps after opening the WhatsApp website on your computer:
Step 1: Open WhatsApp on your Android device and select the three dots in the upper-right of the Chat page.
Step 2: Select Linked devices, and then select Link a device. Use your fingerprint or enter your device passcode if prompted.
Step 3: Scan the QR code with your phone to pair it with your computer.
Step 4: Following the last step, your smartphone should be linked to WhatsApp Web, and the webpage in your browser should refresh immediately to log into WhatsApp Web.
How to log in to WhatsApp Web without a QR code
Scanning the QR code on your iOS or Android smartphone is just one way of logging into WhatsApp Web. But you can also link by entering the phone number of your WhatsApp account, which will give you an eight-digit code to sign into WhatsApp on your phone to authenticate the link instead. The steps for both iOS and Android are basically identically.
Step 1: From the WhatsApp Web sign-in page, select Log in with phone number.
Step 2: On the next screen, enter the phone number of your WhatsApp account and select Next.
Step 3: You will be given an eight-digit code to enter into WhatsApp on your phone.
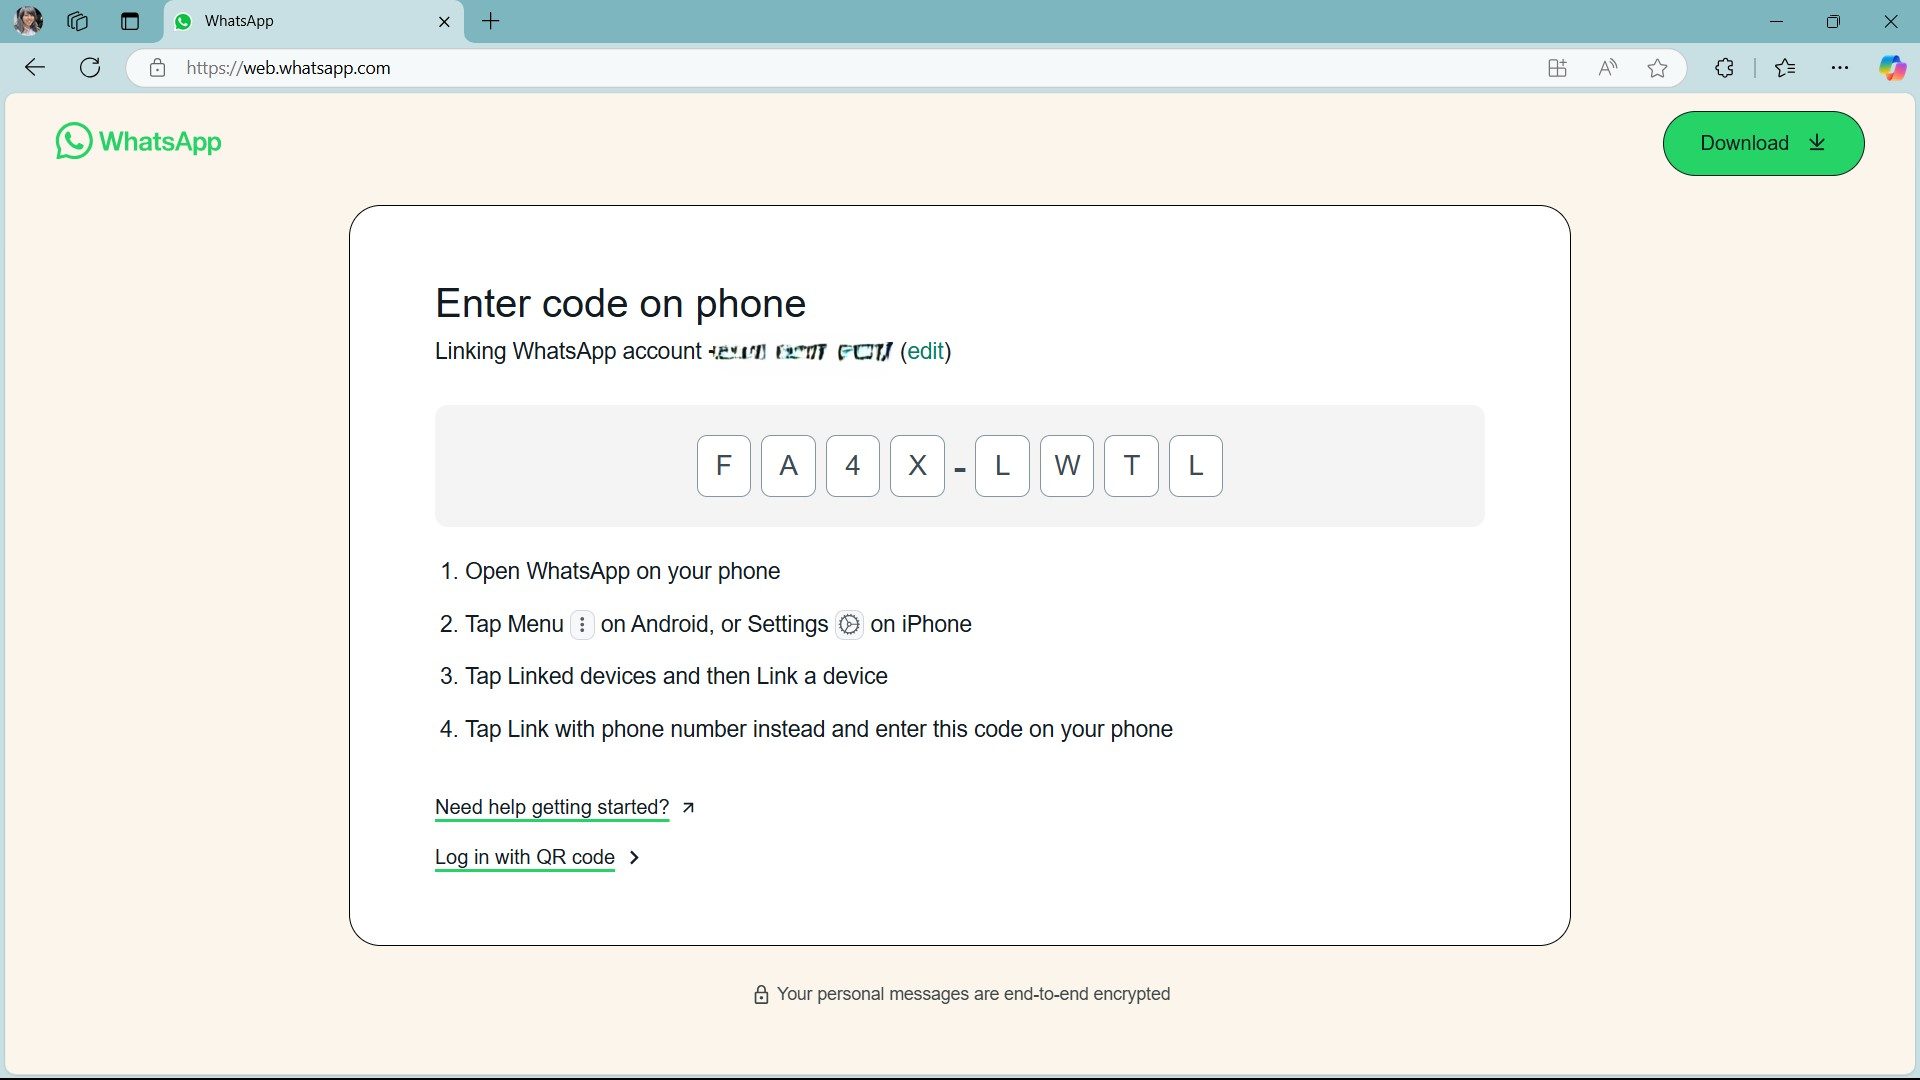
Step 4: Launch WhatsApp on your phone, and select Settings > Linked devices on an iPhone or the three-dot menu and Linked devices on an Android phone.
Step 5: Select Link a device.
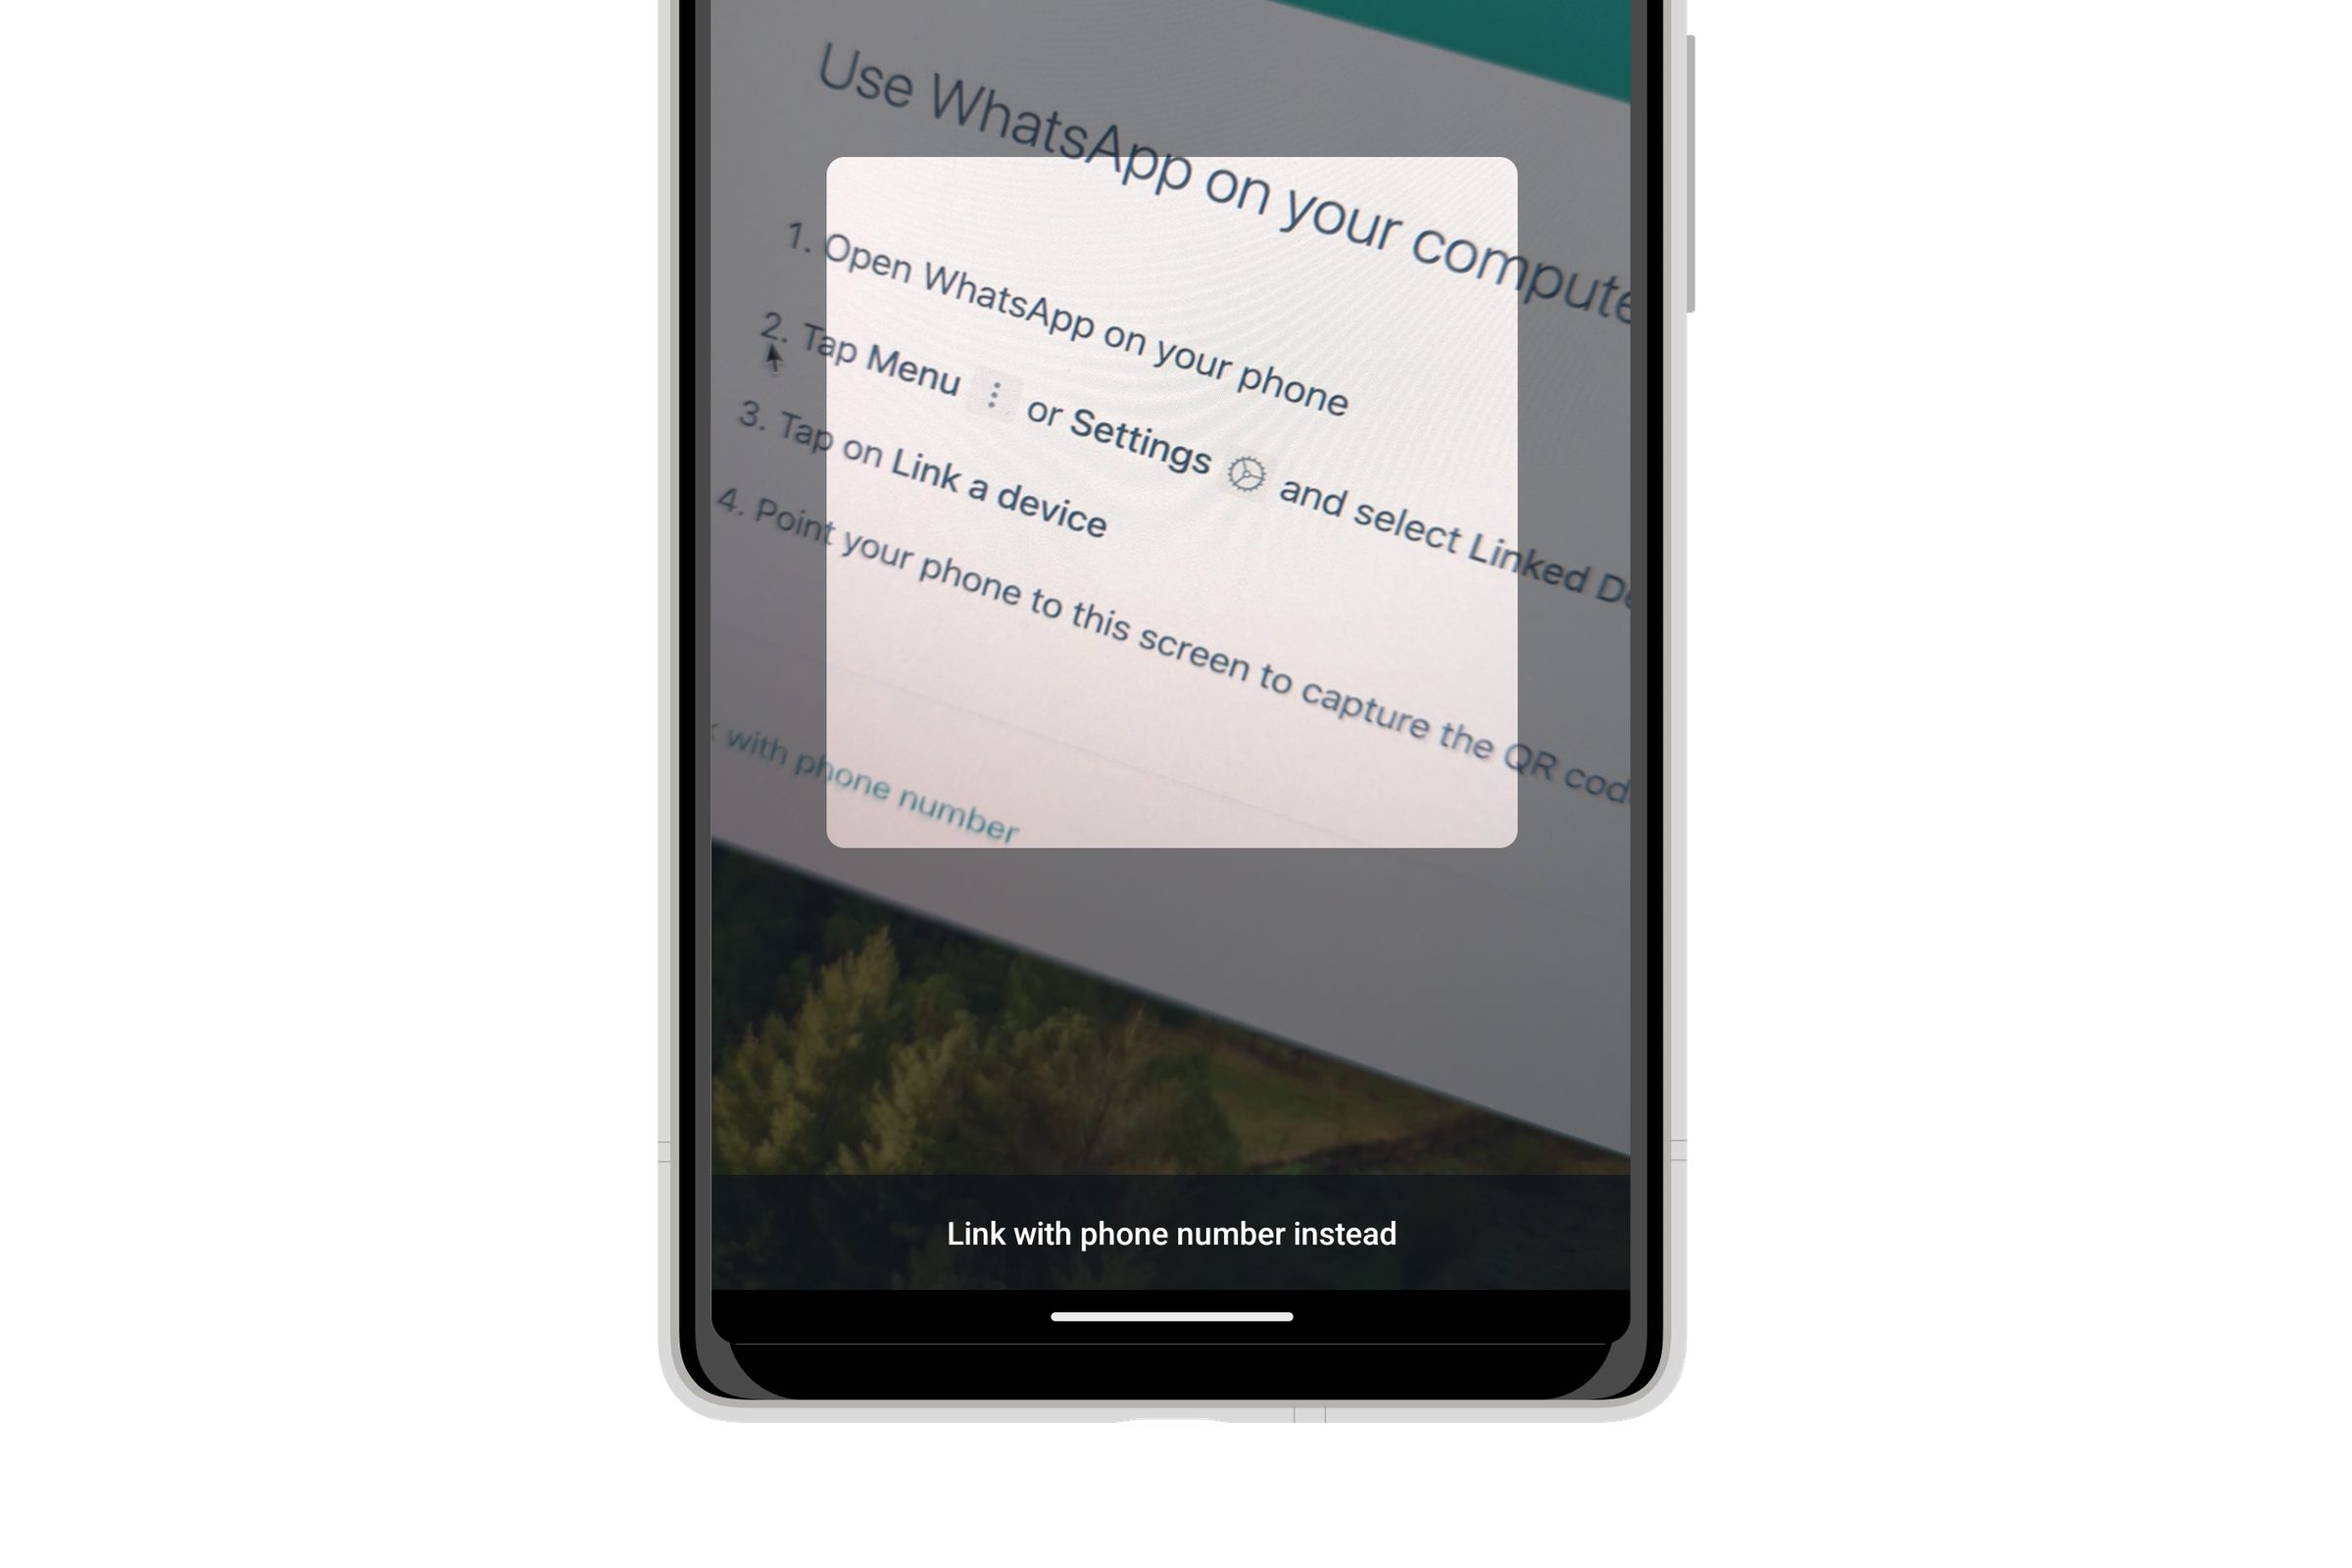
Step 6: On the QR code scanning screen, hit Link with phone number instead and enter the eight-digit code from WhatsApp Web when prompted.

Step 7: The WhatsApp page in your browser should refresh immediately and log you into your WhatsApp account.

How to use WhatsApp Web
Once you’re in, WhatsApp Web is just as simple as its mobile app counterpart. And for those who already use it on their phones, the interface will feel very familiar.
Step 1: To send a message from your desktop, click on an existing chat or click on the New chat icon and select the contact you wish to interact with. Here, you can see previous chats if they are saved, or use the message bar at the bottom.
Step 2: Click on the Type a message bar and start chatting.
Step 3: When you are done with your message, press the Enter key on your keyboard to send it, or just click on the Send icon.
Step 4: You can attach documents, images, or recordings by just attaching the files from your desktop and sending them as you would any other message by clicking on the paper clip Attach icon at the bottom of the current chat.

How to protect WhatsApp Web with a password
After logging into WhatsApp Web, the browser will remain logged in and associated with your account until you log out. But keep in mind that logging out will require you to use your phone to sign back in again.
Fortunately, you don’t need to sign out to keep your private messages away from prying eyes. You can enable an App Lock feature in WhatsApp Web that will keep your browser signed in and linked to your account while requiring a password to unlock it.
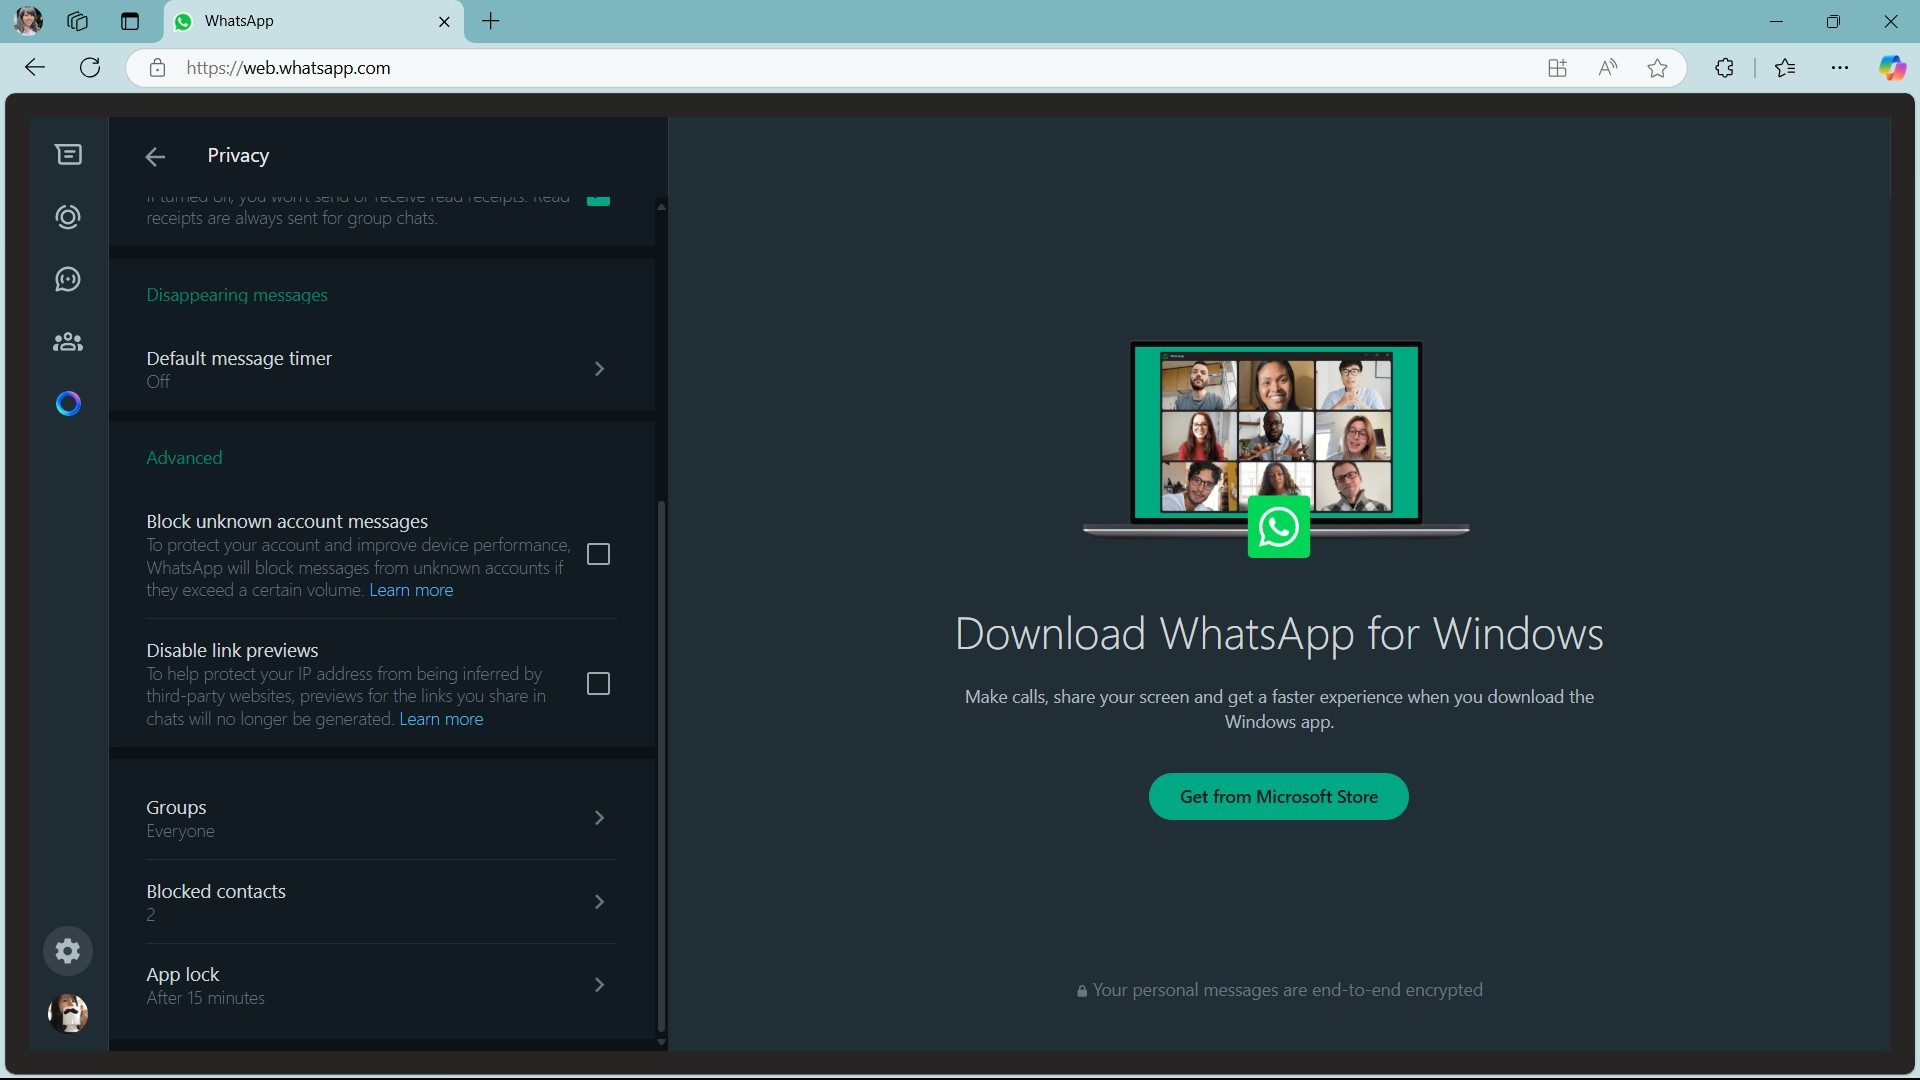
Step 1: In WhatsApp Web, select Settings with the gear icon above your profile picture in the lower-left corner.
Step 2: From the Settings menu, select Privacy, then scroll down and select App lock.
Step 3: Select the check box beside App lock to enable the feature.
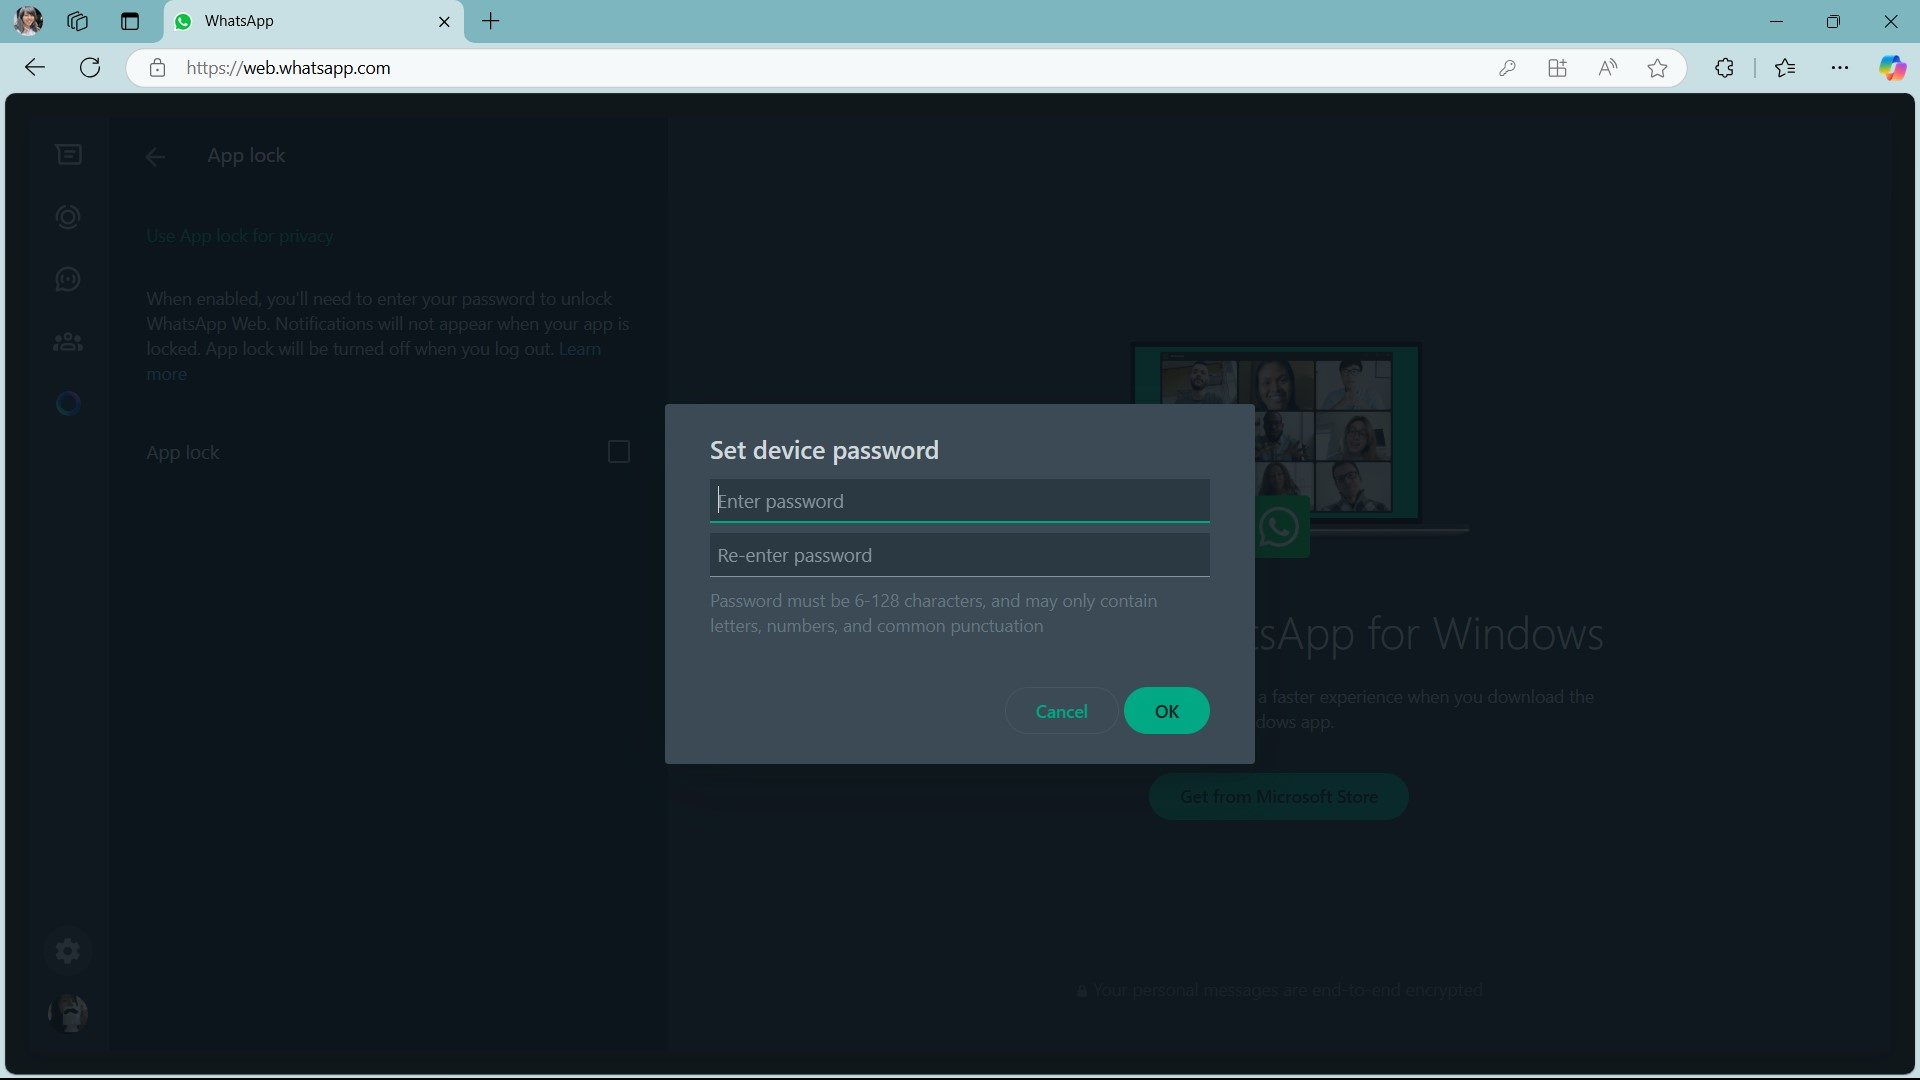
Step 4: When prompted, enter and confirm the password you want to use to secure WhatsApp Web, then select OK.

Step 5: Choose how long WhatsApp should wait before automatically locking the screen after inactivity. Once App Lock is enabled, you can also lock the app at any time by selecting Lock app from the main three-dot menu. This replaces the Log out shortcut there, though you can still log out from the Settings menu if needed.
It is worth noting that the app lock password only applies to the current WhatsApp Web session in the browser you are using. It is not shared with your other devices, and you will need to set it up again if you log out and sign back in later.
WhatsApp Web Features
After scanning the QR code, you can view your WhatsApp chat list directly on the web page. On the left, you will see your chats, and you can click any contact to open the conversation and view your message history, if you saved it.
At the top-left of the page, three icons are available: Status, New chat, and Menu, which opens a list of additional options. The Status option reveals updates posted by your contacts, along with the ability to reply from the pane below. Clicking New chat opens your contact list on the left side of the page, where you can start a conversation or create a new group.
The three-dot drop-down menu lets you create a new group, update your profile information, search archived chats, view starred messages, change settings like notifications and chat wallpaper, or log out.