We all love loot drops. The satisfaction of a shiny new piece of gear hitting the ground after defeating a tough boss or opening a chest is always worthy of the goosebumps and elevated heartrate they create, and Outriders is just the latest game to scratch that itch. The game is packed with things to collect, from guns and materials to, of course, new pieces of armor. Most of the way through the game you’ll work your way up through the various tiers of gear, but at a certain point, nothing but the best of the best will cut it, and you’ll need to get your hands on some Legendary-level equipment.
Weapons may steal the spotlight for most people when hunting for the top-tier items, but because of how Outriders handles armor they can be just as impactful on your build as a gun. No matter what you’re hunting for, though, Legendary drops are hard to get. With so many Legendary-level armor sets to find, you’ll want to know which ones do what and how best to go about getting it. Here are all the Legendary armor sets in the game, plus the best way to increase their drop chances.
See more:
How to get Legendary armor drops
Farming for gear in Outriders is absolutely possible, and even encouraged, thanks to a unique system the game implements. All Legendary items, weapons or armor, have a set chance to drop based on the world tier you are playing on. The higher the world tier, the better the chances of a Legendary drop, but also the more difficult the enemies will become. Not only that, but the stronger enemies — such as captains, elites, and bosses — have a much better chance of dropping rarer loot than regular mobs. Anyone who played the demo should also know that the devs tweaked the game so that you can’t get Legendaries from chests anymore, so no more grinding those easy missions. At the moment, there are 15 world-tier levels, each with a different Legendary drop rate percentage:
World Tier 1: +0%
World Tier 2: +0%
World Tier 3: +0%
World Tier 4: +130%
World Tier 5: +215%
World Tier 6: +285%
World Tier 7: +300%
World Tier 8: +315%
World Tier 9: +330%
World Tier 10: +345%
World Tier 11: +360%
World Tier 12: +375%
World Tier 13: +390%
World Tier 14: +405%
World Tier 15: +425%
Naturally, the higher the world tier you play on, as long as it is above tier three, the better odds you have of getting a Legendary drop, so challenge yourself with the toughest world tier you can handle. Of course, each level tier corresponds to how much higher of a level the enemies will be relative to you, so find a good balance of drop rate, difficulty, and how long it takes you to actually get through the mission for the most efficient grinding possible.
Unlike guns, which any class can use, Legendary armor sets are unique to each of the game’s four classes: Devastator, Pyromancer, Technomancer, and Trickster. Each class has four full sets of armor, made up of five components, that each grant unique buffs. That totals out to 20 pieces of Legendary armor for each class to grind for. While you technically only need three pieces of each set to get the bonus, they do work best as a complete set. Of course, each set of armor will have its own level and stats, but it is the bonuses that are really worth grinding out all the pieces for. Each unique set is diverse enough that you will find at least one that complements your play style.
Devastator Legendary armor sets
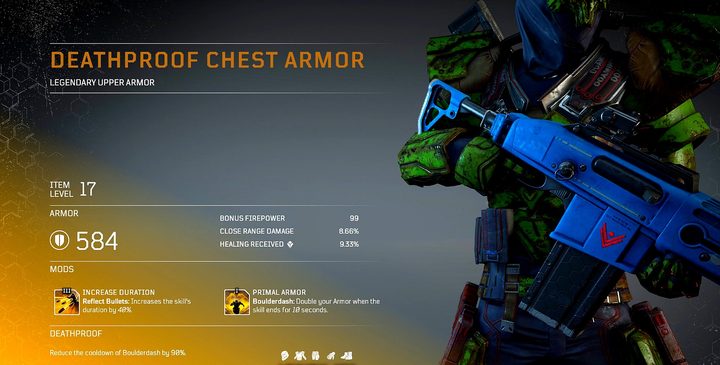
The first Legendary armor set for the Devastator is called Deathproof. This is made from the Deathproof Mask, Deathproof chest armor, Deathproof gauntlets, Deathproof leg armor, and Deathproof footgear. All combined, you get a massive 90% faster cooldown on Boulderdash so you can charge and smash all across the battlefield over and over.
The second set is called Marshal and is built from Marshal’s helmet, armor, gauntlet, waistcloth, and footgear. With these, your Endless Mass will suck in enemies and cause them to all share damage. Essentially, this just makes everything great about this skill even better.
Third is the Seismic Commander. Find and equip the Seismic Commander’s helmet, armor, gloves, leg armor, and footgear to buff your damage against bleeding enemies by 150%.
Finally the Devastator has the Statue set. Find all five Statue-labeled pieces of armor, and you and your team all get double firepower and weapon skill leech when you use Golem. If you’re playing the tank, you’ll be popping Golem as much as you can anyway, so why not beef up your damage and help out your team at the same time?
Pyromancer Legendary armor sets
We start off with the Pyromancer’s Legendary Acari set. You’ll need to find the helmet, armor, gauntlets, waistcloth, and boots of the Acari. Once you do, each enemy you damage with your Heatwave will buff your Anomaly power by 25% for 10 seconds.
Lava Lich is the next set, all completed with the helmet, upper robe, charms, lower robe, and boots of Lava Lich. With these equipped, your Eruption will do more damage and have a shorter cooldown time.
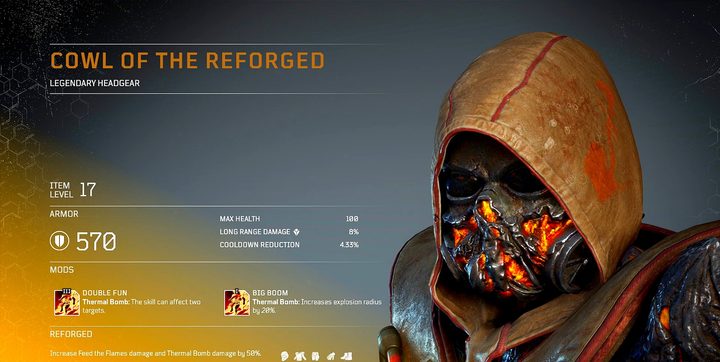
Your third choice is the Reforged set. Get all five Reforged pieces of gear, and you will make your Feed the Flames and Thermal Bombs do 50% more damage.
Last is the Torturer set. Once you’ve fully taken on the appearance of the Torturer, your Volcanic Rounds’ AOE will be three times as large as normal for each bullet fired.
These are all fairly tame bonuses compared to some of the other classes, but hey, no one is ever disappointed with raw stat increases to their skills, right?
Technomancer Legendary armor sets
The Technomancer’s Legendary armor sets start with the Borealis Monarch. This set is built from the crown, robe, gloves, waistcloth, and boots of the Borealis Monarch. Put them all together, and you will do 80% more damage to frozen enemies with your guns, plus grant a buff for your entire team every time you use Cold Snap, which increases crit damage by 10% for eight seconds.
Grim Inventor is for you heavy hitters out there. Get the Grim Inventor’s mask, coat, gloves, leg armor, and boots to instantly refill 20% of your ammo for your minigun and RPG when you land a hit with the Pain Launcher while your Tool of Destruction is activated. This effect can only be triggered once, however.
The third legendary set is focused on your status effects. With the Plague Sower, once you complete the set of five armor pieces, any time you inflict toxic on an enemy you will get a damage reduction buff of 5% for five seconds. That may not sound too powerful, but you can stack it up to five times, resulting in a substantial 25% damage reduction bonus.
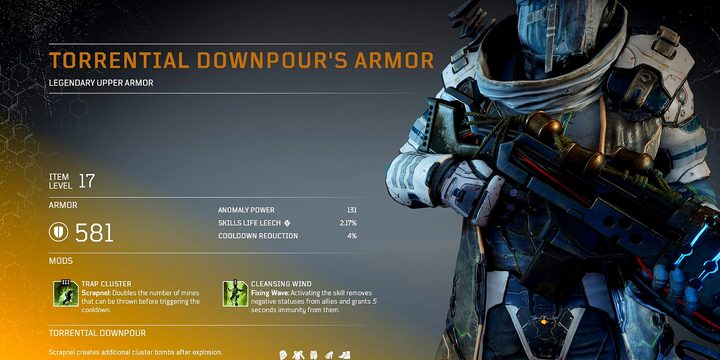
Last but not least is Torrential Downpour, which is a fantastic set if you enjoy dealing big AOE damage. Put on the goggles, armor, gloves, leg armor, and footgear to make Scrapnel create more cluster bombs after the initial explosion.
Trickster Legendary armor sets

We finally come to the Trickster’s four Legendary armor sets, starting with the Chronosuit. Find yourself the Chronosuit mask, upper Chronosuit, Chronosuit gloves, lower Chronosuit, and Chronosuit footgear to make it so that any time you revert time, you also get a free refill of your current gun’s ammo. With this and a few other skills or mods, you can almost eliminate the need to reload manually.
Next is The Edge of Time. Find and wear all the armor in this set to make your Temporal Blade and Cyclone Slice deal more damage. It’s simple, but if you enjoy those weapons, then a straight damage buff is never a bad thing.
Trespasser is perhaps too strong if you build yourself right. With this full set, you are unable to die as long as you are inside your Slow Trap. Combined with the normal effects this skill has, you can pull off some mind-bending plays with this one.
Last up is Ugake Otarah. Grab all of these armor pieces to make it so Hunt the Prey no longer uses your cooldown after teleporting behind an enemy you’ve marked with Venator’s Knife. It’s a little harder to pull off, but if you get the hang of this, you can chain teleport attacks all over the battlefield.