The AirPods Pro 2 are the latest addition to Apple's impressive lineup of true wireless earbuds and headphones. And with improved amps and drivers for better sound, enhanced active noise-canceling features, and the addition of some bud-based volume controls, the AirPods Pro 2 are Apple's best buds yet — for proof of that, read our full review.
For years now, AirPods have been controlled by tapping or long-pressing the outside of each bud (for models like the AirPods 2), or by tapping or pressing the AirPod stems (for the first- and second-gen AirPods Pro). But did you know that you can actually customize the way these taps and presses operate?
If you own a set of the AirPods Pro 2, we've put together this guide to teach you how to personalize the different touch controls of your AirPods Pro. Many of these customizations also apply to the original AirPods Pro, so read on if that's you instead.

How to customize the long-press commands
Out of the box, both of your AirPods are configured for the same long-press commands: noise-canceling controls. By default, pressing and holding the stem for just a moment or two will cycle each AirPod between active noise cancellation (ANC), transparency mode, and off (no noise-canceling at all).
But what if you want one of the AirPods to do something else with a long press? Well, there is one alternative, and its name is Siri. Here's how to map the voice assistant to a long-press, as well as how to further adjust your noise-canceling controls.
Step 1: If your iPhone is running iOS 16, getting into your AirPods Pro 2 dashboard is a very easy process. To begin, you just need to be wearing your AirPods or have them placed in the MagSafe charging case with the case opened up.
This ensures that your AirPods are actually connected to your iPhone.
Step 2: Grab your iPhone and open the Settings app. Then, select the AirPods Pro dashboard tab.
The tab will be located right underneath your Apple ID info at the top of the screen. If your AirPods are not showing up, they may be disconnected from your iPhone.
You can also access your AirPods Pro dashboard by opening Settings, tapping Bluetooth, and pressing the More info icon (a blue emblem with the letter "i" at the center).

Step 3: On the AirPods Pro dashboard, you should see a category called Press and Hold AirPods. By default, both the left and right AirPod will be set to Noise Control.
To change one or both of these bud commands, tap either the left or right AirPod tab. For this example, let's begin with the left AirPod.
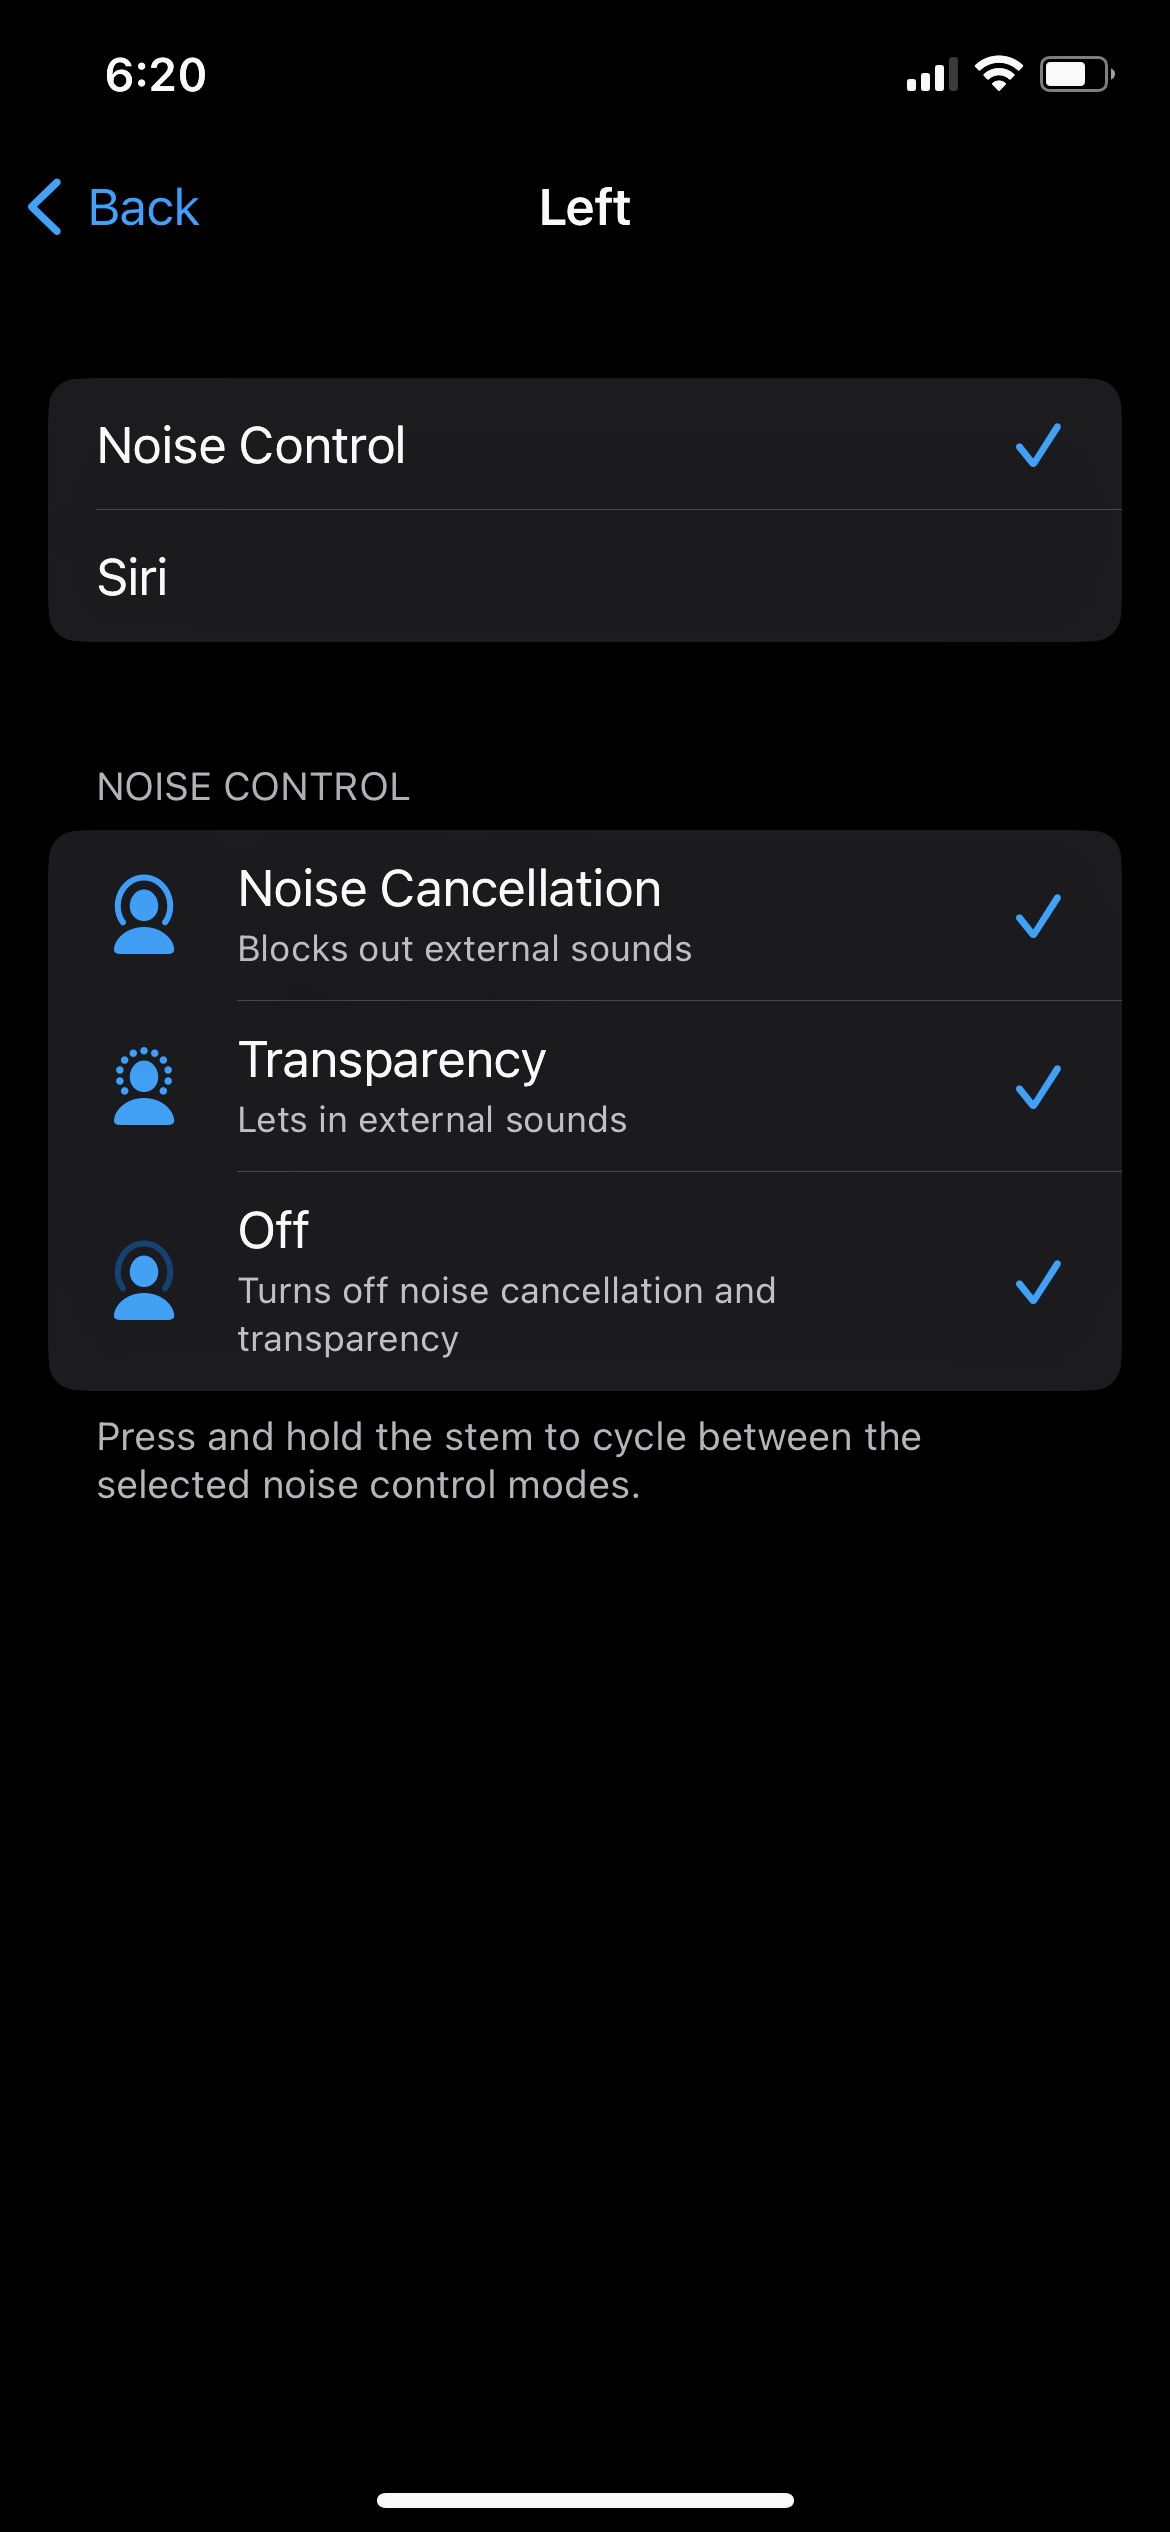
Step 4: At the top of the next page, you'll be able to choose whether you want the left AirPod's long-press to engage your Noise Control settings or activate Siri.
By default, there should also be a Noise Control menu underneath the Noise Control/Siri options. If you change the left AirPod's long-press to Siri, that sub-menu will disappear.
Step 5: Once you've made your changes, you can either tap the Back button to return to the AirPods Pro dashboard, or you can close the entire Settings app by swiping up from the bottom left-hand corner of the screen then swipe the Settings app up and away.
But wait! We've got one more long-press tip for you.
Step 6: Did you know that you can customize the different noise-cancellation settings your AirPods will cycle through? To do so, let's first choose the right AirPod from the dashboard.
Step 7: On the next screen, make sure the right AirPod is set to Noise Control.
You should then see a Noise Control sub-menu beneath Noise Control/Siri. By default, your AirPods should have Noise Cancellation and Transparency checked, with Off as a third unchecked option.
You can customize exactly what Noise Control modes your right long-press will cycle between by checking/unchecking any of these three options. You need to have at least two modes checked off, but you can also enable all three.
Step 8: Once you've customized your Noise Control settings, go ahead and close the Settings app, and if you're not wearing them already, pop your AirPods into your ears and give each stem a long-press to ensure your customizations went through correctly.
How to adjust press speed/press and hold duration
The main way you'll be controlling your AirPods Pro 2 (and first-gen AirPods Pro) is with single-, double-, and triple-taps of the bud stems to do things like play/pause music, accept and end phone calls, and skip forward and backward when listening to tunes. And as we've mentioned, you can also use long-press commands to cycle between Noise Control modes and/or Siri.
Out of the box, both Press Speed and Press and Hold Duration will be set to Default, but you can easily adjust the speed and duration of both your regular stem taps and long-presses.
Step 1: Head into the AirPods Pro dashboard, then scroll down and select Accessibility.
Step 2: Under the Press Speed sub-menu, you'll be able to change the Default setting to either Slower or Slowest. If you're finding you'd like to have a little more time to tap your stems, you can select one of these settings, pop in your AirPods, and try out the new speed.
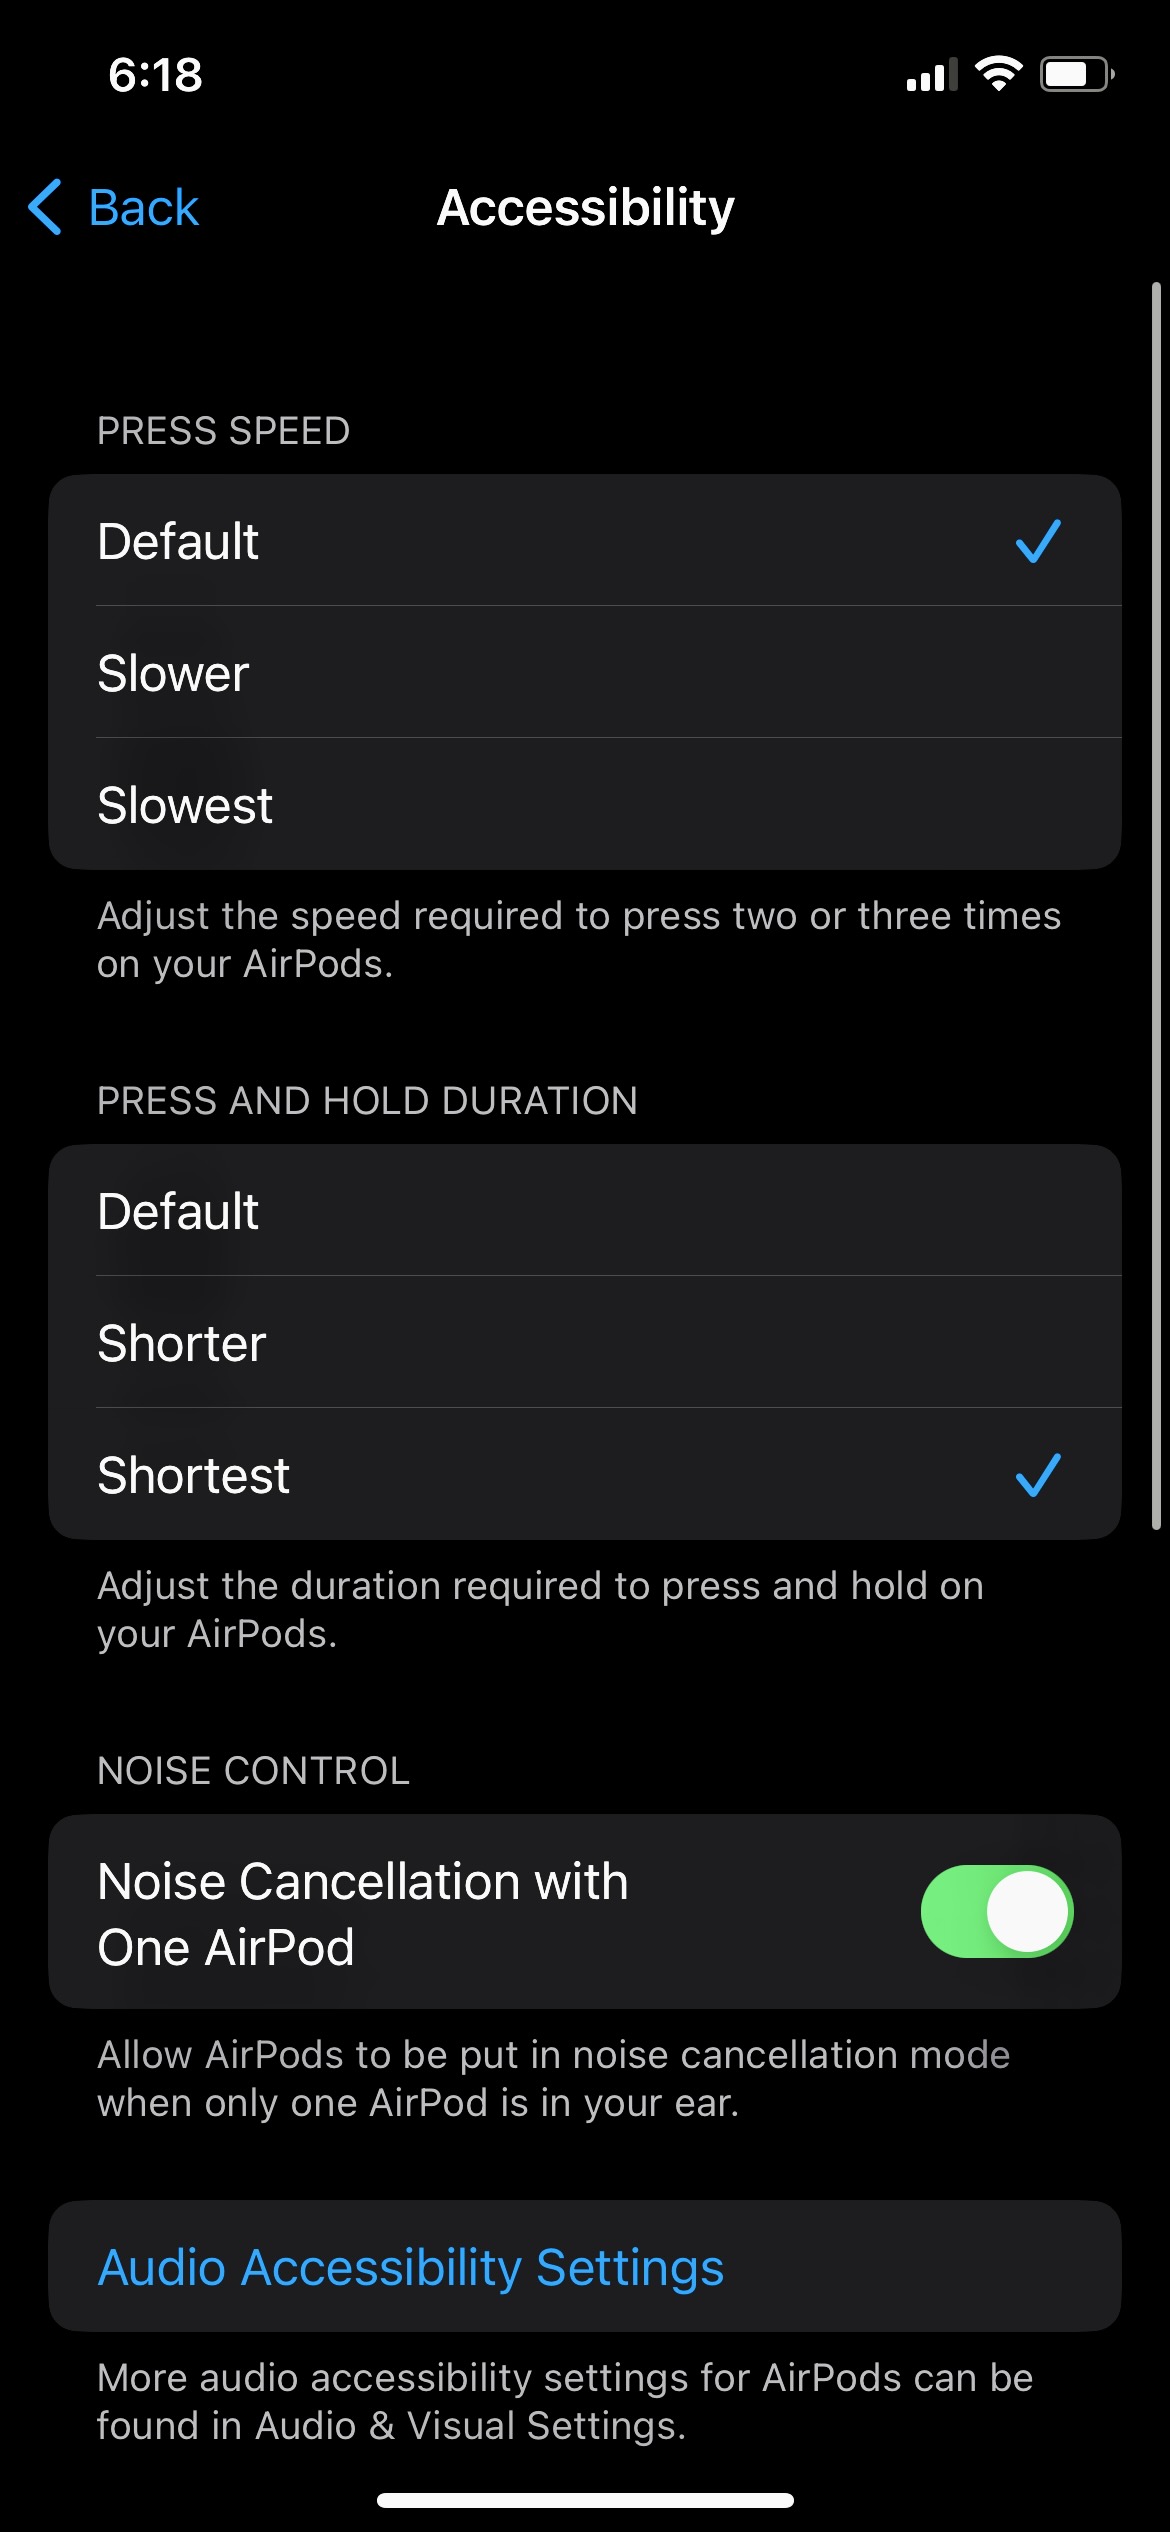
Step 3: To adjust the long-press duration, choose either Shorter or Shortest from the Press and Hold sub-menu (located right underneath the Press Speed panel).
How to adjust the tone volume of your AirPods Pro
When you're single-, double-, or triple-tapping your stems or initiating a long-press for noise cancellation or Siri, your AirPods will issue a series of different clicks (for taps) and chimes (for long-presses) to let you know the AirPods are successfully carrying out your different commands.
And like all customizable AirPods Pro settings, you can adjust just how soft or loud these sounds are.
Step 1: In the AirPods Pro dashboard, scroll down and select Accessibility. Then, scroll all the way down to the bottom of the page, until you see a Tone Volume setting.
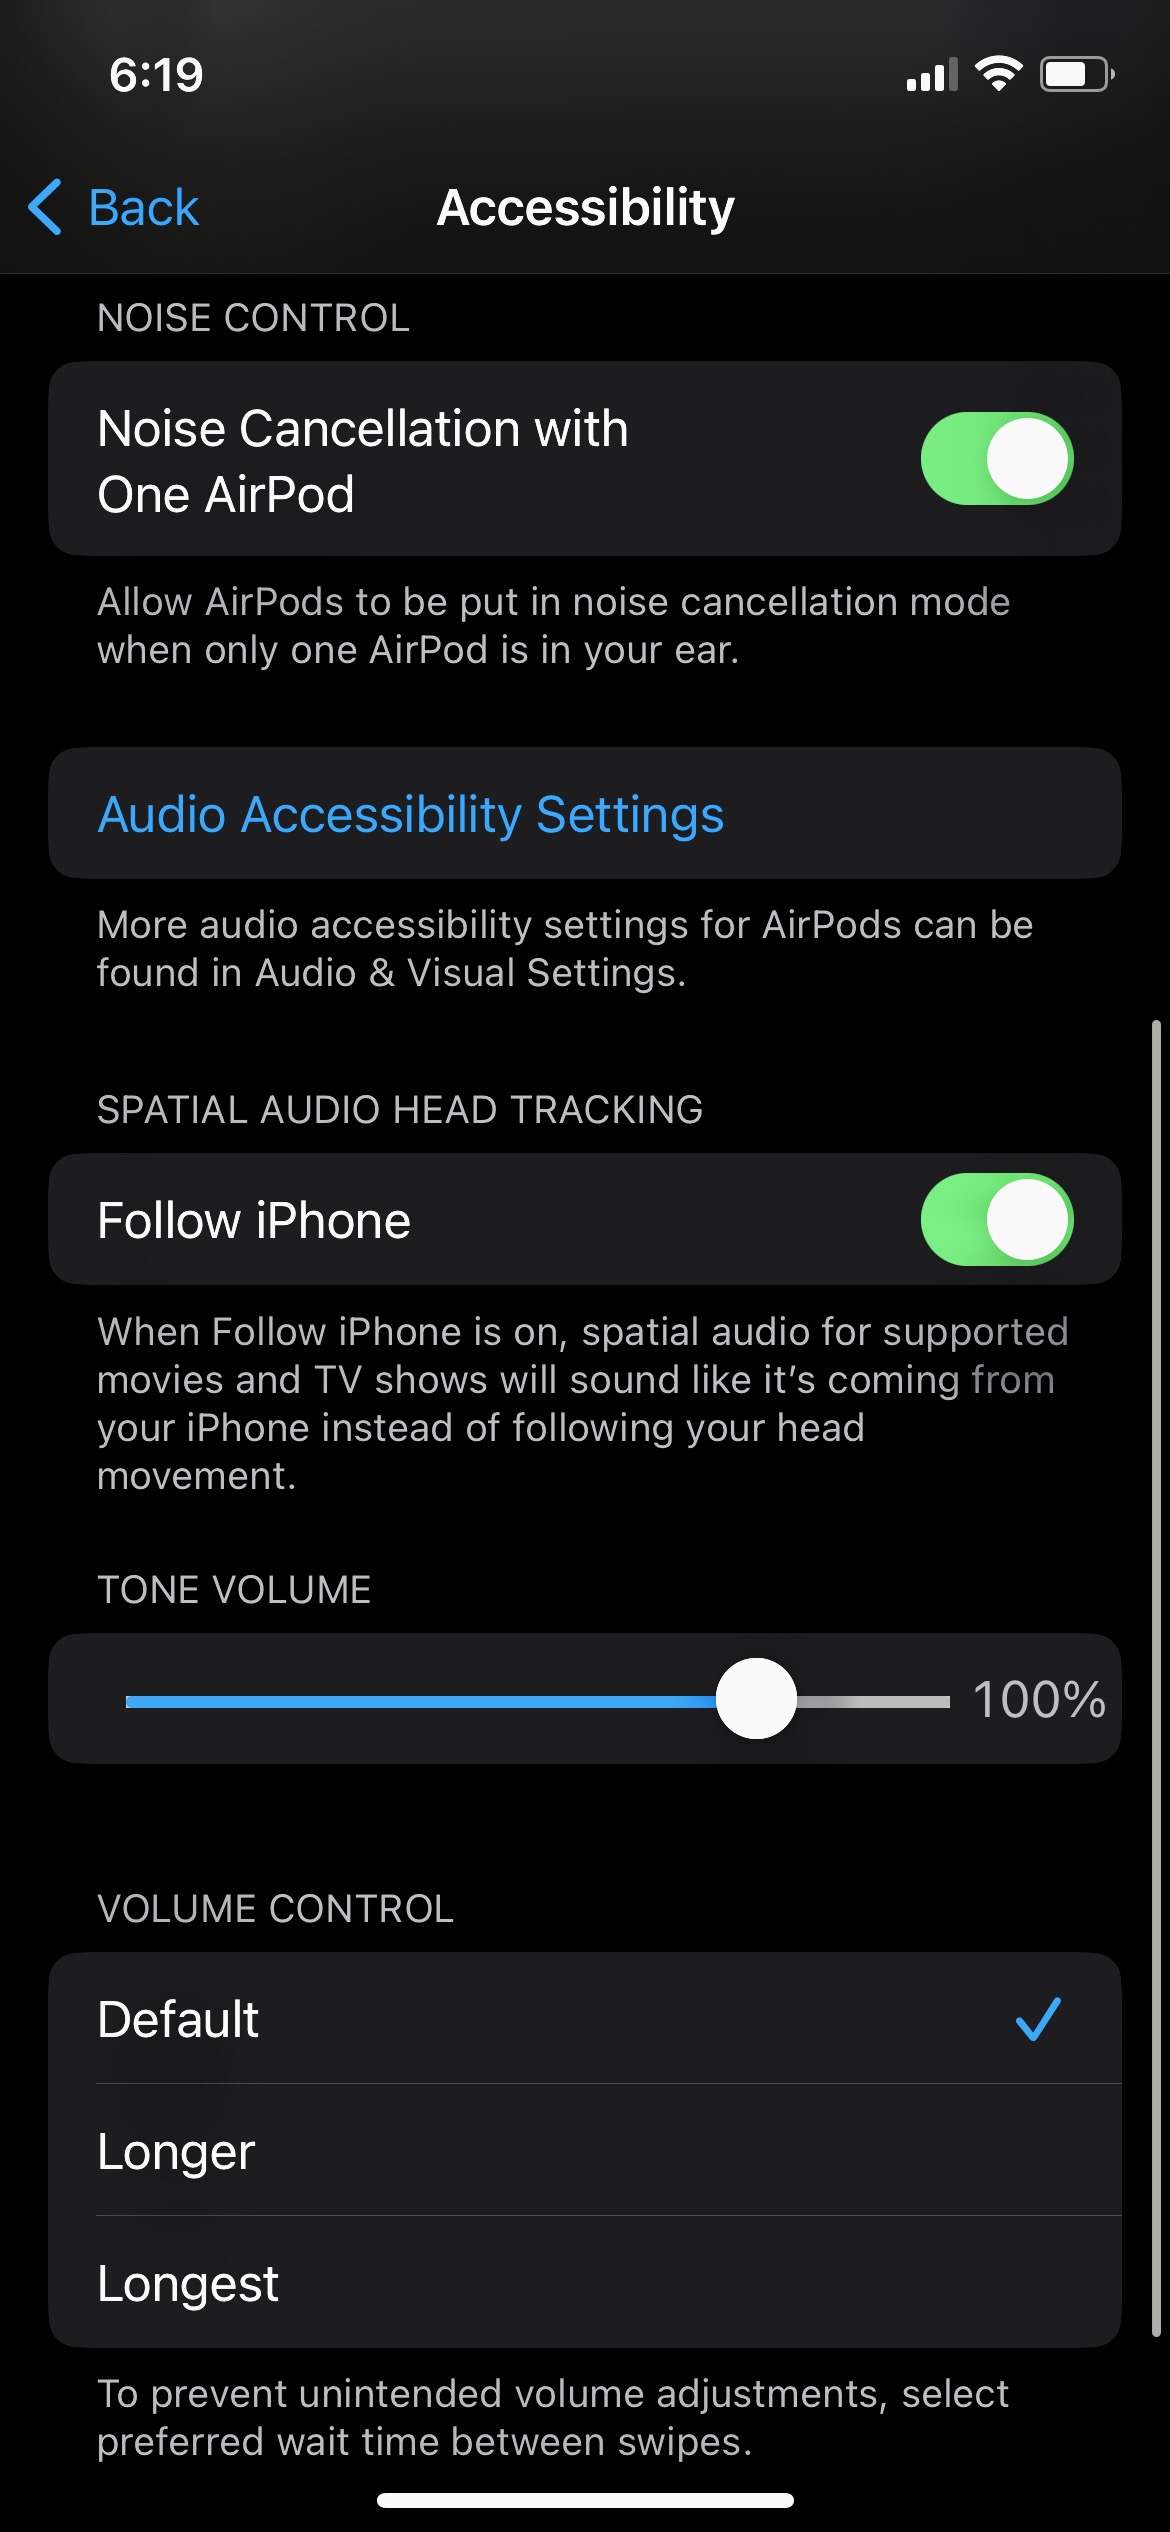
Step 2: Using the volume bar, drag the adjuster left or right to either lower or raise the volume for your AirPods' tones. Once you've adjusted as much as you want to, go ahead and give the AirPods a tap or a long-press to see if you like the new volume level.
How to adjust the volume control speed
While most of these customizations actually apply to both AirPods Pro generations, this next one is only available for the AirPods Pro 2, seeing as the original model doesn't have a way to raise/lower volume from the buds themselves.
To avoid unintentional volume adjustments with the AirPods Pro 2, you can customize how long to wait between volume swipes.
Step 1: Open the AirPods Pro dashboard, then select Accessibility.
Step 2: Scroll to the very bottom of the page to locate the Volume Control panel. You'll be able to choose between Default, Longer, and Longest.
As with all the other customizations we've covered, go ahead and choose one of these settings and test it out.
How to customize additional AirPods Pro audio settings
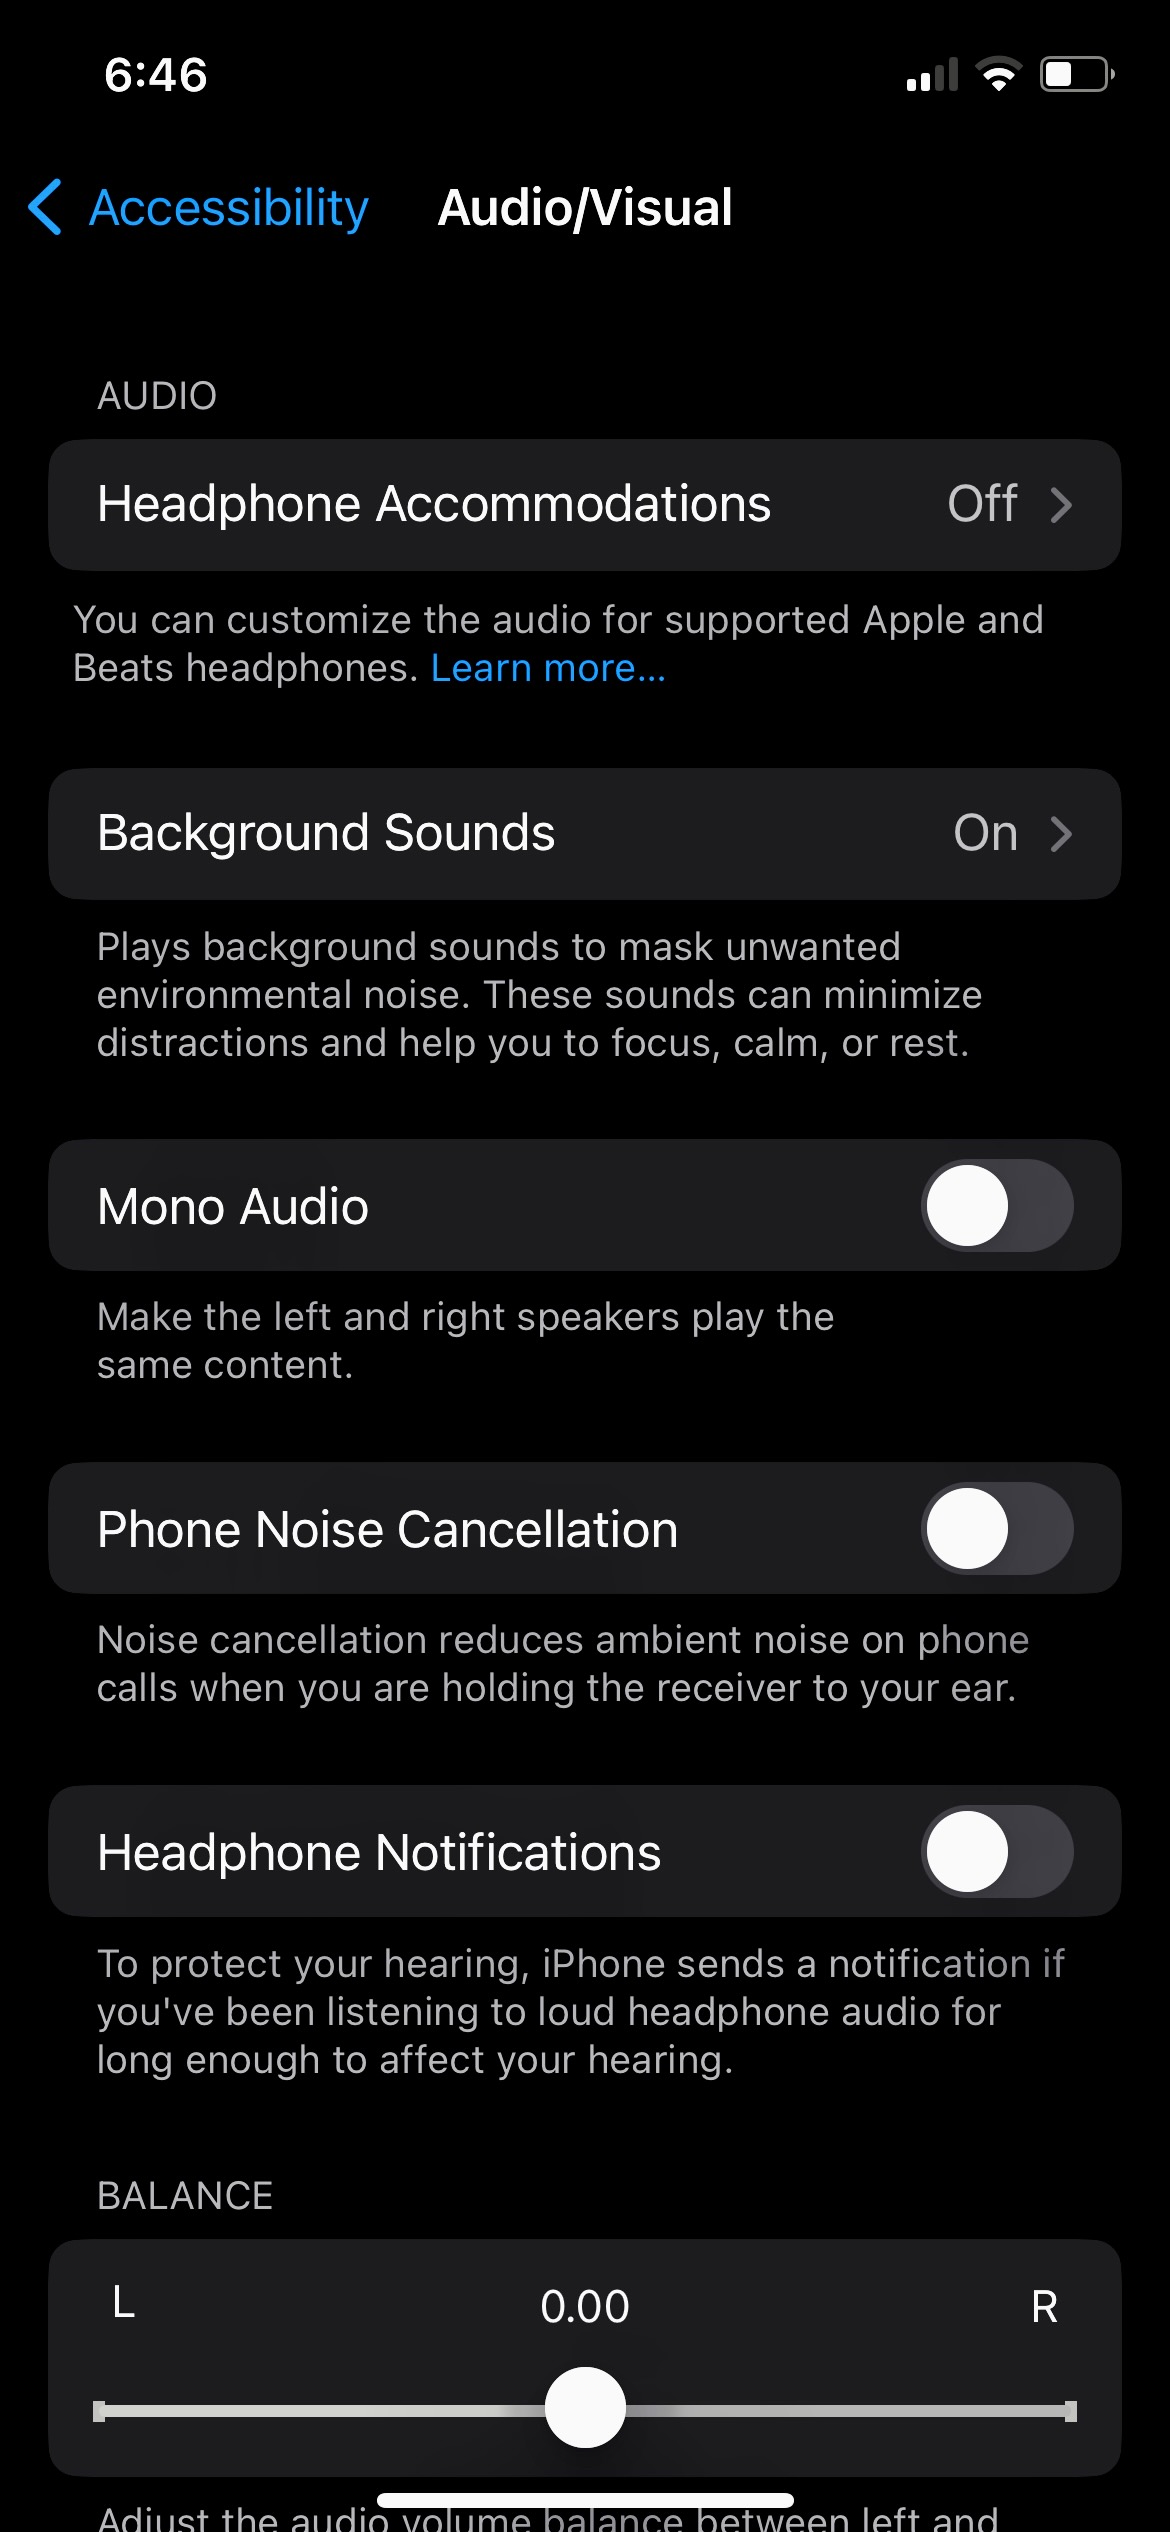
Outside of tap, long-press, and volume control adjustments, you can also customize some additional AirPods Pro audio settings, including Background Sounds, Phone Noise Cancellation, Headphone Notifications, and more.
To do so, open the AirPods Pro dashboard, select Accessibility, then scroll down and select Audio Accessibility Settings. You'll then be taken to the Audio/Visual page where you'll be able to make further adjustments to your AirPods Pro listening experience.
For more fun and helpful things you can do, check out our post on AirPods Pro 2 tips and tricks you should know.
Editors' Recommendations
- Best AirPods deals: Save on AirPods and AirPods Pro
- AirPods 4: Everything we know about Apple’s next wireless earbuds
- Best Apple deals: Save on AirPods, Apple Watch, iPad, MacBook
- How to replace lost or broken AirPods, AirPods Pro, or cases
- Apple’s AirPods Pro earbuds are back at their cheapest-ever price