Near the top of Sony’s LED lineup sits the Sony X930E TV — just behind the Sony X940E TV. The X930E comes in 55-inch and 65-inch sizes and features smart home device integration. To make it easier to get this TV ready for viewing, we have created a video explaining the unboxing and setup. Follow along with the video to get tips and tricks for setting up your TV.
Unboxing tips
When you begin to set up your Sony X930E TV, open the top of the box first because that is where a handy setup guide is located.
What’s in the box
- TV stand
- Stand legs
- Screws
- Wall spacers
- Power brick
- Power cable
- IR blaster
- Remote
- Batteries
- Decorative panels
Items not included
Several items are not included with the TV. You will need to buy HDMI cables to connect your TV to other devices. The easiest way to ensure you have the proper HDMI cables is to buy the AmazonBasics High-Speed HDMI cables at the same time you buy your TV. If you do not buy the AmazonBasics HDMI cable, make sure the cables you use are rated as “high speed,” as they’ll be handling a large amount of 4K HDR data.
While the TV does come with wall spacers, it does not include any of the other necessary equipment for wall mounting a TV. For more information about wall mounting, check out our wall-mounting guide video.
TV setup
Setting up the stand is the first step in assembling the TV. Place the base plate upside down on your knees and attach the legs. There is numerical coding on the legs and base plate, so you know where to attach the legs. Slide the legs on and then secure them in place with the small screws. The TV comes in a protective shroud, so you can carefully place it facedown on a flat surface to make attaching the stand easier. The stand slides into place on the back of the TV and you can secure it in place with the bigger screws.
The next step is to run power to the TV. Find the power brick, then attach the AC cable to the bigger jack. Turn the power brick 180 degrees and you will see the little jack — the custom cable that came in the box goes in there. Now attach the free end of the custom cable to the back of the TV in the recessed bay in the left middle part of the TV.
The Sony X930E also comes with a variety of connections. This doesn’t appear to be the case at first glance because the connections are hidden behind panels on the back of the TV. There are two connection bays on the right of the TV. The main connection bay has three HDMI inputs, one USB input, a land cable input, and an infrared blaster input. The second side bay has one HDMI input and several older legacy connections. Since the connection bays are covered, there is a cable management system to help organize your cables. Run the cables through two black brackets and then through the legs of the TV to the back of your entertainment center. After that, replace the two decorative panels to completely cover the back of the TV.
Design features
Given the slim profile of the TV, it makes sense as to why Sony used a power brick — it helps keep the TV slim. The covers on the back give the TV a sleek look with no obvious ports visible. From the front of the TV, you can see a little bit of a bezel. The bezel is necessary due to Sony’s slim backlight master drive scheme — the bezel covers the outer edges of the system. The narrow pedestal for the TV is a nice feature because you can place this TV on almost any entertainment stand.
Set up connections
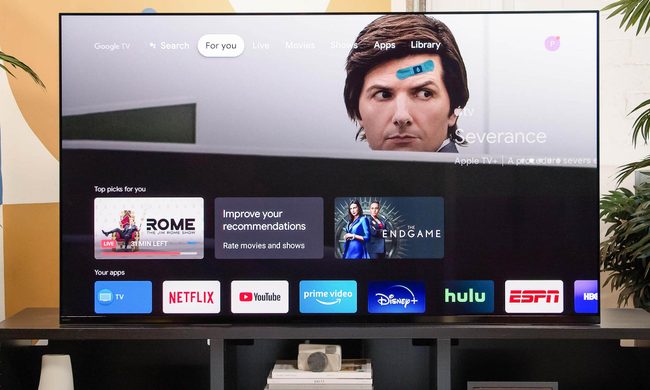
When you turn the TV on, the X930E’s Android system will take you through a setup wizard. The first thing you will be asked to do is enter your Wi-Fi password to connect your TV to your internet network. If you have a Google account, you will want to log in. Your Google account is how the TV will track what you like to watch and will enable you to access the different videos, music, and photos you may have connected to your Google account. The TV will also offer to scan for over the air channels connected via an antenna to your TV, or it will program itself to control your cable box.
This TV allows voice search with “OK, Google.” You can also control it with Amazon’s Alexa digital assistant using an Echo device. You can also cast content to this TV from your smart phone, tablet, or PC using Google Cast compatible apps.
Adjusting settings
The color settings on this TV are more than respectable right out of the box. If you select the Cinema home setting under Picture mode, you really don’t need to touch any other picture settings. If you do want the screen to be a little brighter, standard mode is also good.