Whether your bathroom is outdated or tacky, or you’re just in the mood for something new and different, updating your bathroom sink fixture is a pretty easy DIY project. In a few short hours, you can have a shiny, new, and clean faucet. You can even install cool tech in your bathroom, like lights or a touchless faucet (which can help you avoid those nasty flu germs). As long as you know what you’re doing, installing a sink fixture is pretty painless.
Before you get out your plumber’s belt, check out our guide on how to replace a bathroom faucet. We’ll help you get through the process from start to finish without getting water all over the place.
Things you’ll need:
- Basin wrench
- Adjustable wrench
- Plumber’s putty
- Bucket
- Bathroom faucet and package contents
- Rags/towels
- Silicone caulk
- Knife or putty knife
- WD-40
Step 1: Examine your old faucet and sink. Note the type of faucet you currently have, the connections, and the space available above and under your sink.
Step 2: Pick out a new faucet that meets the appropriate size and specifications for your sink. Most sinks will fit either a center set, single hole, or widespread faucet. Some faucets are even wall-mounted. Make sure you know what type of faucet to purchase, so you can install it properly. If you have a pedestal sink, you may have space limitations under the sink to consider as well.
Step 3: Remove everything from under your sink, so you have a clean and decluttered working area. Get a bucket and some rags ready because you will need them shortly.
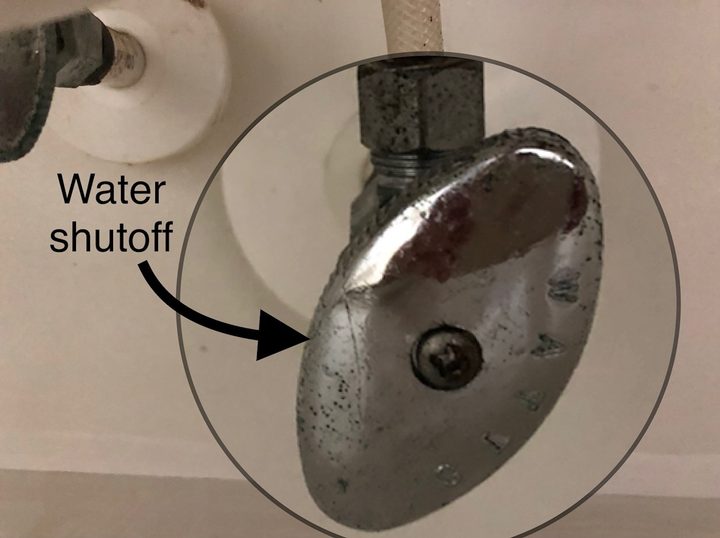
Step 4: Turn off both of your water lines. Turn each knob clockwise to turn it off. Turn on your faucet to drain out leftover water.
Step 4: Disconnect the old faucet.

Step 4a: Disconnect the p-trap. The p-trap is the j-shaped pipe under your sink that connects to the drain. Before you start removing anything, put a bucket underneath to catch any water that escapes. It is normal for water to fall out when you disconnect the p-trap. Once you have your bucket and rags ready, turn the two nuts on each end of the p-trap counterclockwise to remove them. If the nuts are too tight to disconnect by hand, use a wrench to help loosen them.
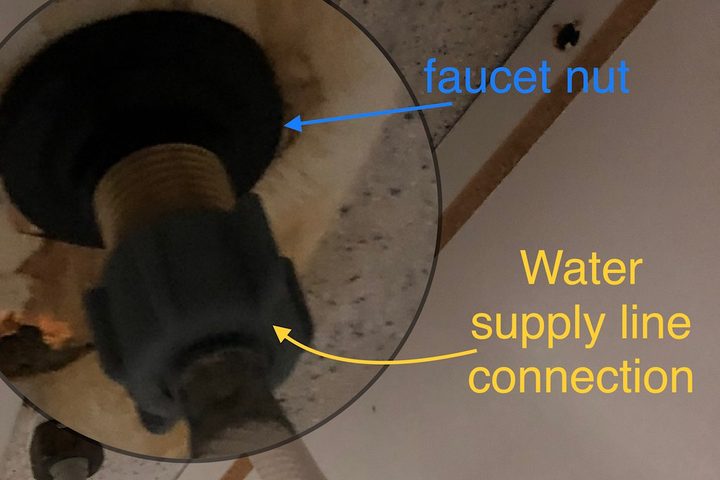
Step 4b: Disconnect the water supply line connections from your old faucet. On the underside of your faucet, you’ll see your old faucet’s nuts and water supply line connections. The water supply line connections should be located below the faucet nuts.
A basin wrench is the best tool for this, but in a pinch, another adjustable wrench you have available can do the job. Use your wrench to loosen the water supply connections from underneath your faucet. After you loosen the water supply line connections with a wrench (you’ll likely have to turn them clockwise), remove the line the remainder of the way with your hand. Make sure to catch any water that escapes when removing the water line.
Step 4c: Unscrew the nuts from under your faucet. The faucet nuts are located above the water supply line connections, and these nuts are what holds your faucet in place. You may need to use a wrench and some WD-40 if you can’t remove them by hand.
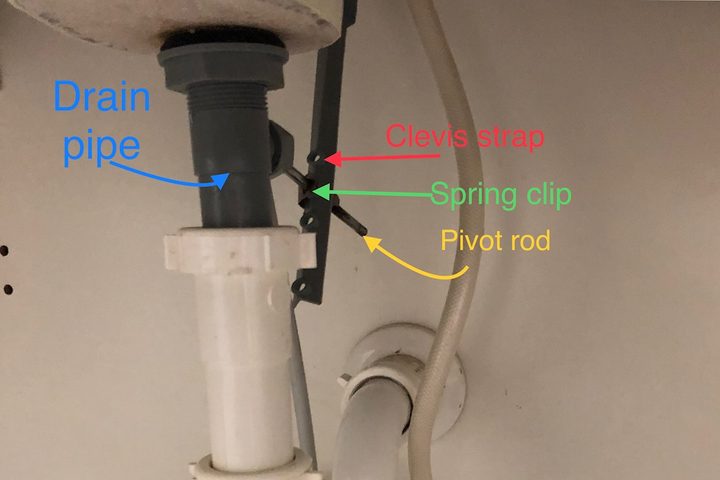
Step 5: Take out the drain. You’ll see a bar with holes in it running behind the sink and pipes. This is the clevis strap. On the clevis strap, you’ll see a little clip called the spring clip. Remove this and pull the strap through the rod so you can turn the drain pipe freely.
Unscrew the drain pipe and remove it. Use a wrench to loosen it if you can’t remove it by hand. After that, unscrew and remove the top of the drain (the flange) from inside of your sink.
Step 6: Remove the remaining parts and clean the area. You should be able to simply pull out your old faucet. Remove any old silicone caulk or plumber’s putty using a knife, scour pad, or sponge. You want your sink to look as much like a brand new sink as possible.
Step 7: Install your new faucet. Each manufacturer may have slightly different installation instructions. However, most faucets follow similar installation steps.
Step 7a: Place the gasket on the bottom of the faucet, put the faucet into the mounting holes in your sink, and then tighten the nuts to secure the faucet in place. Depending on the type of faucet you purchase, you may also have to install your faucet’s handles. Follow the manufacturer’s instructions to install the faucet handles.
Step 7b: Install the new drain. The drain sometimes comes partially assembled. You may see gaskets connected to the flange, or a drain nut screwed onto the flange. Remove the drain nut from the flange. Apply a small amount of silicone or plumber’s putty under the flange, and then position it in place inside of your sink. Under the sink, put on the gaskets and screw the nut onto the flange. Use a wrench to tighten it, as you don’t want your sink to leak.
After your flange and nut are in place, screw on the drain pipe. The drain pipe has another hole on the side of it (the pivot nut) where the drain rod connects. Make sure this hole is facing the back, or away from you.
Install the drain rod. Unscrew the pivot nut, place the drain rod inside the hole, and then tighten the nut. Slide on the clevis strap (the bar with holes in it) and spring clip.
Back up at the top of your sink, insert the down rod for your drain stopper (the thing that opens and closes your drain so you can fill it up with water) through the hole in your faucet. Guide it down through to the clevis strap, and secure the rod to the clevis strap with the screw.
Step 7c: Connect the supply lines. Your new faucet may come with new water supply lines. If you are replacing the old supply lines, you’ll need to disconnect them at the shutoff points. Then, install the new supply lines. Connect one end to the hot water shutoff valve, then connect the other end to the hot water supply line connection. Do the same for the cold water. Tighten your water supply lines, but do not over-tighten the connections.
Step 7d: Connect the p-trap. Connect both nuts on your p-trap. You want to have the p-trap pipe slightly overlap the vertical pipe (by an inch or so). You can also purchase p-trap extenders for added protection.
Step 8: Test your new faucet. Turn on the water, and let hot and cold run for a few minutes. Check for any leaks, and tighten any connections if you need to. Once everything is running smoothly, you can enjoy your new faucet.
Considerations:
- Some people choose not to replace certain parts like water supply lines. If your new faucet comes with these parts, and they are compatible with your home, it’s a good idea to replace your old parts with new ones.
- Some faucet manufacturers provide tools that will help install your new faucet. These tools can be a helpful timesaver, so it’s best to take advantage of them.
- If you are going from a three-hole to a single-hole faucet, make sure you measure the distance across the holes and get an appropriate plate to cover them.