
“The Jura GIGA 5 will make you feel like a professional barista in your home, though you’d need a lot of tips to pay for this machine.”
- Barista setting lets you step up your coffee game
- Makes coffee fast
- Milk foam feature is equivalent to boutique coffee shop quality
- Expensive
- Requires a lot of maintenance
“Why you can trust Digital Trends – We have a 20-year history of testing, reviewing, and rating products, services and apps to help you make a sound buying decision. Find out more about how we test and score products.“
What can you expect from a coffee machine that costs over $5,000? Faster service than you’d ever get from a barista and over 20 different choices of coffee drinks. The Jura GIGA 5 can do just about everything required to deliver a sophisticated cup of java, except make a cool design in the milk.
Hands on video
Look and feel
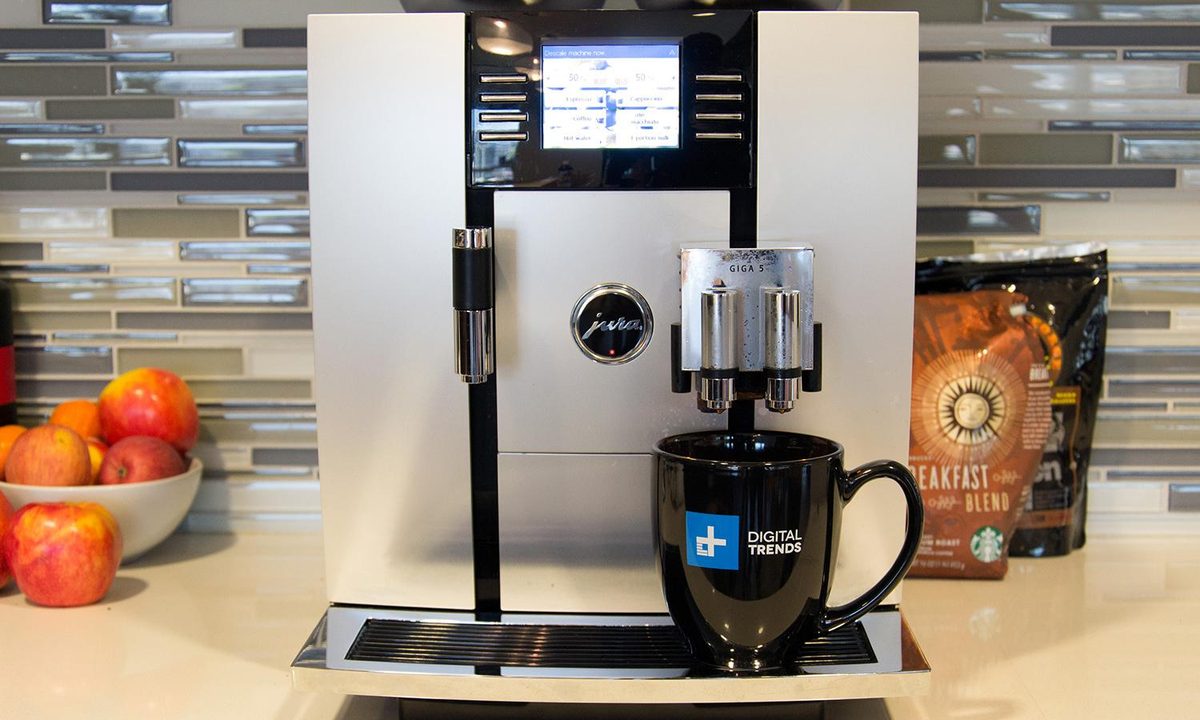
We’ll just come out and say it: The Jura GIGA 5 is one good-looking coffee machine. It’s aluminum front, slick spouts, and black plastic sides, coupled with its color TFT screen, give it an esthetic that makes it at home in any upscale kitchen. The front of the machine sports a dedicated hot water spout and two adjustable spouts for making coffee. It’s not immediately clear that the coffee spouts are adjustable, but you can easily move them up and down to accommodate different size cups. That said, the coffee spouts are part of the same mechanism, so they move together. Both spouts are used when making a single cup of coffee.
The top of the Jura GIGA 5 is just as impressive as the front. There’s an on/off button, rotary switch, and program button. The rotary switch quickly became our favorite part of the machine. First, it’s just fun to use and second, its key to navigating the machine’s menu. Oh, and it lights up red when in use, which is always a plus. You’ll also find vents on top of the machine that flap up when coffee is being made, which is reminiscent of a jet plane getting ready for a landing. Behind the vents is a hidden compartment for ground beans and a coffee scoop is hidden under a nearby black panel.


Further back are two ceramic canisters for beans. The benefit of the ceramic canisters is that they don’t make as much noise when grinding the beans. That’s not to say they don’t make noise at all, but it’s considerably less than that of a traditional grinder. However, once the cup is filled, the machine does make an unusually loud sound, as if it’s saying “Blam! There’s your coffee.” While you can put decaf beans in one and a different blend in the other, it’s not always clear from the screen which canister is being used to make the coffee.
The left side of the machine features the water tank, which holds 87 ounces of water. If you’re making 6-ounce cups of coffee, you can get approximately 15 mugs brewed. In our tests, we found that to be accurate. Though the instructions suggest changing the water daily, you can get away with adding more water every few days if you’re only making a few cups of coffee a day. In the tank is where the water filter goes. You’ll want to bring the water to the machine, if it’s installed. If you opt not to use the filter, you can easily remove the tank and fill it at a sink. It snaps back into place with ease.
The star of the machine is the TFT color display. This is what is you use to make all the magic happen. On a machine this slick, you’d think it would be a touchscreen. It’s not. You use the corresponding silver rectangle-shaped buttons to make menu selections. Navigating the menu isn’t immediately intuitive, since it involves using the rotary switch to choose selections and pressing the corresponding buttons to activate the machine. Once you get the hang of it, using it to pick settings and make coffee is insanely easy.
If you like strong coffee, the Jura GIGA 5 won’t disappoint.
There are tons of settings on the screen. It’s time well spent to go through them all, and learn what they do. You can adjust things like coffee strength (they all make a pretty strong cup of Joe), the menu background (there are seven options), and Expert mode. When you first set up the machine, go into Expert mode; this is where you can adjust things like volume, grinder, coffee strength, and water temperature. Getting out of the menu is a little confusing, and you can get trapped in an endless cycle. Press “P” when it appears, and you can get out of anything. It works just like a “back” button.
Features and use
Physically setting up the Jura GIGA 5 is as easy as taking it out of the box, plugging the cord into an outlet, and switching the master power button in the back of the machine to on. It does weigh close to 40 pounds, so it’s not exactly lightweight. You only have to take it out of the box once, so that’s not really an issue. It comes with a welcome kit that includes two water-cleaning tablets, a ClearylBlue water filter cartridge (plus attachment), cappuccino cleaner, two clear tubes for the milk, and plastic splashguard.

When it comes to features, the Jura GIGA 5 is fully loaded. There’s definitely a reason most of the videos on it are about eight minutes long. As mentioned, you can make two cups of coffee simultaneously. The machine doesn’t take powdered milk, and the liquid is kept separate in your own container. When you want to make fancier drinks that involve steamed milk, simply attach the included clear tube to the side of the dual spout and put the other end in a container of milk. You will end up with a cappuccino that could come from any gourmet coffee shop.
Beware; if you don’t have enough milk in the container steam will shoot up from the spouts. The good news is that it’s not hot enough to burn the skin, but it’s far from pleasant. That’s where the settings come in handy since you can select how much milk to add. Here’s the interesting thing about that setting: it’s in seconds. So you choose how many seconds you want of milk. It’s a lot of trial and error to get the setting just right. You’ll also need to wash the tube out frequently. It can’t go into a dishwasher, so if you let a lot of milk residue build up this can be a task. Not everyone at the Digital Trends office was diligent about this, so our tubes got funky, fast.
Speaking of cleaning, it’s also a self-cleaning machine. It likes to be cleaned a lot. During testing, we had to perform the cleaning a couple of times. For reference, we had made about 20 cups of coffee. Cleaning doesn’t take that long – for example, rinsing the milk system takes 50 seconds. Emptying the used grounds and splash tray is fairly straightforward; it is a bit cumbersome because of the size and shape of the removable section. It can take up to five minutes to clean the machine properly. While there’s a removable splashguard that gets placed in line with the dual spouts, there is quite a bit of splatter. After a couple of months of use, we did start to see some scuffs on the machine.
It’s also a self-cleaning machine, and it likes to be cleaned a lot.
The basic settings on the machine aren’t all that basic at all. For each drink you make, you can choose coffee strength (one to five beans), size, water temperature, and amount of milk and milk foam when applicable. It’s up to you to decide just how much customizing you want to do. In the main menu, you can make one or two cups of the following: latte macchiato, cappuccino, espresso macchiato, coffee, espresso, and ristretto. In this setting, the machine does all the work for you. If it requires milk, you’ll need to make sure the right amount is in the adjacent cup. It’s the Barista menu that has all the fun drinks: Marocchino, Pepresso, White Cool, Flavored Latte Macchiato, Irish coffee, Café Mélange, Vienneses, Winter Magic, Shakerato, Mango Lassi, Red Cool, and Summer Fire. When making a drink using the Barista setting, the screen walks you through the steps. The nice thing is you don’t have to feel rushed, since it doesn’t move onto the next step until you select it.
In our tests, we made all of the basic coffee options and a few Irish coffees. We have to admit, making the Irish coffees were fun to do. How long it takes to make the Irish coffee depends solely on how fast you move. In the end, they tasted like coffee with some booze in it. We did appreciate that when making the Irish coffee, the booze isn’t added at the end like a second thought.
Performance and taste
We’re just going to admit it; we’re still a little jittery from all the cups of coffee we made and tasted during testing. Yeah, we’re dedicated like that. In our tests, we measured coffee temperature, how long it took to make, and overall taste. According to the National Coffee Association, coffee temperature should be maintained at 180 to 185 degrees Fahrenheit. For some, that still might be too hot to drink, for example the McDonald’s coffee lawsuit found that 175 degrees is a safe temperature. Here are our results:
Brew |
Temperature (Farhenheit) |
Brew time |
Coffee Amount |
Amount of Cups |
Taste |
| Coffee | 153.1 | 60 seconds | 8 oz | 1 | Balanced |
| Coffees | 150.4 | 1 min 26 seconds | 8 oz | 2 | Balanced |
| Cappuccino | 130 | 48.2 seconds | 3 oz/13 seconds milk foam | 1 | Strong/perfect foam |
| Cappuccinos | 130 | 1 min 29 seconds | 3 oz/13 seconds milk foam | 2 | Strong/perfect foam |
| Espresso | 133.6 | 28 seconds | 1.5 oz | 1 | Strong |
| Espressos | 134.5 | 35.5 seconds | 1.5 oz | 2 | Strong |
| Macchiato Latte | 129.2 | 1 minute 8 seconds | 4 oz/4 seconds milk/10 seconds milk foam | 1 | Balanced |
| Macchiato Lattes | 129 | 1 minute 16 seconds | 4 oz/4 seconds milk/10 seconds milk foam | 2 | Balanced |
We measured taste based on the type of coffee you would expect from a professional barista. If you like strong coffee, the Jura GIGA 5 won’t disappoint. It does brew some strong coffee, whether you’re using grounds or fresh beans. Some might find the coffee too strong, which is when the hot water spout comes in handy. You can easily add a splash of hot water to help dilute the taste.
Making a basic cup of Joe or a fancier beverage with this machine really is quite straightforward and literally takes just a minute. When you’re only making one cup, the dual spouts are both used. In the case of a cappuccino, the two spouts leave two dots in the foam when it’s done. Perfectionists who like to see an even sea of milk foam span the top of a cup might be a bit disappointed. That said, it makes a darn good cappuccino with perfect foam consistency.


We did find making two cups of coffee simultaneously was a little challenging. You need to place the cups close together under the spouts to make sure the coffee makes it into the cup. If you have mugs that are odd shaped or have thick rims, this could be difficult. Seriously, this shouldn’t deter you since you can make a second cup in a minute.
The DT Accessory Pack
Ozeri Moderna Artisan Series Glasses ($19)
If you’re going to have an espresso machine, you need espresso cups.
Death Wish Coffee ($20)
Really, really like strong coffee? These beans are called Death Wish.
Jura Milk Cooler ($200)
Need a cappuccino at a moment’s notice? This cooler keeps milk fresh.
Conclusion
There’s no denying the Jura GIGA 5 is the Ferrari of coffee machines. It has all the bells and whistles anyone could want, and it’s got the looks to fit in the most high-tech of kitchens. The coffee it produced was strong to some, but the machine quickly replaced the three other options here at Digital Trends as the office darling. Well, once everyone got a hang of the machine, which does take some time to get to know.
Like a Ferrari, maintaining the coffee machine takes time and dedication. Although it has a lot of self-cleaning features, you need to stay on top of it to keep it pristine. As it was often said around the office, “You need a maid to keep up this machine.” As we were quick to point out during testing, “If you can afford a $5,000 coffee machine, you probably already have a maid.”
Highs
- Barista setting lets you step up your coffee game
- Makes coffee fast
- Milk foam feature is equivalent to boutique coffee shop quality
Lows
- Expensive
- Requires a lot of maintenance