
“Why you can trust Digital Trends – We have a 20-year history of testing, reviewing, and rating products, services and apps to help you make a sound buying decision. Find out more about how we test and score products.“
“Luminar 2018 simplifies photo-editing for amateurs and pros.”
Editing a photo can be as easy as applying a one-tap filter in Instagram or as complex as creating a multilayered piece of artwork in Adobe Photoshop. Macphun Luminar 2018 is the in-between, covering the gamut from easy to advanced.
We had a sneak peek of the product back in October, but the company announced the final product will be available on November 16, 2017 (discounted pre-orders are being taken now). In addition, the once Mac-only software will come to Windows, however, certain features will not show up in the Windows version until later. (The company will also change its name from Macphun to Skylum in 2018, to reflect its new position as a multi-platform developer).
Macphun says Luminar 2018 was rebuilt from the ground up to enhance the performance, with the same tools from previous versions, plus some new options that deliver results in less time. While some new features, like a digital asset manager (think Adobe Lightroom’s Library), won’t be launching until next year via a free software update, we took a spin with a pre-release copy for our Luminar 2018 review. What we found is an affordable and excellent photo editor that will appeal to amateurs and pros alike.
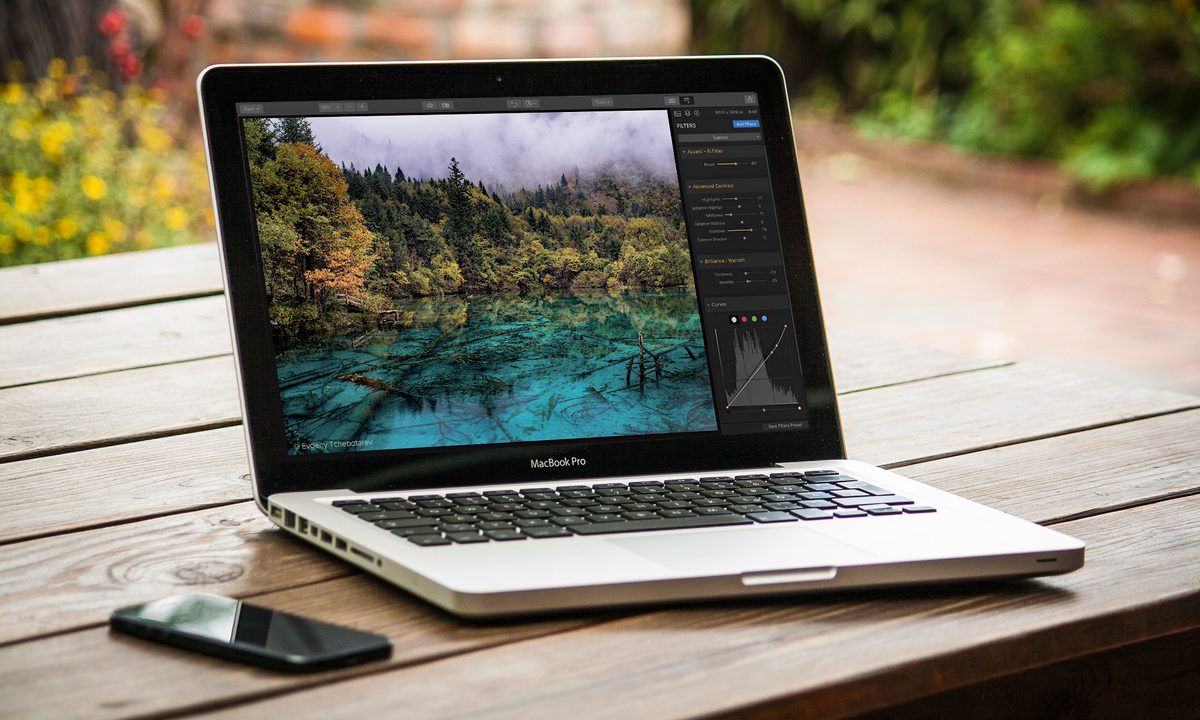
User interface
The controls in Luminar 2018 are familiar enough for photographers who have used other editing platforms, including Adobe Lightroom and Adobe Photoshop, to make an easy transition. But when it comes to workflow, Luminar 2018 has a few, essential differences.

Upon launching Luminar 2018, you’ll find a menu of presets along the bottom. Essentially filters, presets let you entrust the software to apply edits automatically and quickly. It’s not only ideal for those who don’t have the time, patience, or experience to deal with photo editing, it’s great for advanced users as a means to get a head start on the editing process — have the computer do the brunt of the editing, and then go in and fine-tune it.
Presets are organized by category, including the type of edit (basic or “dramatic”) as well as the type of photo, like portrait or street. Users can also save their favorites to organize the most used options into their own category.
Luminar 2018 simplifies editing for amateurs and pros alike.
Each filter has a percentage slider that lets you adjust the overall intensity. At the same time, clicking on a preset opens a workspace on the right, which displays all the settings that you can tweak specifically.
For example, the Auto Smart Enhancer is a preset that uses artificial intelligence to analyze and enhance all aspects an image. We thought the preset did a good job adjusting the exposure and contrast, but it also bumped up the saturation of the colors. For more control, you might prefer to make colors pop using the hue, saturation, and luminance (HSL) sliders. Simply by dragging the saturation slider back down, you can override that single aspect of the Auto Smart Enhancer and move on to adjust colors manually through HSL. In short, Luminar never locks you in to a preset’s default settings.
You can bypass the presets, of course, and start the photo-editing process from scratch. You can either select a workspace from popular options (e.g., portrait or landscape), or add specific sets of adjustments individually. The latter lets you add only the settings you need while leaving the unneeded tools out of the workspace for a clutter-free interface.
Each customized workspace can be saved. You can create a workspace dedicated entirely for color correction, exposure, or special effects, for example. Customization options are seemingly endless, and it’s one of Luminar 2018’s biggest strengths.
Luminar also allows for localized edits, as every adjustment can be selectively applied using the brush tool. This is one of the ways in which Luminar combines the one-click simplicity of presets with the advanced editing features of a program like Photoshop.
Editing experience
Luminar is a sort of mix between Lightroom and Photoshop. Sure, the image management feature isn’t here yet, and it’s not the graphic design powerhouse that Photoshop is, but it mixes the broad strokes of RAW processor with the fine tuning abilities of a powerful image editor, including support for adjustment layers. For the unfamiliar, layers allow users to choose different blending modes — similar to Photoshop — as well as adjust the opacity. With layers, you also have options for masking and copying entire sets of adjustments. These layers can be removed, and you don’t “damage” the original image, and it’s why photo-editing experts rely on layers in their workflow.
Luminar 2018 adds a number of unique filters and adjustments. One favorite of ours is the sunrays filter, which lets you add artificial light rays and adjust the glow of the surrounding area. When done right, the effect looks realistic.


Dodge and burn is also new, and it mimics a technique from film days. While it isn’t new to photo editing, Luminar 2018 simplifies the tool so that it’s easier to use. Another tool we like is a digital polarizing filter that adjusts the intensity of a blue sky without requiring any masking.
While the brush tools are certainly useful, we missed Lightroom’s ability to change brush size with a simple swipe on a trackpad or flick of a scroll wheel. Luminar 2018 also doesn’t include an auto-mask option, where the computer helps detect the edges for a more accurate selection. And with some tools, like the healing brush, we found working on a 45-megapixel file a bit slower in Luminar 2018 compared to Photoshop.
Excellent mix of editing tools for pros and amateurs
Luminar 2018 mixes some of the best tools from the most popular editing programs with automated presets, easy-to-use sliders, and layers. The program’s customizable workspaces let you turn on the features you use often, and hide away those that you won’t ever use.
Luminar 2018 adds a number of unique filters and adjustments, like sun rays and dodge and burn.
The promised 2018 update will make the program more comparable to Lightroom, but Luminar offers a few tools Lightroom doesn’t, including the sunrays filter and polarizing filter. On the other hand, Lightroom offers a handful of features not found in Luminar, including auto-masking options and faster healing brush performance.
Macphun told Digital Trends that it doesn’t expect Luminar to unseat Lightroom or Photoshop, but it does see it as a strong contender. In fact, the company sees customers using Luminar, Lightroom, and Photoshop together. And Luminar complements Adobe’s products, as well, via Lightroom and Photoshop plug-ins. You can apply a preset to a photo in Luminar, and then fine-tune the image in Photoshop, for example.
Luminar sells for $69 for new users or $49 for owners of earlier editions, with a $10-off pre-order discount until Nov. 16. The same software license can also be used on up to five different computers within the same household. As a newcomer to the family, the Windows version won’t immediately have feature parity with the macOS version. Certain workspaces, clone and stamp tools, blend modes, luminosity masking, flip and rotate, and a few other features will arrive via a free update by the end of the year.
Overall, Luminar 2018 is an excellent photo editor for beginners and hobbyists, with enough features to appease even some professional photographers. For photographers looking to break away from Adobe’s Creative Cloud subscription platform, Luminar is worth their time to try the free trial and see if the tools match their style and workflow.


