Rebellion Developments pulled off something special in Sniper Elite 3. Once a game that hinged on a presentation gimmick — its gory x-ray kill cam — the studio reinvented the series in its third effort by offering up more of a sandbox experience (which it expanded even more in Sniper Elite 4). Instead of blasting the heads off of Axis forces as you move from point A to point B, you’re presented with a large, freely-navigable space and an open-ended set of objectives. Relying on a mix of cunning, observation, and reflexes, you fight to bring the German war machine to its knees.
That freedom also makes Sniper Elite 3 more difficult, with various objectives to tackle and no clear way of dealing with them. You’ll often find yourself surrounded by enemies with an objective on the other side of the map. To help you defeat the Nazi forces and make your mark as a sniper, we’ve compiled a list of tips and tricks in this Sniper Elite 3 beginner’s guide.
Hit the range
Sniper Elite 3 has a short and effective tutorial during the opening moments of its first level. However, during those opening moments, you’re given a total of three targets. If you’re new to Sniper Elite or just brushing up on your skills, that’s not enough. Make sure to head to the shooting range before deploying for your mission. Not only will you get a chance to hone your sniping skills, but you can also try out the four rifles, four submachine guns, and three pistols in the game. You only have one weapon in each category unlocked from the start of the campaign, so the shooting range provides an opportunity to familiarize yourself with all the tools Sniper Elite 3 gives you without Nazis swarming your position.
Customize your difficulty

Sniper Elite 3 comes with four difficulty presets: Cadet, Marksman, Sniper Elite, and Authentic. The two middle levels are the best options for most players. Marksman is far more forgiving, presenting a reasonable challenge while only touching on Sniper Elite 3′s ballistics system. Sniper Elite, on the other hand, has more realistic ballistic simulations and tougher enemies (“tougher,” in this case, means “more aware”). There are a lot of differences between the four presets, with Authentic going as far as to remove manual saving from the game entirely.
Given Sniper Elite 3′s sandbox approach, the different difficulty levels are mainly around for additional playthroughs. You don’t have to stick with the four presets, though. After you set your preset, you can adjust enemy skill, ballistic realism, and tactical assistance. If you want a Realistic experience but still want to save, for example, you can max out enemy skill and ballistic realism while lowering tactical assistance on a lower difficulty level. That will, effectively, give you the experience of a Realistic playthrough, just with the ability to save.
Control your running

As we’ll get to in a moment, running is a vital part of staying alive in Sniper Elite 3. Whenever you pull the trigger, nearby enemies will start rushing to your area; there are no silenced rifles in Sniper Elite 3. Although running to vacate a compromised position is an effective tactic, you should limit your running otherwise. As you run, your heart rate increases, making it more difficult to empty your lungs and pull off a clean shot.
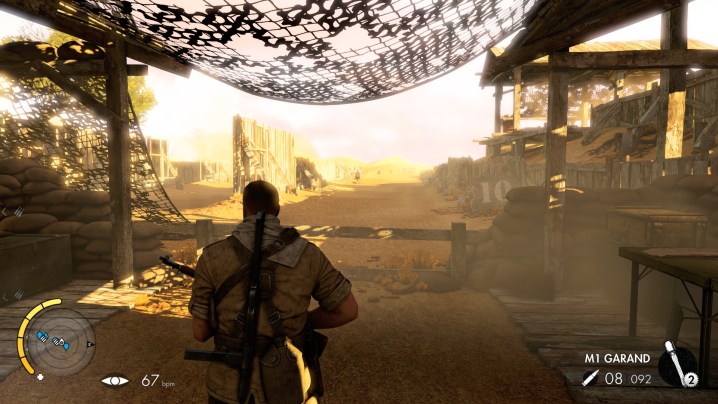
Sniper Elite 3 uses a (now tired) mechanic of emptying your lungs and steadying your aim before pulling the trigger (entering this state even pulls up a marker of where your bullet will hit). What the game fails to mention is that you can only empty your lungs if your heart rate is 80 beats per minute (BPM) or lower. You can find your heart rate in the bottom-left corner of the screen. Running, no matter if it’s the standard light job or an all-out sprint, raises your heart rate, and once you reach your position, you’ll have to wait until your heart rate drops.
Here’s a rough breakdown: When crouched or prone, your heart rate will never exceed 65 BPM. Prone is much slower, so crouching should be your default state unless you’re in the clear and have a lot of ground to cover. Walking — or more accurately, lightly jogging — brings your heart rate closer to 90 BPM and never exceeds that mark. Sprinting breaks the 90 BPM ceiling, forcing you to wait multiple seconds after stopping to steady your aim.
Keep your eye on the prize
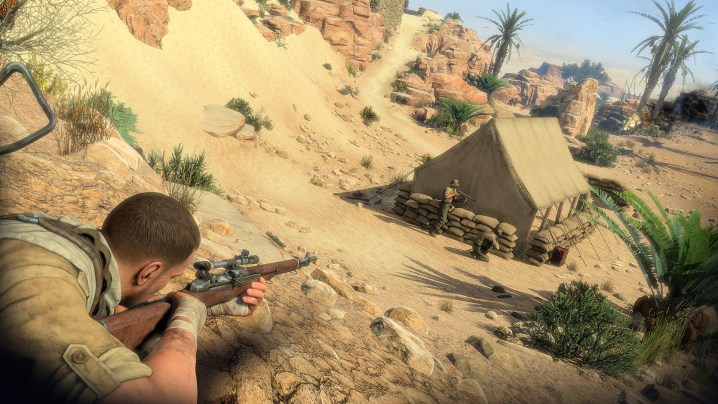
Half the battle in Sniper Elite 3 is awareness. You need to know where your enemies are and what they’re doing. When you reach a new area, scout for a high position to spot enemies before taking them out.
Making use of your binoculars is key when spotting. Even the stock optics have a much stronger zoom than any of the game’s four sniper rifles, and you can upgrade the zoom range even further by picking up certain collectibles. Once you’ve spotted an enemy through your binoculars, press RT to tag them. Note, however, that you can only have a certain number of enemies tagged at any one time. Look at the bottom-center of the screen when you’re peering through the binoculars to see how many tags you have active and how many you’re allowed to have in total.
Tagged enemies remain visible in the HUD even when they’re not in sight. With the way most maps are laid out, it’s best to tag them in groups and then take them out one by one before moving on to a new patrol area. In addition to enemies, you can tag vehicles, too. Doing so will reveal the vehicle’s weak points, allowing you to blow up a patrol car before the soldiers inside have a chance to deploy.
Tactical awareness

Spotted enemies stay visible on your HUD — outside of Realistic mode — and the same is true for alert enemies. There are three levels of alertness: White, yellow, and red. Unalert enemies are shown with a white circle. They don’t know that you’re there, they haven’t heard any suspicious noises, and they’ll continue their normal activities. Enemies marked with a yellow circle are alert, but they’re not searching for you. At this level, enemies will stop and look, but they won’t investigate. If you make a small noise or slip out of cover at range, enemies will go to this status and often stay there for a while.
A red circle means the enemy will start searching. They’ll break from their route and actively investigate either the area of a noise or an area where they spotted you. It’s worth pointing out that if you move too much while enemies are suspicious (yellow) and they spot you, their circle will slowly fill with red, indicating that the enemy can see you. Finally, when the center of the circle goes red, the enemy knows where you are and will start attacking you.
Knowing the status of your enemies is vital when you’re surrounded, but you should constantly be thinking about it. Like any good stealth game, enemies will spot their fallen comrades and investigate the nearby area. The goal is to make your way through the map without being spotted, no matter if that’s directly or through an enemy you’ve already taken out.
Rummage and hoard

Resources aren’t exactly scarce in Sniper Elite 3, but you can only carry a limited amount at a time. The sniper rifle itself always comes with a generous amount of ammo, but you only get three clips worth of machine gun ammo and two clips worth of silenced pistol ammo. Bandages, medkits, and various explosives and traps also cap out at two apiece. Unless you’re just sniping — which is very difficult to pull off — you’re going to dip into these supplies before long.
Keep an eye out as you explore for pickups on the ground and open crates filled with goodies. It’s very easy to keep your supplies topped off if you’re vigilant. Be sure to loot the bodies of any enemies you take out. Not only does this provide valuable resource recovery, but looting certain, specific enemies also rewards you with one of the 15 collectible Weapon Upgrades (including binoculars).
For a rundown of all Weapon Upgrade locations (and every other collectible in the game, for that matter), check out YouTuber Maka’s extremely thorough rundown on GameFAQs.
Using sound as a distraction
Sniper rifles make a lot of noise when they fire. Because there’s no silenced option available in Sniper Elite 3 (with the exception of the Welrod pistol), you’ve got to go loud whenever you want to take out enemies from a distance. Fortunately, there’s a feature called “sound masking” that allows you to use ambient noise in the environment to conceal the noise generated by your sniper fire. It’s simple, really: Whenever you see a mirrored set of pulsing lines (looks like three pairs of parentheses facing each other) at the top-center of the screen, you can fire any unsilenced weapon without giving your position away.
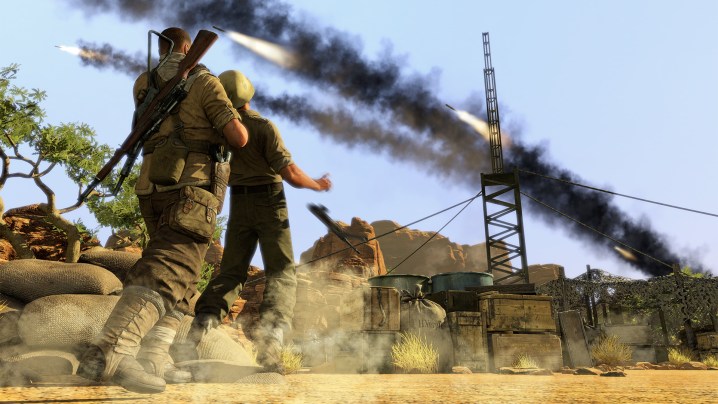
Sometimes the sound-masking noises are generated by objects in the world, such as a backfiring truck or a manned anti-air emplacement. These can be effectively “turned off” by alerting or killing the troops connected to the source of the noise, so it’s best to use the masked sound as much as you can to take out other enemies on the map before you kill the source of your sound-masking.
You also sometimes come across power generators of varying sizes. Interact with one to kick it a few times, causing it to backfire at regular intervals. This masks your unsilenced shots as well as an anti-air turret would, though generators don’t last forever. Try to do all of your spotting before you break the generator to better maximize your sound-masking time. Also note that in all cases, you’ve got to be close to the source if you want to hide your shots. If you hear a zooming plane overhead or a truck backfiring but don’t see the sound-mask icon, then you’re too far.
Using sound as a weapon

Sometimes, it’s impossible to wait on sound or other distractions when you want a clear shot. This is the time when you should make sound into your weapon. Since there aren’t any silenced rifles in Sniper Elite 3, you will signal any close by foes if you fire off a shot or round without causing a simultaneous distraction. It’s possible to use your shot as misdirection, but you could give yourself away entirely if you don’t do this carefully. It’s likely that you’ll come across multiple enemies in only a short distance, and you know battling them all at the same time will probably end in your demise. We suggest using your weapon’s sound to lead your adversaries into a trap so you can annihilate them all in one round.
If you blow something up close to your location, your opponents will move toward the sound while you can escape to another position. Keep an eye on the dynamite so you can see if your rivals are close. After you know where you’re headed, take a shot at one enemy or a random selection. Then, move to your new spot and wait patiently. Your enemies will arrive at one single destination, creating a single target. From here, you can aim and shoot at your dynamite to blow them to pieces. You can also achieve this same task using a tripwire. It doesn’t matter how you gather your enemies. Sniper Elite 3 is a sandbox, and it often rewards you for playing in the sand.
Save early, save often

Like Hitman or any other sandbox stealth game, Sniper Elite 3 concentrates on trial and error, which means manual saving for you. As long as you’re not using Realistic mode, you can save your game as often as you feel necessary. We suggest you hit save before and after you confront an enemy because then, if you make a mistake, you can go back and restart from your last saved location. Everyone can benefit from a second chance. It’s common to wreck encounters in Sniper Elite 3, but this also allows you a save to ensure that you’re still progressing in that particular level of the game.