Although upgrading to the best graphics card (also know as a graphics processing unit, or GPU) is arguably the best way to improve your PC’s 3D rendering ability, you can eke out a little more performance from your existing card with overclocking.
Much like a CPU, a GPU contains chips that with the right tweaks can work harder and faster. That can mean better benchmark results and higher frames per second in your favorite games. Although still a little intimidating and certainly not friendly to your graphics card’s temperatures, learning how to overclock your GPU is easier today than it’s ever been. You just need the right tools, the right steps, and plenty of patience. Let us help show you how to overclock your graphics card GPU.
A word of warning
You can overclock a CPU, and you can overclock RAM. But overclocking anything has inherent risks. They are relatively low, but they are important to consider so that you’re well informed before starting. Overclocking anything involves the process of forcing it to perform at a faster rate than it was manufactured to do so. That means you are pushing it harder and by working faster, it will get hotter and it may become less stable. That could result in crashes in the short term and over the long term, could reduce the lifespan of your particular hardware.
There’s a chance that overclocking your hardware may void your warranty too. Many manufacturers allow it, as graphics cards will throttle up and down during general usage anyhow. However, serious tweaks like playing with voltages or flashing your graphics card’s BIOS are more likely to impact any warranty you have. The best bet is to double check with your manufacturer whether what you’re doing affects the warranty before beginning.
Although we will do our best to guide you along the path to a faster, more powerful graphics card, Digital Trends accepts no liability for any problems you run into with your hardware along the way.
Overclocking a graphics card is also only recommended for desktop PC users. Although in some cases you can overclock laptop GPUs — including Intel HD chips — it’s not usually recommended due to temperature concerns.
Step 1: Get ready
Before you can actually get started overclocking your GPU, you need to get everything ready. The first step, if you don’t know already, is figuring out which graphics card you have. To do so, you can take a look at the card itself, or the packaging if you still have it. If that doesn’t work, right-click your desktop and click either the Nvidia or AMD graphics settings link, followed by My Rig or System, respectively.
If you’d rather use a manufacturer agnostic solution, GPUZ can tell you everything you need to know about your graphics card.
Once you know exactly which graphics card you’re running, you should update to the latest graphics drivers. You can find those on Nvidia and AMD’s websites. Upgrading them will likely require a reboot, so make sure to come back to this guide when you’re done, or read on before continuing. Our list of the best GPU overclocking software will help you make the right choice.
Before starting the overclocking proper, you’ll also want to download some useful tools to help you along. First, you’ll want to download the overclocking tool we’re going to be using for this guide: MSI Afterburner. Although AMD has its own Wattman alternative and there are several other popular third-party tools, Afterburner works for just about every graphics card and offers a full suite of features.
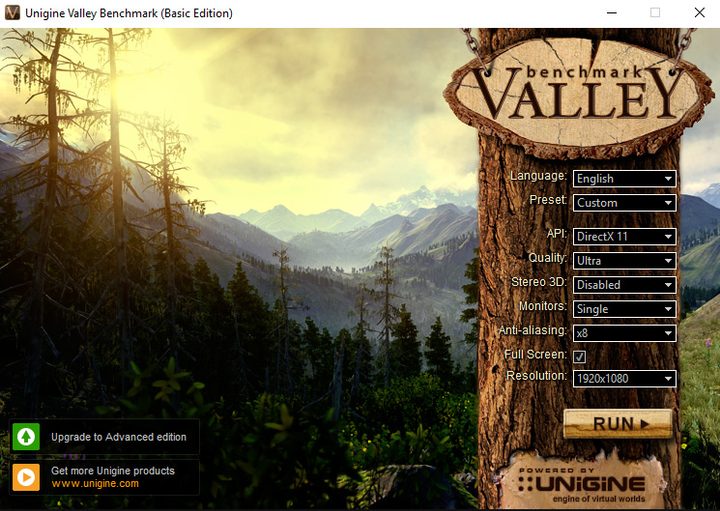
You’re also going to need a benchmark to test the stability of your new graphics card. A proven, lightweight benchmark is Unigine’s Valley. We also like Furmark for its built in temperature readout, but it’s more of a synthetic test. If you have any games with built in benchmarks you may want to have those installed and to hand, so that you can see what effect your new overclocks have on performance.
If you haven’t cleaned your PC in a long time, this is also a good time to do so, as any extra dust in your system can heavily contribute to GPU temperature spikes during overclocking. It’s not a mandatory step but is certainly advisable before you get started.
Step 2: Establish baselines
The next step in your overclocking journey is establishing baselines. You want to know your system’s standard clock speeds (for both the core and memory), as well as its standard operating temperatures (both idle and load) and its standard performance.
To find out those figures, close down any applications that are already running and startup MSI Afterburner. Although you can customize the look of Afterburner to how you see fit, to make sure we’re all on the same page about the location of different elements, locate the cog Settings button and click it. Use the top-tab navigation arrows and select User Interface. Then in the User interface skinning properties heading, use the drop down to select Default MSI Afterburner v3 skin, and click OK.
If you need to, use the temperature settings to convert readouts to Celsius or Fahrenheit depending on your preference.
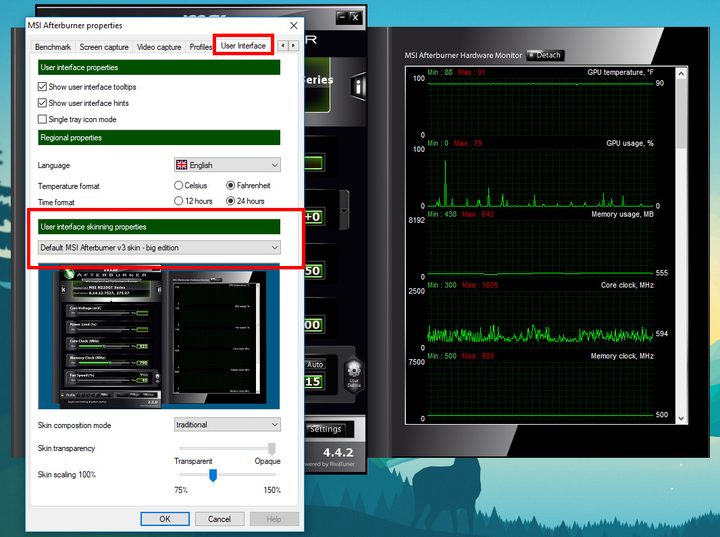
The graphs on the right-hand side will tell you most of what you need to know at this point. The top one is for your graphics card’s core temperature. It can run anywhere up to 176 degrees Fahrenheit without much difficulty, but anything beyond that gets dangerous for your hardware and can result in crashes or even damage, so it’s important to be aware of your GPU’s temperature at all times during overclocking and subsequent testing.
The other figures to be aware of are core clock and memory clock. Those are the figures that we’re going to be tweaking during overclocking. The “Min” numbers on those graphs are the idling speeds, while the “Max,” figures are the ones that your graphics card will typically use when it’s working hard at rendering a game or benchmark. That’s what we want to raise to improve performance.
The final number(s) to find out before we start overclocking for real, is an idea of your graphics card’s performance. Run the Valley benchmark you downloaded earlier using the Extreme HD preset, or with everything at maximum quality, fullscreen, and at System resolution.
Note: Press F9 during the demo to begin the benchmark.
If you want to note down some additional performance numbers before beginning, you may also want to run Futuremark’s 3Dmark, or any modern game with its own built-in benchmarking utility, like Shadow of Mordor or Rise of the Tomb Raider.
Step 3: Slow and steady
Overclocking might be easier today than ever before, but that doesn’t mean you should rush into it headfirst. Overclocking is most successful when you take your time and take precautions along the way. Make sure that during your baseline benchmarking that Afterburner’s temperature graph doesn’t show any dangerous peaks. Anything over 176 degrees Fahrenheit would suggest you need to improve PC case cooling for overclocking.
Also make sure that in the Afterburner window the Apply overclocking as system startup, box isn’t ticked. That forces your newly designated clock speeds to startup with Windows and you don’t want that until you have found a stable overclock.
If you have some temperature headroom, start up the Valley stress testing application again, but this time run it in Windowed mode. In the Afterburner window, raise the power limit to its maximum percentage — that lets your GPU draw as much power as it needs for the settings you put into it and avoids any automated throttling. It will not affect the voltage put through your chips.

Make sure Valley is running and return to the Afterburner window. Using either the slider or by typing in the number yourself, raise your clock speed by 10MHz. Once that’s done, reopen the Valley window and watch for any visual “artifacts.” These are visual signs that your graphics chip is working too hard and can manifest as tiny blocks of miscolored pixels, or large shard-like bands of color. If you don’t see any of those after a minute or two, return to the Afterburner window and repeat the process.
Repeat that time and again until you see artifacts, or until Valley itself crashes. If you push things too far, you may see a black screen as your graphics driver crashes or your entire system reboots. Don’t fret, you just went too far. Dial things back a couple of steps (20Mhz or so) and run Valley again. This time let it run through a couple of loops. If everything is stable you’ve found a safe maximum for your GPU.
Once you have found the limit for your core, note down that value, reset the clock to its default and perform the same process on the GPU’s memory clock. This time you’re looking for artifacts that represent as solid blocks or blobs of color. Again, once you’ve reached the limit, roll back a couple of steps and perform a longer stability test. Once you’ve found your limit, note it down and reset everything.
Step 4: Bring it all together
Now that you have your individual maximums for both core and memory clocks, it’s time to combine them. It’s unlikely that you’ll be able to use the full maximum overclock for both at the same time, as both put additional stress on your graphics card, but it’s possible. Your best bet is to start at the bottom again though and raise both values together. Know what the maximum is and be ready for artifacts and crashes as you approach it. As before, once you find the limit, roll back a step or two and perform longer stability tests. You can then raise one or the other individually if you like, to see if either, in particular, was the cause of the stability issue.
Once you have your stable dual-maximum overclock for both core and memory, it’s time to perform some real stability testing. Let the Valley test run through several times in a row, play some games for a few hours — and keep a keen eye out for problems. If you encounter any, scale back the clocks a single step and start again.
Although this process can seem arduous, it’s the final big step in making sure your system can run at these clocks all day, everyday. Once you’ve found it, you can — if you like — use Afterburner to trigger these settings every time your PC boots up.
You now have a permanent GPU overclock. To find out how much of an improvement you’ve made, run all of your gaming benchmarks again and see what your new scores are compared to the old ones.
Hopefully, that boost should keep you gaming at your favorite resolution and detail settings for longer.
What about voltage?
One of the ways in which you can increase stability and viability of some core clocks is by increasing the voltage pushed through the chip, otherwise known as Core Voltage and abbreviated in Afterburner as “mV.” Increasing voltages is disabled in Afterburner by default as it has a much greater impact on your system than other settings. Increasing voltages can reduce the lifespan of your graphics card and even damage it irreparably if used irresponsibly. It can also lead to a large increase in the amount of power your graphics card draws, reducing the card — and by extension, your system’s — efficiency.
Although Afterburner has its own limits that are unlikely to allow you to stress your card too much, because every card is different, if you want to try out mV adjustment, do a quick Google search for your particular card to find a safe limit. You can enable voltage adjustments in the Afterburner settings menu.
With that said, use it much the same way you would frequency adjustments. Raise it in small amounts to see if it allows for a more stable overclock — or increased clocks. Regularly check your GPU temperature and if you encounter any problems, scale it back. Make sure to test for stability as you did with all previous changes.