
Digital cameras, from DSLRs to your phone, are constantly making it easier to get better pictures, but that doesn’t mean we always get perfect results. There are still situations that can fool our cameras, leading the images that come out too bright or too dark.
Fortunately, there’s an easy way to correct this even if you don’t understand manual exposure settings thanks to a tool called exposure compensation. It may sound complicated, but exposure compensation is actually an easy way to adjust brightness on virtually any camera, including your phone.
What is exposure compensation?
Simply put, exposure compensation is a quick way to adjust the exposure value (EV) of your camera’s metering system. When you increase the EV value, you are making an image brighter; decreasing it will make an image darker. Exposure compensation doesn’t tell you how the image is made brighter or darker, but that’s the whole point: You don’t have to worry about shutter speeds, f-stops, or ISO settings.
For cameras that offer manual controls, note that exposure compensation doesn’t actually affect your images if you are already shooting in manual mode — but it will work in both shutter and aperture priority.
Photography 101
- Shoot better photos at the golden hour
- How to use a histogram to expose photos
- Exposure, aperture, shutter speed, and ISO
- The rule of thirds and how to use it
- How to take great actions shots
It’s important to understand that exposure compensation isn’t the same as setting exposure manually or using exposure lock — your exposure is still automatic and the camera may make adjustments from shot to shot as the light changes. But if you are in a situation where you know your camera is prone to underexpose or overexpose, using exposure compensation will tell the camera to sway from what it thinks is right to what you think is right.
If, for example, you’re trying to photograph something indoors in front of a bright window, your camera may want to expose for what’s outside the window, causing your subject to be too dark. Adding +1 or +2 EV of exposure compensation can fix this.
Where is the exposure compensation setting?

On a phone, the location depends on the specific app you are using, but you can generally find exposure compensation in the default camera app simply by holding your finger down on the screen. This will lock focus and exposure on that area of the frame and allow you turn the brightness up or down simply by dragging your finger. You’ve probably done this already, without realizing it was called exposure compensation.
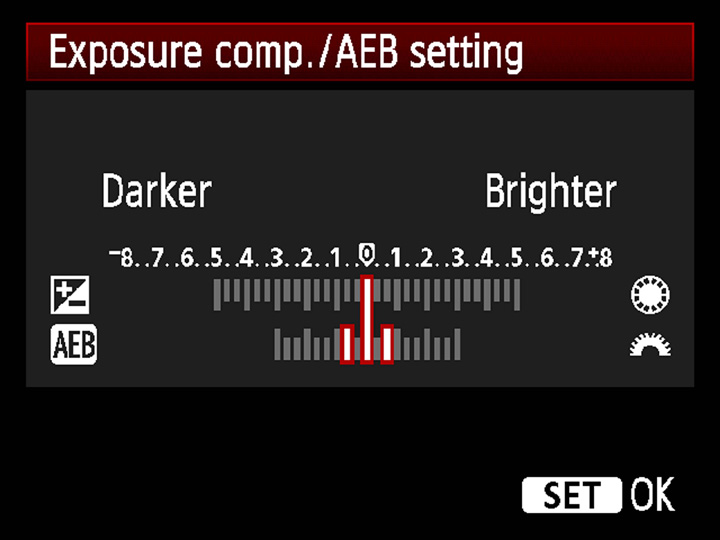
On dedicated cameras, exposure compensation is always represented by a sliding scale with a zero in the middle. Some cameras may have dedicated dials for exposure compensation, while others will have a button or menu option. Both in a camera’s menu and on a button, exposure compensation is identified by a universal “plus/minus” symbol (some phone camera apps may use this symbol, too).
Depending on the camera, you can adjust your exposure in 1/2 or 1/3 stops. Going to +1 or +2 means you’re making your exposure one or two full stops brighter. Negative numbers indicate that you’re making the exposure darker.
Note: A “stop” represents a doubling or halving of exposure; an image shot at +1 EV will have twice the light as one shot at 0 EV. Conversely, setting exposure compensation to -1 EV will result in half that amount of light of 0 EV.
When should I use exposure compensation?
Modern cameras have the ability to meter perfectly fine exposures most of the time, but there are instances when you’ll want to take exposure control into your own hands.
Like the aforementioned example of photographing a subject in front of a bright background, the opposite situation can also call for exposure compensation. A brightly lit subject in front of a shaded background could trick your camera’s meter, which will try to brighten up all the background darkness, only to result in overexposing your subject. In this situation, move your exposure compensation meter to the minus side to make the photo darker. The end result is that the main subject of your photo will be properly exposed. You may have to experiment with varying levels of compensation to find the perfect exposure.
On live-view cameras like smartphones, point-and-shoots, and mirrorless cameras, you can see the effect of exposure compensation on the screen as you make adjustments. When using the optical viewfinder on a DSLR, you obviously won’t be able to see the effect until you play back the picture. Particularly in this case, it is important to remember to turn exposure compensation off before you move to a new location. Otherwise, you may accidentally shoot your kid’s entire soccer game at +3 EV and end up with a set of hopelessly overexposed photos.
Exposure compensation also can’t fix every type of exposure problem. If you’re trying to expose properly for a dark subject and a bright background, it can’t help you. Here, you’ll need other techniques, like high dynamic range compositing or fill flash.
Especially for beginners or phone photographers, exposure compensation is a very easy way to help you get great images in challenging lighting situations without worrying about what’s actually going on under the hood.


