
Photographers rely on a number of tricks and techniques to make an image look as good as possible, but none is more important than showing a subject in its best light — literally. When it comes outdoor photography, that means shooting during “golden hour,” the name given to early morning and late evening when the sun is low in the sky and shines with a warmer color.
If you’ve ever wondered why your own pictures didn’t stand up to professional photos taken from the same spot, there’s a good chance you were simply there at the wrong time of day.
Shooting during golden hour is a cardinal rule of landscape photography, but it also benefits portrait, street, and even outdoor sports photography. Whatever you shoot, choosing the right time of day to shoot it can make a big difference in the look of your images. Here’s what you need to know about the golden hour and how you can best use it to your advantage.
More photography 101
- Exposure, aperture, shutter speed, and ISO
- What is a histogram, and how do you use it?
- What is the Rule of Thirds, and how do you use it?
When is golden hour?
Like rush hour, golden hour isn’t actually just an hour. There is no definitive beginning or end, and the time changes depending on your latitude and the season. For example, at the right time of year above the arctic circle, golden hour can actually last 24 hours.
For those of us at less extreme latitudes, the basic rule of thumb is that golden hour will peak twice a day, at sunrise and sunset.
That doesn’t mean you need to be ready to shoot at precisely the exact moment. You may have up to a couple of hours of excellent light preceding the sunset, and can even continue shooting after the sunset (during a time called “blue hour”) depending on the effect you’re going for. Keep in mind, mountains, trees, or buildings may block sunlight well before the official sunset time in your region, so it’s a good idea to plan ahead.
What makes golden hour so special?
When the sun is low in the sky, it takes on a warmer, more orange color temperature — hence the golden part of golden hour. But it isn’t just about color. Low-angle light also casts longer shadows, adding drama and revealing textures that would be lost at other times of day. This is what makes it so critical for landscape photography.
But beyond these technical reasons, golden hour photographs look more interesting because they show us something in a way we don’t typically see it. Most people are not waking up at the crack of dawn to go outside, nor staying out through sunset.
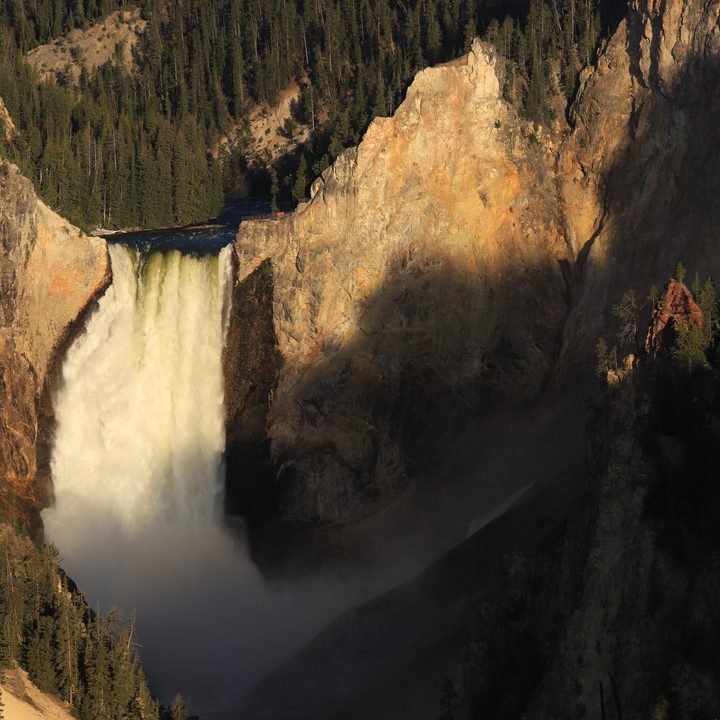
Even at our most visually striking and over-photographed destinations, like Yellowstone National Park seen above, the peak visitor times are in the middle of the day. By going out at less popular times, not only do you avoid the worst of the crowds, but you also get a photographic perspective that most people miss.
Golden hour also opens up some opportunities to capitalize on other photographic techniques and effects, detailed below.
Lens flare
The sun being so low in the sky poses some challenges. If it’s anywhere in the frame, you’re bound to get a pretty obtrusive lens flare. You can try to avoid this by reframing the shot, or you can embrace it or even enhance it.
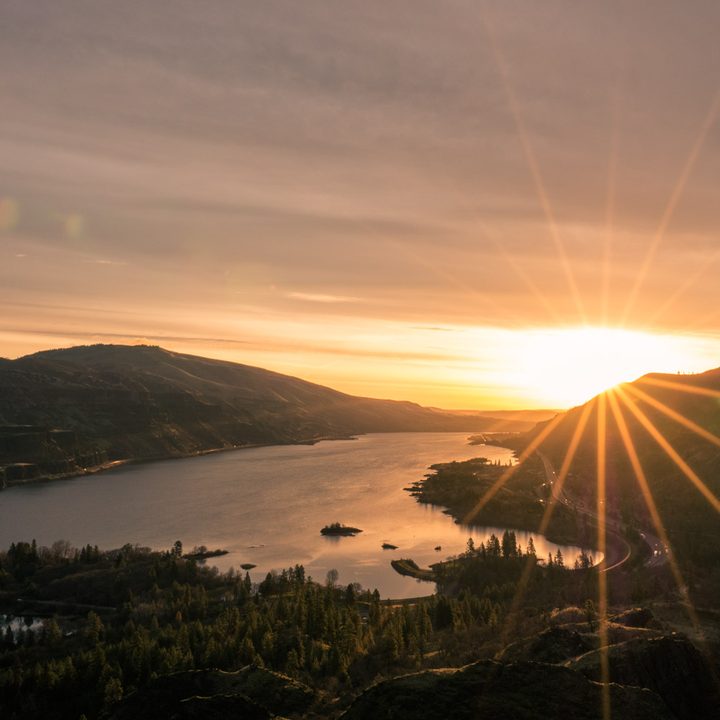
To turn the flare into a sun burst, stop your lens down to near its smallest aperture (this will probably be around f/16). This will cause any lights in the frame — namely, the sun — to turn into multi-pointed bursts. This type of flare can spice up a landscape, and is another example of presenting something in a way that people don’t normally see it.
Rim and bounce light


Rim light is another technique that is aided by having the sun low in the sky. Use it to help frame portraits by placing your subject between the camera and the sun. This will cause the light to wrap around them, creating a natural outline.
To avoid your subject becoming a silhouette, you may want to use bounce light. In an urban environment, you can often find naturally occurring bounce light by looking for where the sun reflects off of the windows of buildings, but you can also use a photographic reflector to make your own bounce light. This affordable accessory can be folded up and easily taken on location, although you may want an assistant to help hold it. While you can use a reflector at any time of day, the low-angle sunlight of golden hour makes it both easier and more dramatic.
Silhouettes


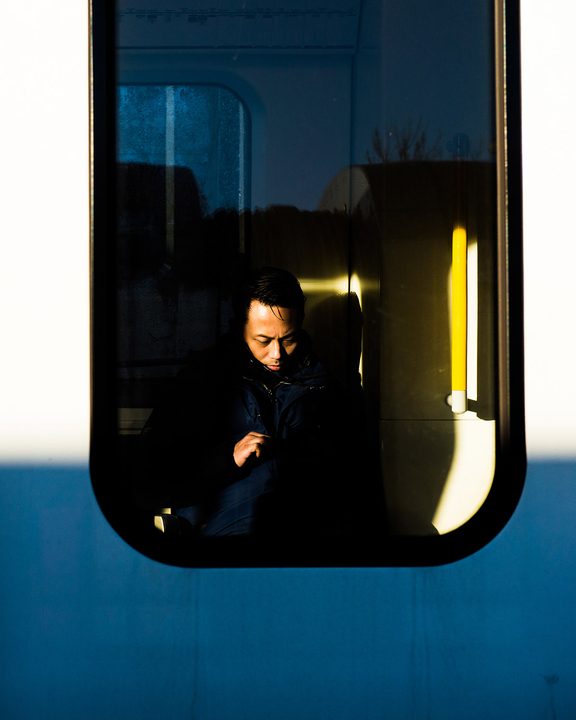
If you do want to create a silhouette, golden hour is the perfect time for it. With direct sunlight or a bright sky on one side of your subject and very little light on the other side, silhouettes can almost happen by accident during golden hour. You can even continue to shoot silhouettes into the blue hour after sunset, as in the second examples above.
What camera settings are best for golden hour?
There are no universal settings for taking pictures during golden hour. Like any other time of day, your camera’s light meter should provide a good starting point, but you might have to trick it in order to achieve certain results.
For a silhouette, for example, a good place to start is by pointing your camera at the sky and locking in your exposure settings. Then frame up your shot, shoot it, and review the image on the LCD screen — if your subject still isn’t completely black, use a faster shutter speed or stop down the aperture (or use negative exposure compensation). The beauty of digital photography is that you can keep guessing-and-checking until you see the result you want.
Your light meter can also be fooled if you have both direct sunlight and dark shadows on your subject. The default meter reading will likely blow out the highlights, which could cause you to lose detail where it’s most important. Here, you may want to use the “spot meter” setting on your camera to meter specifically for the highlights, or simply guess-and-check again, adjusting the exposure as necessary.
However, guessing-and-checking isn’t practical or possible in some situations, like in street photography. Or speed might be essential for getting a good shot, so you’ll need another solution. You can take a few test shots to check your settings and then shoot in aperture priority or shutter priority modes while automatically using exposure compensation to “correct” the image. If you notice your camera is consistently overexposing a particular scene, for example, tune your exposure compensation down as many stops as needed until you achieve the look you want. You’ll most likely have to change this setting each time you point your camera in a different direction or move to another spot.
Using manual mode gives you greater control over your photos and lets you control the settings to optimize each image. It keeps you from getting blown-out highlights no matter where you point your camera. The potential of too-dark photos is a natural downside to this mode, though.
Can I use my phone for golden hour pictures?
You can use most smartphones for taking stunning golden hour photographs. High-end smartphone cameras produce pictures comparable to digital cameras, but most smartphone cameras will give you decent results. Naturally, smartphone settings are different from camera settings, but smartphones include helpful features like exposure lock and compensation. Today’s modern smartphones can deliver excellent, high-quality images, which our iOS devices camera manual guide or Android camera guide covers in detail.


