The Steam Deck easily grants access to your library of Steam titles, and can handle all but the most demanding games — but sometimes that’s just not enough. Enter Xbox Game Pass, the subscription service packed with games offered by Microsoft, most of which are available to play on both Xbox and PC.
That compatibility also means that there’s a way you can play the latest hits on Game Pass like Halo Infinite or the upcoming Starfield on your Steam Deck, wherever you're at. All it takes is the right setup. We’ll show you exactly what you need and what to do.
How to enable Xbox Game Pass games on your Steam Deck
While it may be obvious, please remember that you need to be signed up for Steam and have an active Xbox Game Pass or Game Pass Ultimate subscription for these steps to work.
Step 1: This is a lot easier when you have the time to hook your Steam Deck to a mouse and keyboard before you begin. We recommend sitting at your desktop to make this step effortless.
Step 2: With your Steam Deck turned on, press the central Steam button. When the menu opens, select Power, then choose Switch to desktop. This will switch to a desktop Linux mode that allows for more direct control over a wide variety of settings (you don’t need to connect the Deck to an actual desktop monitor for this to work).

Step 3: Look at the taskbar on the button and select the icon that looks like a blue shopping bag. This will open the Discover Software Center. In the Software Center, find the three-line “hamburger” button and select it, then choose Applications, then go to the Internet section, then find Web Browsers.
Step 4: In the list of available web browsers, look for Microsoft Edge (it’s currently in a beta version on the Deck, but don’t let that stop you). Select or right-click it and choose to Install.
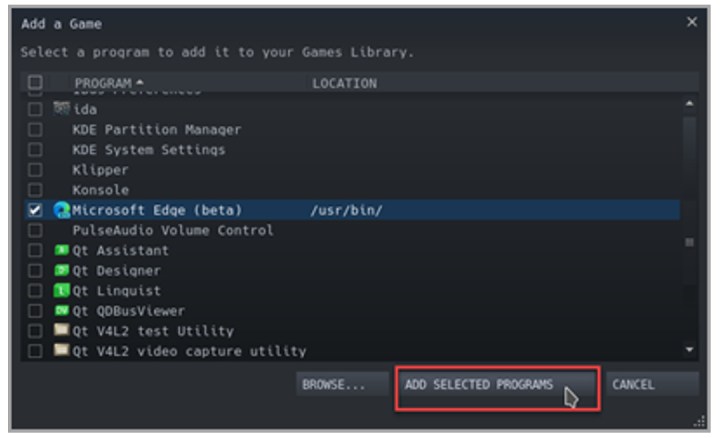
Step 5: Now return to the Steam desktop. Choose the Application Launcher from the taskbar this time. Select Internet, then find Microsoft Edge (beta). Right-click it, and choose Add to Steam. Now in the Add a Game window, locate Microsoft Edge once again, and choose the Add Selected Programs button at the bottom.

Step 6: Go back to the desktop and choose Application Launch again. This time, choose System, and then choose Konsole to open the terminal window. It’s time to type some commands! Enter this command and press the Enter key afterward:
flatpak --user override --filesystem=/run/udev:ro com.microsoft.Edge
To leave the Konsole, type "exit" and select the Enter key.
Step 7: Back in the desktop, select the Steam icon to open up Steam. Go to your Library, then find Microsoft Edge (beta) here. Right-click it, and choose Properties. You’re going to make a couple of important changes here.
First, select the name Microsoft Edge next to its icon, and change it to Xbox Cloud Gaming. You may want to add a (beta) at the end to remember that this is still a work in progress, although the Edge icon has a beta label of its own to help.
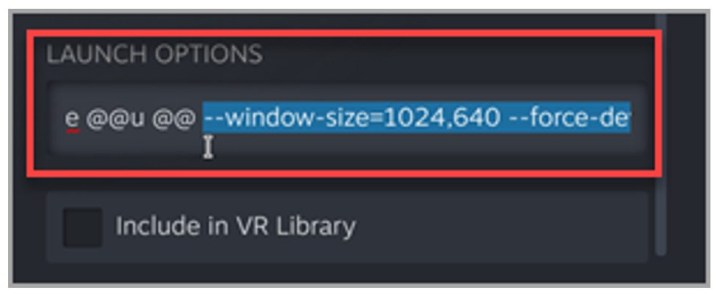
Go to Launch Options, where you’ll see a command line. You will want keep the section that says “e @@u @” but replace everything that comes after it with a new command:
--window-size=1024,640 --force-device-scale-factor=1.25 --device-scale-factor=1.25 --kiosk "https://www.xbox.com/play"
This essentially turns Edge into Xbox Cloud Gaming, a somewhat messy workaround that Microsoft is planning to improve in the future, but it will work for now. Just remember that the Edge icon is actually your Xbox games access. Technically, you can switch out the icon for another image, but it’s a lot of work for a feature that will hopefully be replaced at some point in the future, so we’re fine with leaving it.

Step 8: You can also choose to manage the controller layout of your new Xbox Cloud Gaming app in your Steam Library, so make sure you set it to a layout you like to play Xbox games with by right-clicking, then choosing Manage and Controller layout.
Step 9: That should be it! Switch back to your Gaming Mode, and you should be able to select the Xbox Cloud Gaming icon and sign in with your Microsoft account to get started.


