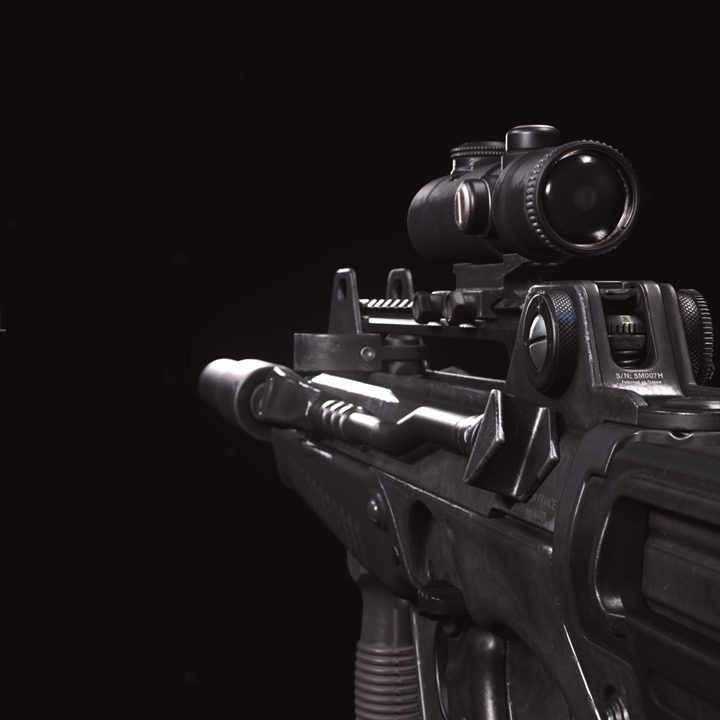
Given the current state of the meta in Call of Duty: Warzone, there are numerous viable options for primary weapons. That wasn’t always the case. When the Cold War integration happened in December 2020, a couple weapons in particular dominated the playing field, and it significantly dwindled the number of options players had at the time. One of those weapons was the FFAR 1, an assault rifle with an immensely fast rate of fire. It has since been retooled to be more balanced, and following its update, the weapon now feels strong without being overpowered.
It’ll likely never feel like it once did, but that’s a good thing. Now, it’s much more in line with the other assault rifles in the game. The FFAR 1 is still a versatile weapon, with plenty of options for builds. In this guide, we’ll go through a few recommended builds that are sure to suit your playstyle — whether you’re a run-and-gunner or someone who likes to take shots from afar. These are the best FFAR 1 loadouts in Call of Duty: Warzone.
Further reading:
- Contraband contracts guide for Call of Duty: Warzone
- The best loadouts in Call of Duty: Warzone
- The best weapons in Call of Duty: Warzone
FFAR 1 overview
First, we should detail how the FFAR 1 works and what its best attributes are. Despite its recent nerf, it’s still a great option for running as a sniper support weapon. This is because it feels lightweight, has a high rate of fire, but can still take down your opponents at around 30-50 meters or so. It still feels like a cross between an SMG and assault rifle, making it an ideal choice when pairing it with a sniper.
In general, the FFAR 1 has moderately high recoil due to its fast rate of fire. In fact, you’ll want to completely avoid trying to secure eliminations with this weapon beyond 150 meters because it likely won’t get the job done. The other main point with this weapon is that it blows through ammo quickly, so you’ll always want to default to the 50-round mags. The standard amount on the FFAR 1 is only 25, which is simply not enough. This means the weapon isn’t as forgiving if you miss your shots, so it does take some getting used to. With all that said, let’s take a look at the recommended loadouts.
FFAR 1 loadout: Best close-range
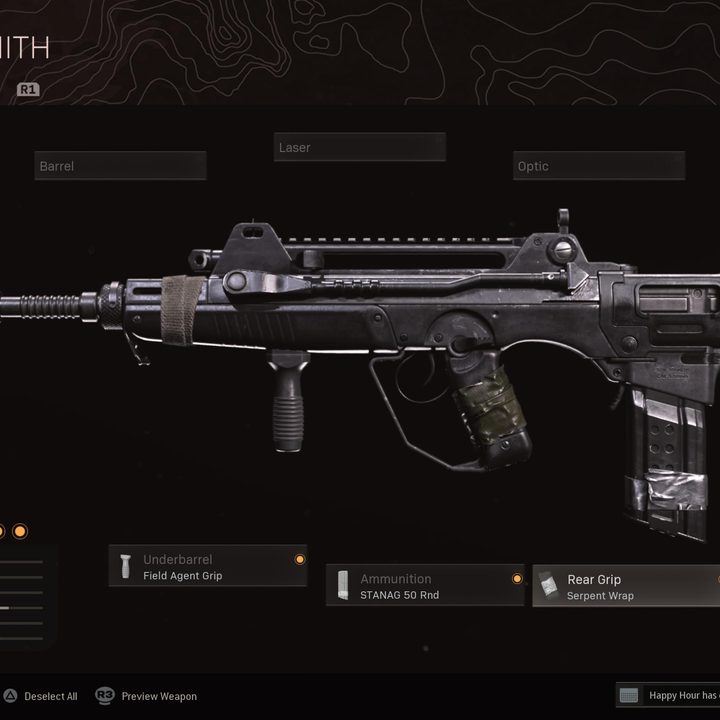
| Muzzle | Suppressor |
| Stock | Raider Stock |
| Underbarrel | Field Agent Grip |
| Ammunition | STANAG 50 Rnd |
| Rear Grip | Serpent Wrap |
The close-range build for the FFAR 1 is unusual because it makes this assault rifle feel like an SMG. With the Cold War assault rifles, you’ll feel much faster on your feet than with the ones from Modern Warfare, so you can get away with using an assault rifle as an SMG if you apply the right attachments. For this build, we recommend taking on opponents at up to 25 meters or so. Start off with the standard Suppressor Muzzle, which actually just recently received a buff. This, of course, gives you sound suppression, a boost to aim-down-sights (ADS) speed, a boost to bullet velocity, and better sprint-to-fire speed. It does slightly penalize your effective damage range, but that isn’t relevant with this particular build since it’s meant for close range.
Go ahead and skip a barrel for this one since none of them is worth having with a close-range AR setup. You can also get away with skipping an Optic since you won’t need too much zoom at around 25 meters. Then, apply the Raider Stock to give the weapon faster ADS movement speed, faster aim walking movement speed, and improved sprint to fire times. You’ll feel the bonuses of this attachment when an enemy surprises you up close, as you’ll be able to quickly start firing after sprinting.
For the Underbarrel, we pretty much always recommend having the Field Agent Grip. This attachment greatly improves the FFAR 1’s vertical and horizontal recoil, which will come in handy since its rate of fire can make it harder to control, even up close. And, as we mentioned before, you’ll always want to use the STANAG 50 Rnd ammunition type since the rate of fire causes the weapon to blow through ammo so quickly. One thing to note is that we always advise using the STANAG 50 Rnd over the Salvo 50 Rnd Fast Mag since the latter slows down your ADS times considerably. One of the main FFAR 1 nerfs was to its ADS speed, so you’ll want to try to avoid tanking it even further.
Finally, equip the Serpent Wrap Rear Grip for improved ADS speeds. As you can see, this build is meant for fast ADS times and lightweight mobility and is designed around accuracy up close. With that in mind, you shouldn’t take on engagements at over 75 meters with it since its attachments aren’t meant for those types of engagements. This is a great loadout for those who play on Rebirth Island, but it can still function on the traditional Verdansk map.
As for perks, we always recommend E.O.D. for the first slot, Ghost or Overkill for the second slot, and either Tune Up or Amped for the third slot, depending on the mode you play. With this build being meant for close quarters, you’ll absolutely want to have an additional weapon that’s effective at longer ranges, such as a sniper, LMG, or assault rifle. We like the M16, so you can give that a try. In addition, this build is great for running and gunning, which pairs nicely with the RPG. As for equipment, you should stick with Molotov cocktails or thermite or semtex grenades along with a heartbeat sensor or stuns.
FFAR 1 loadout: Best medium-range
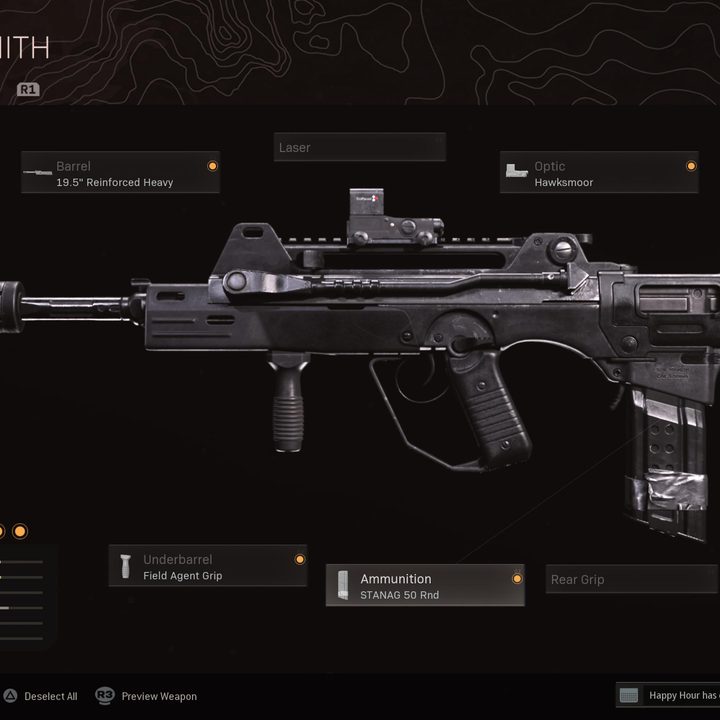
| Muzzle | Agency Suppressor |
| Barrel | 19.5″ Reinforced Heavy |
| Optic | Hawksmoor |
| Underbarrel | Field Agent Grip |
| Ammunition | STANAG 50 Rnd |
While the previous loadout works well in close-quarters situations, it isn’t always practical. For that reason, we recommend giving our medium-range FFAR 1 build a try. This will still work well from 15 to 50 meters or so, giving you a bit more versatility as you play. Since you’ll need more range with this loadout, we advise going with the Agency Suppressor Muzzle instead of the regular Silencer. This keeps you from appearing on the minimap when firing but will also improve vertical recoil control, bullet velocity, and damage range at the expense of ADS speed and aiming stability. With this being a long-range weapon, the ADS speed penalty isn’t a huge deal.
After that, we do recommend applying a Barrel — specifically the 19.5″ Reinforced Heavy. This, once again, is great for those longer-range battles and improves your effective damage range and bullet velocity. Follow that up with an Optic, preferably something that gives you less than 2.0x zoom. We love the Hawksmoor, but there are plenty of fantastic options with this build. If you can still use the iron sights effectively, then more power to you, but an Optic significantly improves how effective the FFAR 1 is at medium to long range, especially since it has moderate recoil.
The rest of the build is the same as before. Use the Field Agent Grip Underbarrel to improve your recoil control and the STANAG 50 Rnd Ammunition type to have plenty of rounds to take down your opponents. You’ll find this build to be a hybrid of the short-range and long-range setups, emphasizing accuracy without penalizing mobility and ADS speed much.
For perks, stick with the same as mentioned above. You have a little more flexibility with your secondary since this weapon works from close to medium range, so you can get away with bringing a shotgun, sniper, LMG, or tactical rifle. This is yet another great build for Rebirth Island since most of your battles on that map will be at close to medium range.
FFAR 1 loadout: Best long-range
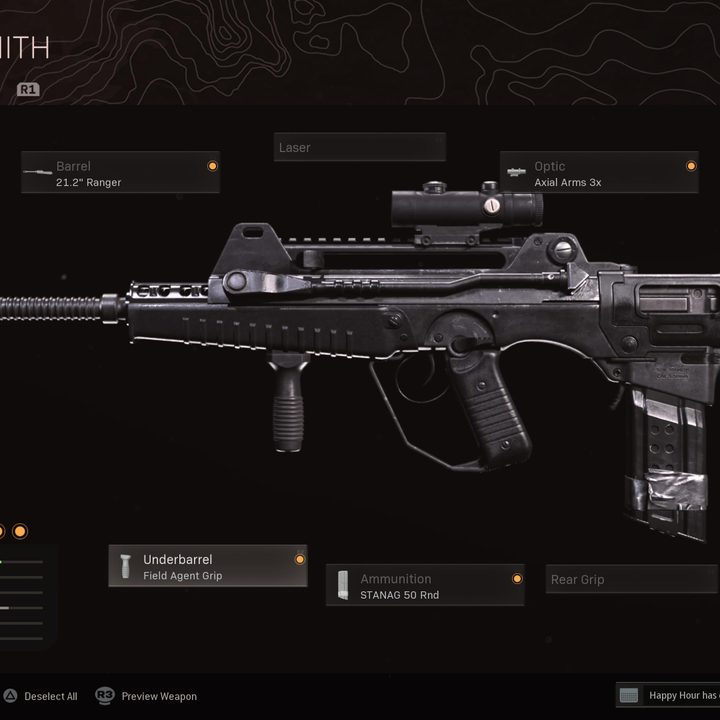
| Muzzle | Agency Suppressor |
| Barrel | 21.2″ Ranger |
| Optic | Axial Arms 3x |
| Underbarrel | Field Agent Grip |
| Ammunition | STANAG 50 Rnd |
Finally, let’s take a look at the best FFAR 1 loadout for longer-range engagements. The thing about this weapon is that it’ll never function like an M16, a Stoner 63, or (obviously) a sniper since the FFAR 1 is meant more for firefights at up to 75 meters. Still, if you’re someone who feels comfortable with this weapon and can control it during long-range battles, this loadout will help you out. Again, start with the Agency Suppressor, which is the best Muzzle for long range. This will ensure you’ll have an easier time hitting your shots from afar, along with keeping you from appearing on the enemy’s minimap.
Then, go with the longest Barrel, in this case, the 21.2″ Ranger. This is the best Barrel for long-range since it boosts your bullet velocity without penalizing your recoil control. You might be tempted to apply the last Barrel, known as the 19.5″ Task Force, but it severely hurts your recoil control, which is not worth using on the FFAR 1. After that, we advise going with an Optic that has higher zoom, such as the Axial Arms 3x. This Optic just recently got nerfed, but it still works well for assault rifles, giving you plenty of zoom. The nerf makes the scope take up less of the screen so you can’t see as much of the zoomed-in picture when aiming down sights, but this actually frees up more of your peripheral vision — so it’s a trade-off.
As for the rest of the build, it’s the same as before: Apply the Field Agent Grip Underbarrel for that boost to recoil control — which is essential in all situations — and the STANAG 50 Rnd Ammunition, which is also a must with this weapon since its fire rate is so fast and the time to kill in Warzone is slow.
Pairing an SMG such as the Bullfrog or the Mac-10 with this weapon is a great idea. Even a shotgun will work well in many cases. Just make sure you’re aware of this weapon’s recoil pattern and fast rate of fire because it can be harder to use if you’re new to the game or are simply not used to the FFAR 1. Once again, this build is ideal for Rebirth Island but can work on Verdansk if you’re someone who likes to play with a squad who can potentially provide long-range support fire.