Apple’s iPhone 14 Pro has been out for a while now, and we’re going to be getting the iPhone 15 lineup in several more months. But that doesn’t mean that the iPhone 14 Pro is a bad phone – in fact, it’s still incredibly powerful! You have the fast and snappy A16 Bionic chip that powers it all, the new always-on display, Dynamic Island, 48MP main camera, and more. And since it uses iOS 16, there are plenty of fun software things to check out as well.
But unless you know where to look, you may not be utilizing all of the cool features of the iPhone 14 Pro, or at least making the most out of it. We’ll show you some of the best features that you should be using on your iPhone.
Take photos in full 48MP resolution

As mentioned earlier, the iPhone 14 Pro has a 48MP main shooter. However, when you use it normally, due to pixel-binning (four smaller sub-pixels make up a single, larger pixel), the end result in the metadata will say 12MP. This is also a feature that is on many Android phones too, such as the Samsung Galaxy S23 Ultra.
For most photos you capture, that may be fine, and you won’t really notice. After all, a full 48MP photo can be around 75 to 100MB in size, which can quickly eat away at your available storage space. This isn’t something you’ll want to do all the time.
But there will be times when you want to capture every single minute detail in a scene, and that’s when the full 48MP resolution comes in handy. This also means you’ll be able to have full control of the editing process to tweak the image as you see fit. In order to do this, you need to enable the Apple ProRaw setting for the Camera app, allowing you to easily switch when needed.
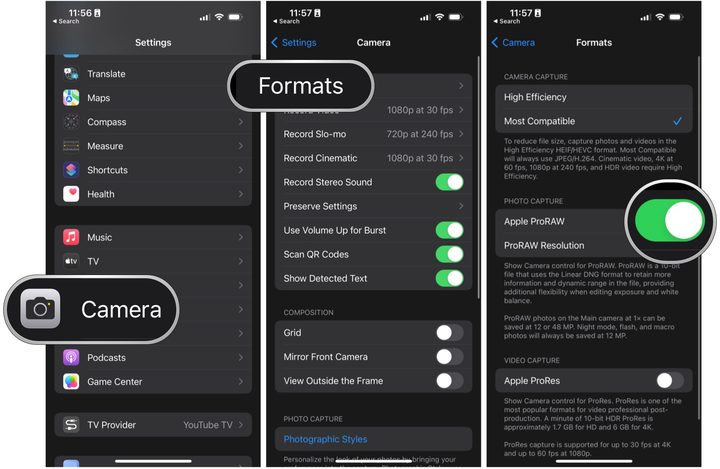
To do this, go to Settings > Camera > Formats > Apple ProRAW and make sure that the setting is enabled (green). Then make sure to select 48MP under the ProRAW Resolution section.
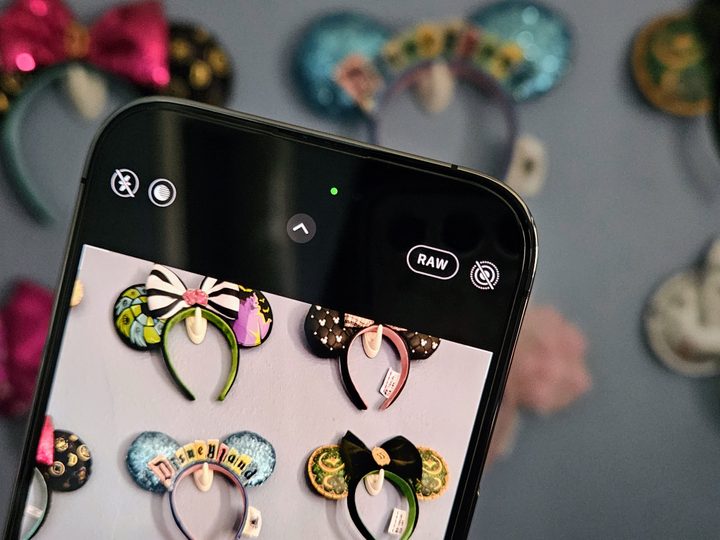
Once this is enabled, go into the Camera app and then tap the RAW toggle at the top — it will capture a ProRaw photo if the RAW is not crossed out.
Unfortunately, the ProRaw 48MP feature only works for photos that are captured at 1x focus. If you use the 0.5x, 2x, or 3x, it will still be in ProRaw but automatically switch to 12MP.
Make the always-on display yours

By default, the always-on display (AOD) on the iPhone 14 Pro is enabled by default. However, when the device first launched, Apple received some criticism based on how the AOD worked, as it would dim your current lock screen wallpaper, drain the battery because the display was still using power (to show the wallpaper), and there wasn’t much privacy since notifications still showed up.
In comparison, Android phones with AOD are typically much more barebones — opting for a completely black screen with discrete notification icons. A lot of people prefer how Android handles this and thought Apple’s method was too distracting.
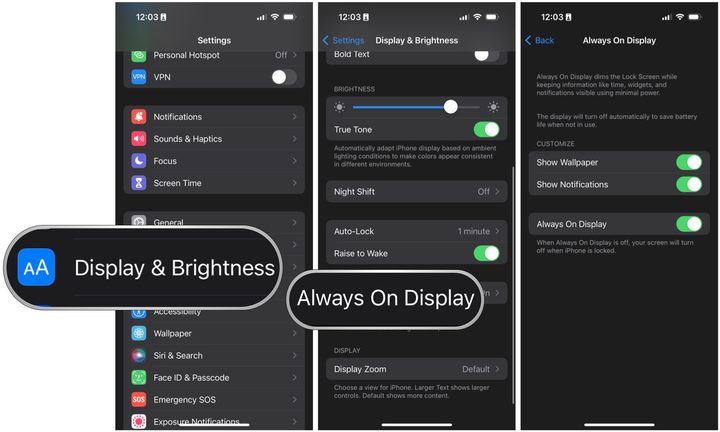
But Apple eventually caved after the backlash and gave users the option to customize the AOD later through an iOS update. So you can keep it the default way if you prefer, or you can make it so that the wallpaper doesn’t show and the display is just black, and you have the option to keep or get rid of notifications. Or you can just disable the AOD entirely — it’s up to you!
To make changes to the AOD, simply go to Settings > Display & Brightness > Always On Display and select the toggles for what you want on or off.
Use Photographic Styles

This isn’t necessarily an iPhone 14 Pro-specific feature (it started with the iPhone 13 series), but it’s still an underrated iOS feature that you may not know about.
Photographic Styles are essentially preset levels for Tone and Warmth in the Camera app, which you can personalize, and these presets are applied to all photos that you take as long as it’s active. The only negative is that Photographic Styles cannot be applied in the post-capture, as they are not filters. In a way, it is considered destructive since you cannot change or remove the style after it’s applied in real-time.
The default Photographic Style is set to Standard, which is a “balanced” look. But there are four other available options: Rich Contrast, Vibrant, Warm, and Cool. I personally like the Rich Contrast look, so I’ve been using it for most of my photos because, well, contrast is nice to have!
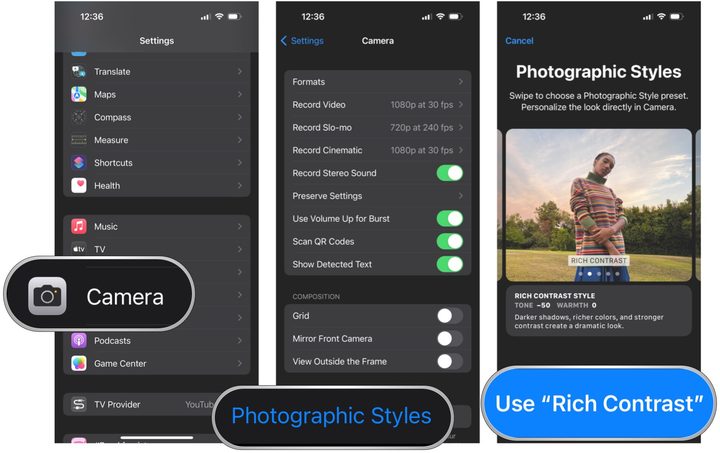
You can set a Photographic Style to be used by default each time you use the Camera app by going to Settings > Camera > Photographic Styles and then swiping through and selecting the one you want to use. The Settings app will give you a preview of what each style looks like.
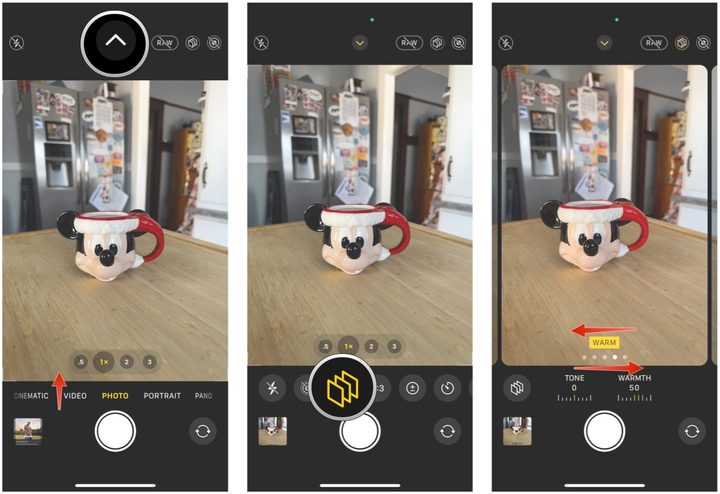
The other method is to activate Photographic Styles when in the Camera app, though this will also override whatever you have set in Settings. When you’re in the Camera app, just swipe up above the shutter button (or tap the arrow button at the top of the screen), then select the Photographic Styles button (it looks like a stack of three squares) and choose the one you want to use. You can also individually change the tone and warmth settings this way.
Set up your Focus modes
Focus modes are also not an iPhone 14 Pro-specific feature, but it is pretty useful if you need some distraction-free time throughout the day for certain scenarios. Think of the basic Do Not Disturb mode, but for when you’re working, driving, reading, gaming, or whatever else.
With a Focus mode, you can customize it so that only notifications from certain people or apps, or you can set it to silence all notifications from certain people or apps — your choice. There are also Focus Filters, which let you customize how apps and the device behave when a Focus is on. For apps, this means only showing certain views, and system filters include the AOD, dark or light mode, and even Low Power mode. You can also set Focus Modes to activate automatically with Smart Activation (uses machine learning to figure out relevant times to activate) or a set schedule.
I’m not sure how many people I personally know who use Focus modes, but I love them. I have one set up for work that kicks in every day through the week at a set time. This blocks out unnecessary notifications and makes it easier for me to actually focus on writing without endless distractions from my iPhone 14 Pro.
If you aren’t already using Focus modes, I’d recommend getting them set up. When the feature originally debuted, it was a bit of a hassle to get them going, but Apple streamlined the process a bit to make it more accessible. To get a Focus mode going, go to Settings > Focus. You can set up any of the premade ones already or create a new one of your own.
Link your lock/home screens with your Focus mode
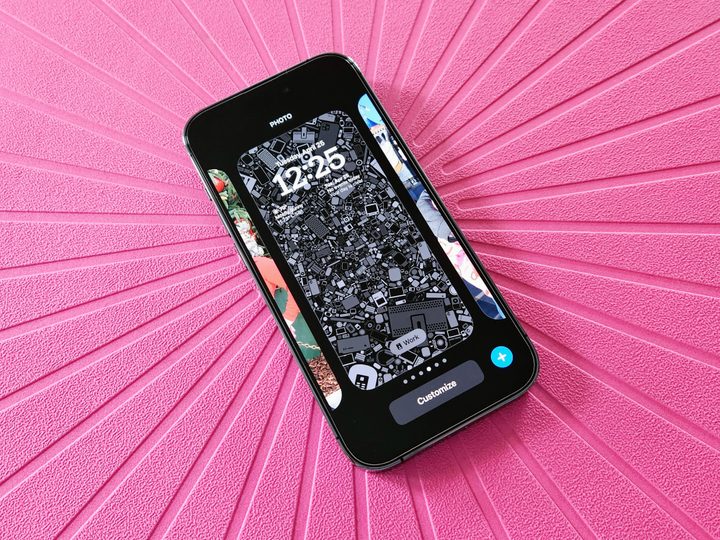
Though iOS 16 gave us lock screen customization, it’s a bit of a mess. But Apple also gave us the ability to create multiple lock and home screens, which we can actually pair up with a certain Focus mode if we desire. I’ve actually found this feature useful for switching between my normal setup and my work setup, with the latter having a more “work” related wallpaper instead of my personal one. It also makes it easier to tell when my work Focus is on from a single glance.
It’s easy to pair a Focus mode to your lock/home screen combo. Just bring up the lock screen switcher, make sure you’re on the one you want to link, and then select the Focus button on the lock screen preview. Then just pick the Focus mode you want to link it to. Now, whenever that Focus mode is activated, your lock and home screens will automatically change to the one you selected.