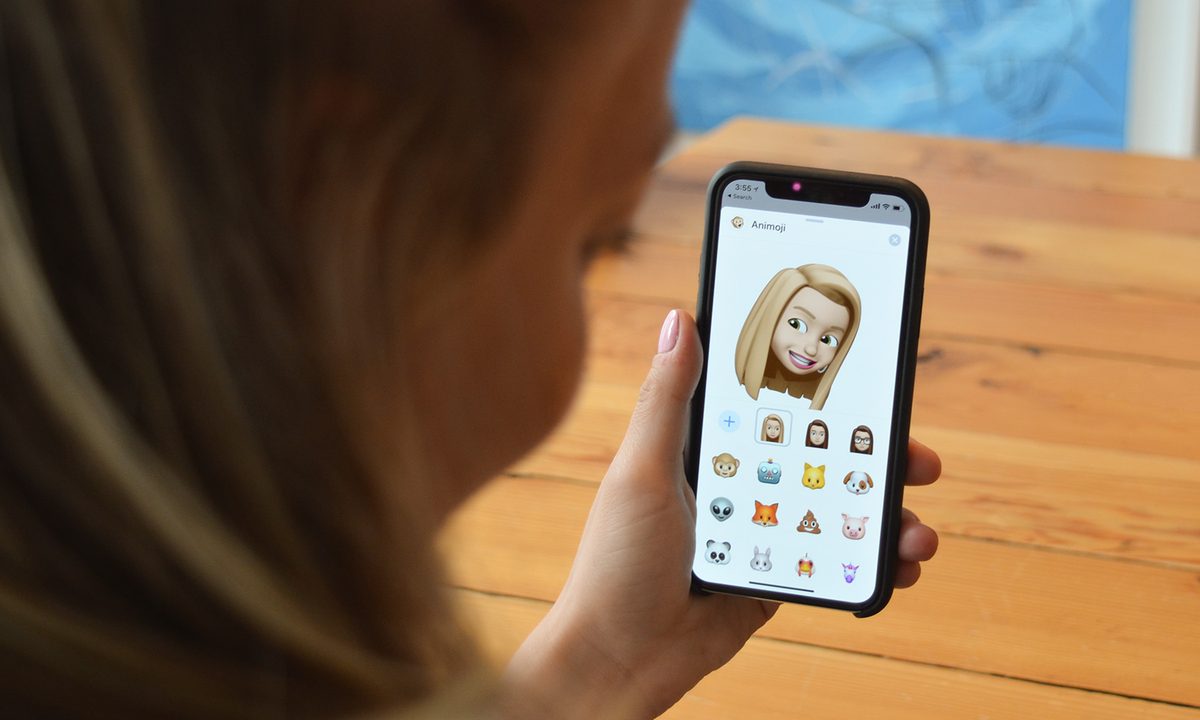
While Apple strives to make its mobile devices useful, it has been known to mix in a zany streak to turbocharge user interest. In recent years, the Animoji and Memoji features have fueled that trend.
Animoji object icons use animals, skulls, ghosts, and poop, among other things, as primary motifs. Memoji — derived from the word “me” — extends Animoji features to avatars that you can create to resemble you or someone you know, kind of like Bitmoji. With Animoji and Memoji, you can control what your friends and contacts see when they connect with you.
The Animoji feature debuted with the iPhone X, but it initially worked only on iPhone models with TrueDepth cameras that could mimic your facial expressions and head movements. That’s because it uses your device’s Face ID to facilitate the creation and recording of animated messages.
This also works on the iPad, including the iPad Pro 11-inch, iPad Pro 12.9-inch third-generation, and newer models. Sensors on the front of your device let you manipulate Animoji by altering your expression -- smiling, frowning, scowling, sticking out your tongue, or turning your head. Memoji and Animoji are most often used in Messages as stickers or videos, with FaceTime calls, and in third-party apps and messengers.
With the launch of iOS 13, and continuing in iOS 14, even older devices let you create your own Memoji. The Memoji on older iPhones that don’t have advanced cameras automatically generate Memoji Sticker packs for everyone. Static Memoji stickers work with Animoji so that all Memoji and Animoji get sticker packs in iOS 13 and later, with 24 varieties in the pack to let you select the specific emotion you want to express. There's also assortment of customization options.


Memoji revitalized in iOS 15
Apple added more options to Memoji with the newly released iOS 15, including clothing, accessibility, updated stickers, different eye colors, new eyeglass frames, hat shades, and more. Memoji let you carve out a unique identity with more specific and accessible features.
With over 40 outfit choices, your memoji can reflect style, mood, sports, or local weather conditions. Three new accessibility options let you project physical conditions with cochlear implants, oxygen tubes, or a soft helmet. New eye colors let you express heterochromia, a different color for each eye. New eyeglasses include heart, star, and retro shapes with new lens and frame shades. Your headgear can sport up to three colors.
Each outfit has three color choices: Main, Second, and Third. When a new color is selected, a slider appears to let you adjust the shade. The clothing feature is limited to static Memoji and is best for Messages and keyboard stickers.


How to create a Memoji
Creating your own Memoji is easy and fun. You can make a Memoji look just like you, or how you wish to look. Or you can create Memoji of your friends. Here’s how to get started.
Step 1: Open the Messages app on your iPhone or iPad.
Step 2: Tap the New Message icon at the top right of the screen.
Step 3: If you don’t see the app drawer below the message bar, tap the App Store icon to reveal the app tray.
Step 4: Tap the Memoji button (with the yellow frame) on newer phones with TrueDepth cameras or the Stickers button (with the three heads) on older phones.
Step 5: You will see various Animoji to choose from, but you can tap the More icon on the left-hand side and then tap New Memoji to get a blank Memoji canvas.
Step 6: On the first panel, Skin, get started with attributes like Skin Tone, Freckles, Cheeks, and Beauty Spot details. Just choose what you want. You don’t have to use everything.
Step 7: You can then move to the next panels, where you can select from an array of hairstyles, brow styles, eye shapes and colors, head shapes, age, nose, mouth, jewelry, and more.
Step 8: Once you get to the Ears section, you’ll be able to rock those AirPods.


How to edit a Memoji
A Memoji is not set in pixel stone. So don’t stress if you really want to change your complexion to blue or your hair to purple with gray highlights. You can easily update the Memoji you already have.
Step 1: Launch the Messages app.
Step 2: Tap the New Message icon in the top-right corner.
Step 3: If the app tray is hidden, tap the App Store icon.
Step 4: Scroll sideways to the right and select your Memoji icon.
Step 5: Tap the More icon to see a menu letting you update your existing Memoji or create a new one.
Step 6: Tap Edit and scroll through the different options to change your persona to whatever you want it to be.
Also, you can use the same screen to delete your Memoji if you’re getting tired of it. Simply go to Messages > New Message > Memoji > More > Delete.


Use your Memoji on an iPhone with a TrueDepth camera
Creating Memoji can be a finicky experience. So the first thing to remember is to have plenty of light available as you work.
Step 1: To use your Memoji, open the App Drawer while in the Messages window and select the Memoji icon.
Step 2: Swipe through to find your Memoji. Since your Memoji mirrors your muscle movements, you will want to ensure your face is in view of the camera.
Step 3: Once you’re ready, tap the record button located in the lower left-hand corner. You can record for up to 30 seconds. You can use the record button to stop the recording or just wait for the recording to reach the 30-second limit and it will stop automatically.
Step 4: After your recording is complete, you can watch it play back one time or choose to watch it again by tapping on Replay above your Memoji.
Step 5: If you are not satisfied with the result, just use the trash icon, erase the recording, and start again.
Step 6: To send your recording, simply tap the blue arrow and the recipient can play it from their Messages window. You can also replay it by tapping on it in the Messages window.
Step 7: FaceTime also supports this feature. When you are talking over video, you’ll see a choice to add a Memoji on your live video.


Use your Memoji without a TrueDepth camera
When you’ve finished making your Memoji, you’ll be able to use it on any apps that support emoji, including as a photo in your Contacts. Apps like Messages, Facebook Messenger, Instagram, Snapchat, Mail, Notes, and Reminders all allow users to play with custom Memoji stickers.
Step 1: Start by preparing your message, email, or note.
Step 2: Swipe right to see the Memoji you use most often.
Step 3: You can also hit the three-dot symbol to see all your Memoji stickers and pick whichever one you prefer.


Use an animated Memoji in FaceTime
Of course, you can use your Memoji for a FaceTime call — for those occasions when you don’t quite look your best.
Step 1: Launch FaceTime and call someone.
Step 2: When the call starts, tap the Effects button.
Step 3: Tap the Memoji that you want to use.
Step 4: Continue your FaceTime call with your customized Memoji or tap to chat without a Memoji.
Troubleshooting creation of Memoji and Animoji
If you’re struggling to get your Memoji to respond to your facial movements, try the steps outlined below:
Step 1: Turn on more lights and use better lighting. For the head tracking and expression alignment to work, the more light, the better. If your Memoji falters or freezes when you’re trying to record, it may be a result of holding the camera too close to your face or because the environment is too dark.
Step 2: The app outlines the right spot for your face via a yellow bounding box for the head and expression tracking, so try to keep your face inside that box.
Step 3: Keep still while you record so that the TrueDepth camera can see you for the entire recording interval.
Step 4: Instead of holding your iPhone very close to your face, keep it more or less at arm’s length.
Step 5: Hold your iPhone straight with the front camera level with your eyes.
Step 6: Your phone or tablet should not be hot to the touch, and there should be no processor-intensive sequences running in the background.
Step 7: If you can’t send Memoji snaps under Messages, go to Settings > Accessibility > Spoken Content and toggle off Speak Screen.