Apple launched iOS 15, its latest operating system, in late September 2021 with a wide range of helpful new features for iPhone owners. Headliners include a Focus mode for blocking unwanted distractions, a SharePlay feature that lets you bring media into your FaceTime calls, and a more intelligent notification summary that orders messages according to your preferences.
It’s not as if Apple then just sat back and took a breather. Immediately upon release, the company got cracking with further updates to iOS 15, adding new features and fixes to keep it fresh, dynamic, bug-free, and secure. The most recent version is iOS 15.4. We’ve compiled an assortment of iOS 15 tips and tricks to help you achieve your iPhone’s full potential.
Use Face ID with a mask (iOS 15.4)


In iOS 15.4, Apple finally lets you unlock your iPhone with Face ID and authenticate Apple Pay payments while you’re wearing a mask. While you could authenticate your identity in the past, you needed an assist from an Apple Watch if you were wearing a face mask. No longer. Today, your iPhone recognizes your eye area features, though Apple says this is less secure than full facial recognition. But it’s certainly more convenient when you’re wearing a face mask, especially when using Apple Pay. Here’s how to set it up. Note that this feature is only available for iPhone 12 and 13 models.
Step 1: Launch the Settings app.
Step 2: Tap Face ID & Passcode.
Step 3: Enter your passcode.
Step 4: Toggle on the Use Face ID With a Mask switch and follow the instructions.
Monitor your privacy with App Privacy Report (iOS 15.2)


The App Privacy Report lets you see how often your apps accessed permission-dependent data like location, photos, camera, microphone, and contacts for the last seven days.
You can see which apps contacted other domains, and when they did so, to monitor app activity in the background. You can see all the trackers that a website uses, so you know where your data is traveling. App Privacy Report is available via the Settings app by selecting the Privacy section, and choosing App Privacy Report. From there, you can toggle it on. After you use apps for some time, data will begin showing up. Here’s how to get started.
Step 1: Launch the Settings app.
Step 2: Tap Privacy.
Step 3: Scroll way down and tap App Privacy Report.
Step 4: Tap Turn on App Privacy Report.
If you had Record App Activity enabled in previous versions, App Privacy Report is automatically on and already populated with data. If you did not, just start using some apps and websites for a few minutes and data will immediately flow in.
Legacy Contacts ensures loved ones can access your data (iOS 15.2)


If you have family or close friends, setting up a Legacy Contact ensures that your Apple ID and data (Digital Legacy) can be recovered in case something catastrophic happens to you. It lets you designate a trusted person to access your Apple ID and your data when you die. That person has access to your photos, messages, notes, files, contacts, calendar events, apps, and device backups. That person can remove the Activation Lock from your devices. This setting does not include iCloud Keychain passwords or licensed media.
You can choose an iPhone user or an Android user, or anyone age 13 or over and share your special access key through Messages or by printing it. You can have more than one Legacy contact, so repeat the steps below for as many as you wish. Here’s how to get started.
Step 1: Launch the Settings app.
Step 2: Tap your profile picture to get to your Apple ID settings.
Step 3: Tap Password & Security.
Step 4: Tap Legacy Contact.
Step 5: Tap Add Legacy Contact.
Step 6: At the pop-up screen that describes the feature, tap Add Legacy Contact.
Step 7: Authenticate with Face ID, Touch ID, or a password.
Step 8: Apple suggests family members if you have Family Sharing enabled. If you do not have Family Sharing, it goes right to your contact list.
Step 9: Once you select someone, tap Next.
Step 10: On the screen describing the feature, tap Continue.
Step 11: Choose how to share your Access Key: You can send an iMessage or you can print a copy of it.
Step 12: Once you’ve sent a message or printed your Legacy Contact info, the person is officially recognized as your legacy contact.
Watch and listen with friends via SharePlay (iOS 15.1)
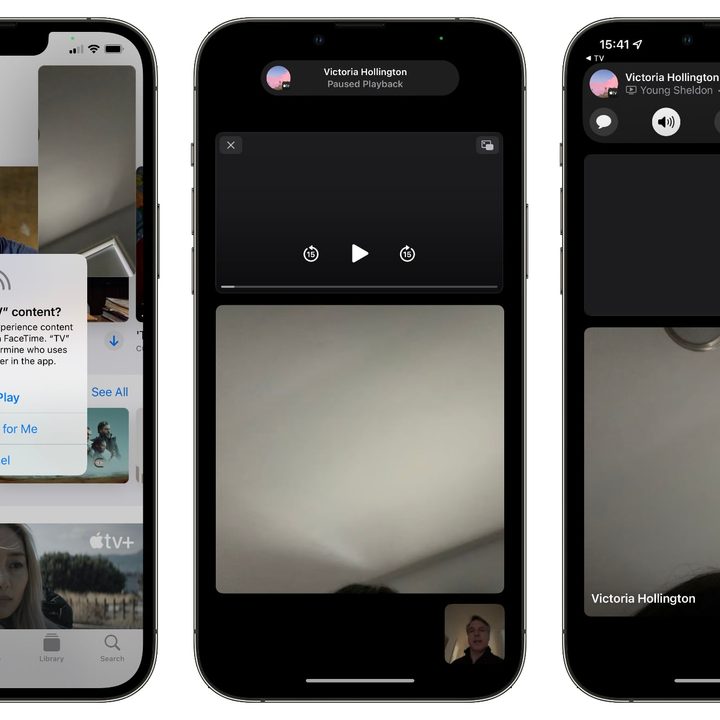
With iOS 15.1 or later, you can turn your Group FaceTime calls into shared watching and listening experiences with friends thanks to Apple’s new SharePlay feature. This includes watching shows together on Apple TV+, listening to playlists on Apple Music, and more. Here’s how to get started:
Step 1: Make sure everyone who wants to participate is using iOS 15.1 or later.
Step 2: Start a FaceTime call — either a person-to-person call or a Group FaceTime call.
Step 3: Once everybody you’ve invited is on the FaceTime call, swipe back to your Home Screen.
Step 4: Open a supported app, like Apple Music or Apple TV.
Step 5: Select a song, movie, or TV show you want to listen to or watch together.
Step 6: When prompted, tap SharePlay to confirm that you want to share the content.
Everyone on your FaceTime call will get a prompt to join SharePlay. Once everyone has joined, the content will be synced so that everybody is watching or listening together. Playback controls are also shared, so anybody can play or pause the content, although features like volume and closed captioning are controlled individually for each user. When sharing songs on Apple Music, you’ll also get a shared play queue. Participants can change what’s playing or add their own songs, for a true listening party experience.
Note that everyone on the call must have access to shared content. For streaming services like Apple Music and Disney+, everyone needs to have their own subscription. If you want to share a movie or TV show that was purchased from iTunes, all participants must have also purchased it. The good news is that this should already be covered for Apple subscriptions and iTunes-purchased content when using SharePlay with your Family Sharing group.
SharePlay only works with apps that specifically support it, but that’s a pretty extensive list. Popular video streaming apps like Disney+, ESPN+, HBO Max, Hulu, NBA, Paramount+, and SHOWTIME are all on board, and it even includes other apps and services — from TikTok and Twitch to Apollo for Reddit and Night Sky.
Add your COVID-19 vaccination card to Apple Wallet (iOS 15.1)
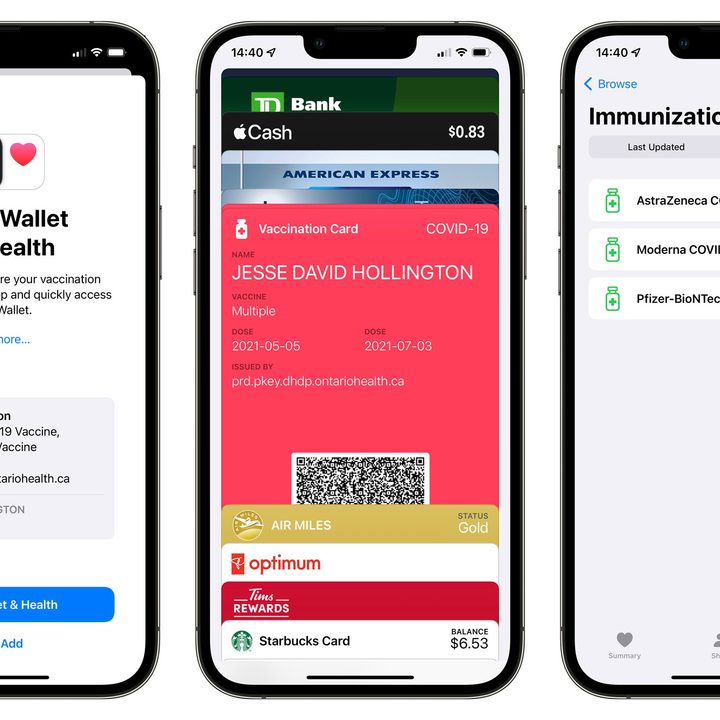
If your state health agency is issuing proof of vaccination cards using the SMART Health Card standard, and you’re using iOS 15.1 or later, you can add a digital vaccination card directly to Apple Wallet. Here’s how:
Step 1: Print out the vaccination QR code or display it on another screen.
Step 2: Open the Camera app on your iPhone.
Step 3: Point your iPhone camera at the QR code.
Step 4: Tap the Health link that appears.
Step 5: Follow the on-screen instructions to add your vaccination record to the Wallet and Health apps.
If you’re still running iOS 15.0, you can use the above steps to store your vaccination record in the Health app, but you’ll need to upgrade to iOS 15.1 to also have it appear in the Wallet app, where you can pull it up as easily as a credit card, loyalty card, or ticket.
If you have the QR code in digital form on your iPhone, such as on a government website or in a downloaded PDF, you can also scan it directly onto your iPhone, without the need to print it out or show it on a second screen, thanks to the Live Text feature in iOS 15. Here’s how:
Step 1: Open your proof-of-vaccination QR code on your iPhone.
Step 2: Zoom in on the web page or PDF containing the QR code so that it takes up most of your screen.
Step 3: Capture a screenshot by pressing the volume up and sleep/wake buttons at the same time.
Step 4: Open your Photos app and locate the screenshot you just saved.
Step 5: Tap the Live Text button at the bottom-right corner. The icon will turn blue and any text and QR codes in the photo will be highlighted.
Step 6: Tap and hold on the QR code.
Step 7: Tap Open in Health from the pop-up menu that appears.
Step 8: Follow the steps to add the vaccination card to your Wallet and Health app.
See our dedicated guide for more information.
Get more information about your photos
With iOS 15, you can now see the EXIF metadata (camera model, shutter speed, aperture, resolution) stored in your photos without third-party app assistance. You can find all of these details right in the Photos app. Here’s how:
Step 1: Tap on a photo to open it in full-screen view.
Step 2: Either swipe up or tap the Info button at the bottom of the screen.
You’ll see a card that shows information about when and where your photos were taken, what device was used to capture them, the size and resolution of the photo, and more.
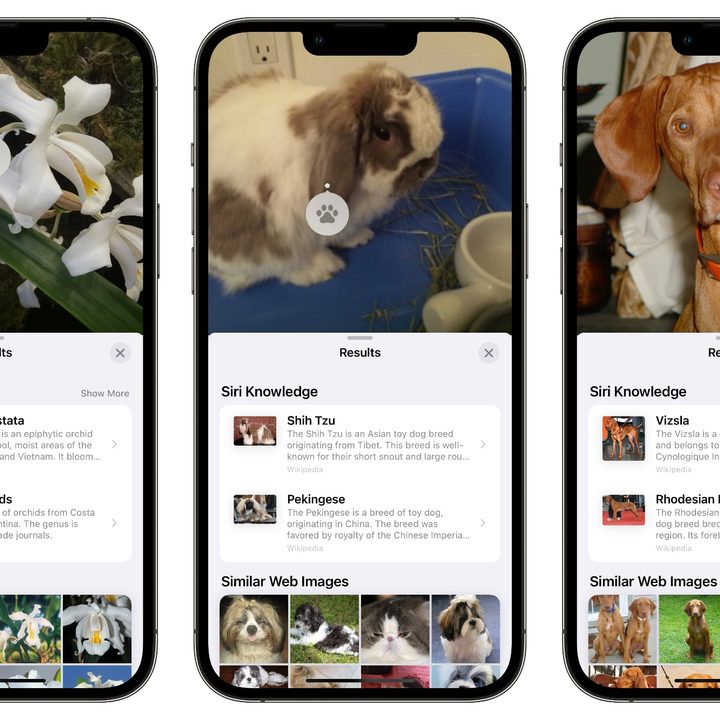
In addition, Apple has added a new layer of machine learning in iOS 15 to help you get even more information from your photos. With the Visual Look Up feature, your iPhone (models XS/XR or newer) can recognize certain objects and scenes and provide links to Wikipedia articles and similar images from the web. Eligible photos include things like flowers, plants, landmarks, popular art, and even pet breeds. You’ll see a visual indicator on any photos where iOS recognizes an object; tap on this to get more information about that object. This Visual Look Up feature is only available in the U.S. right now — that is, your iPhone Region must be set to the United States for it to work.
Add captions and adjust the date, time, and location of photos

The Photos app in iOS 15 doesn’t just let you view EXIF metadata — you can also make changes to some of it. This includes adding captions to your photos, as well as adjusting the date, time, and location your photos were taken. Here’s how:
Step 1: In the Photos app, tap on a photo to open it.
Step 2: Either swipe up or tap the Info button at the bottom of the screen to bring up its extended details.
Step 3: To add a caption, tap the Add a Caption space right below the photo, start typing, and tap Done when finished.
Step 4: To change the date of the photo, tap Adjust to the right of the date and time.
Step 5: To change the location of the photo or remove its location entirely, scroll down and tap Adjust in the bottom-right corner of the map. If the photo doesn’t have a location stored, you’ll see a button to add a location.
Drag and Drop Emails and Notes to Create Linked Reminders
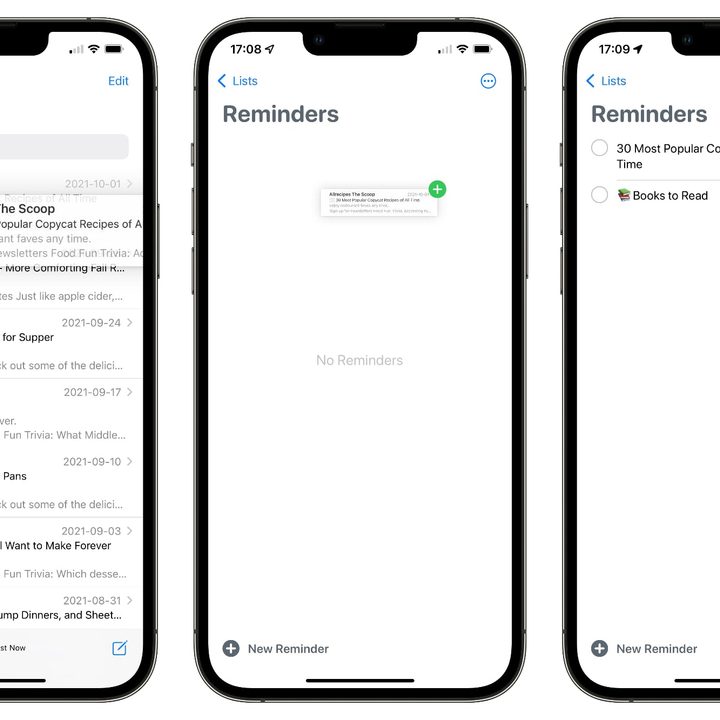
We’ve been able to drag and drop items between apps on the iPad for a few years, but iOS 15 brings this capability to the iPhone for the first time. One handy way to use this is to create new reminders that link back to email messages and notes. Here’s how:
Step 1: Open the Mail or Notes app.
Step 2: Tap, hold, and start dragging either an email message or a note, as appropriate.
Step 3: Once you’ve begun dragging the item, keep your finger on it to hold it in place.
Step 4: Using another finger, swipe up from the bottom of the screen to return to the home screen while continuing to hold the first finger on the message or note.
Step 5: With the second finger, tap the Reminders icon to open the Reminders app.
Step 6: Move the first finger, which should still be holding the selected item, to an empty space in your Reminders list, and lift your finger to drop it in.
A new reminder will be created with the subject of the email or the title of the note as the default name, although you can change this to whatever you want. When you tap away from it to stop editing, you’ll see a Mail or Notes icon to the right, which you can tap to return to the original email or note.
This works with some popular third-party apps too, although you’ll only get backlinks for email messages. Dragging and dropping a note into a third-party app will simply paste in the text of the note, as Apple doesn’t yet allow third-party developers to link directly into the Notes app.
See our dedicated guide to multitasking in iPadOS 15.
Save multiple photos with drag and drop

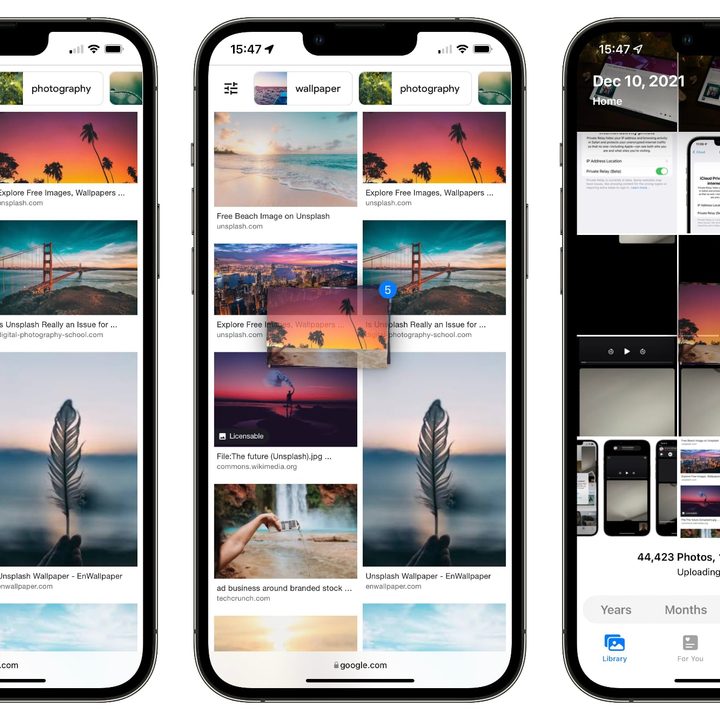
Drag and drop works from many other apps as well, and one of the most popular tricks that’s come up in iOS 15 is using it to save multiple photos from Safari into your photo library. Here’s how:
Step 1: Open a page in Safari with several images, such as the results of a Google Images search.
Step 2: Tap, hold, and start dragging on the first image you’d like to save.
Step 3: Continue holding your finger on that first image.
Step 4: Tap additional images to add them to the selection. You should see them stack up under your first finger, with a blue badge showing the count of how many are selected.
Step 5: While still holding the set of images with the first finger, swipe up from the bottom of the screen to return to the home screen.
Step 6: Tap Photos to open the Photos app.
Step 7: Release the first finger to drop the set of images into your Photo library.
Just keep in mind that this will only save the displayed images from Safari, so if you’re doing this from an index page like Google Image search you’ll only get the lower-resolution thumbnails saved to your library.
You can drag multiple items from just about anywhere with the same technique, however. Use it to attach multiple photos from Photos to Mail, or to drop multiple Mail messages into Reminders — you’ll get one entry for each message in this case.
Dress up your Memoji with new outfits and colors
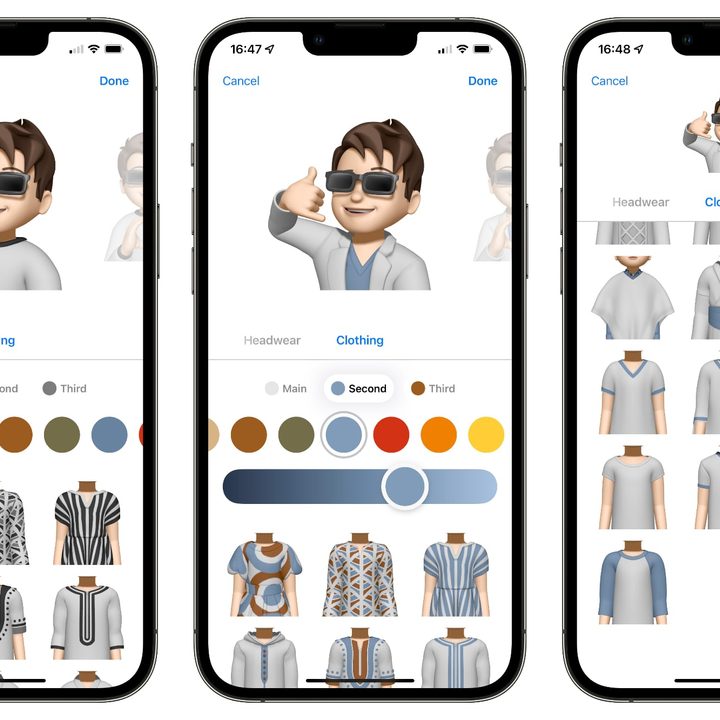
For the digital fashionistas among us, Apple has packed a whole new wardrobe into its Memoji customizations. For the first time, a new Clothing section lets you ditch basic grey with a choice of 12 alternative shirt colors, plus 40 different styles of clothing to give your avatar a unique look. Here’s how:
Step 1: Open a conversation in Messages.
Step 2: In the app drawer above the keyboard, tap the Memoji Stickers icon.
Step 3: Select your favorite Memoji avatar.
Step 4: Tap the three dots button on the left.
Step 5: Tap Edit.
Step 6: Scroll right to the end of the category list and tap Clothing.
Step 7: Customize your Memoji’s clothing using the options found here. When finished, tap Done in the top right corner.
You can apply up to three different colors to each item of clothing — including headgear and glasses — and Apple has added several new poses to show them off. Apple also added some inclusive Accessibility Memoji accessories too, including oxygen tubes, cochlear implants, and a soft helmet for headwear. You can even choose different colors for your avatar’s left and right eyes.
See our dedicated guide on how to create and edit Memoji.
Escape distractions with iOS 15’s Focus


Focus mode is arguably the most significant new feature iOS 15 brings to the table. An updated and more nuanced version of Do Not Disturb mode, it lets you set up more than one “Focus” and customize its settings. For example, you can set up a different Focus for different activities or situations, allowing you to block distracting notifications when working, sleeping, relaxing, or driving). While iOS 15 suggests a few default Focus settings that you can tweak, you can also create entirely new and personalized Focuses. Here’s how you set up and customize a pre-existing Focus:
Step 1: Go to Settings > Focus. You’ll find Focus where Do Not Disturb used to be. (You can also swipe down from the top-right of the touchscreen to open Control Center and tap Focus, located to the left of the Brightness meter.)
Step 2: Tap one of the existing Focus options. Initially, you’ll see Do Not Disturb, Personal, Sleep, and Work, although if your iPhone detects you’re driving, it will prompt you to set up a Focus for that.
Step 3: Now, customize the settings for your Focus, but note that some Focuses have different options and restrictions you can choose from. Most work the same way, allowing you to choose the people and apps you’ll still receive notifications from, as well as the times and other conditions during which they’ll be in effect, such as when you’re at a specific location or using certain apps.
The Driving and Sleep focuses are special cases, however. Driving replaces the Do Not Disturb While Driving feature from iOS 14 and earlier and can only be activated automatically when driving. For safety reasons, you also won’t be able to allow specific apps to send you notifications while the Driving Focus is enabled, although specially designated Time-Sensitive notifications will still come through for those apps that support them.
Likewise, the Sleep focus is tied to the Bedtime sleep tracking feature that you set up in the Health app. It activates automatically at your designated bedtime and switches off at your wake-up time. You can have it start at your wind-down time instead, such as 30 minutes before bedtime.
Additional options within each Focus let you decide if you want to share your Focus status when certain contacts message you, show silenced notifications on the Lock Screen, dim the Lock Screen, disable the notification badge counts for apps on your home screen, or even hide a whole home screen entirely. This last one can be especially useful if you have a set of work-related apps that you’d rather not think about during personal time or vice-versa. Note that this doesn’t lock out those apps entirely — you can still access them through the App Library — but the idea here is out of sight, out of mind. You can return to Settings > Focus at any time and change the parameters for any Focus you’re using.


Focus also lets you create entirely new Focuses for any activity or situation (e.g. vacations, gaming, rehearsals, clubs). iOS 15 also includes special templates for Fitness, Gaming, and Mindfulness that. activate automatically whenever you’re engaged in those activities. For example, a Fitness Focus will turn on whenever you start a workout on your Apple Watch, while the Gaming Focus engages as soon as you connect a wireless game controller to your iPhone or iPad.
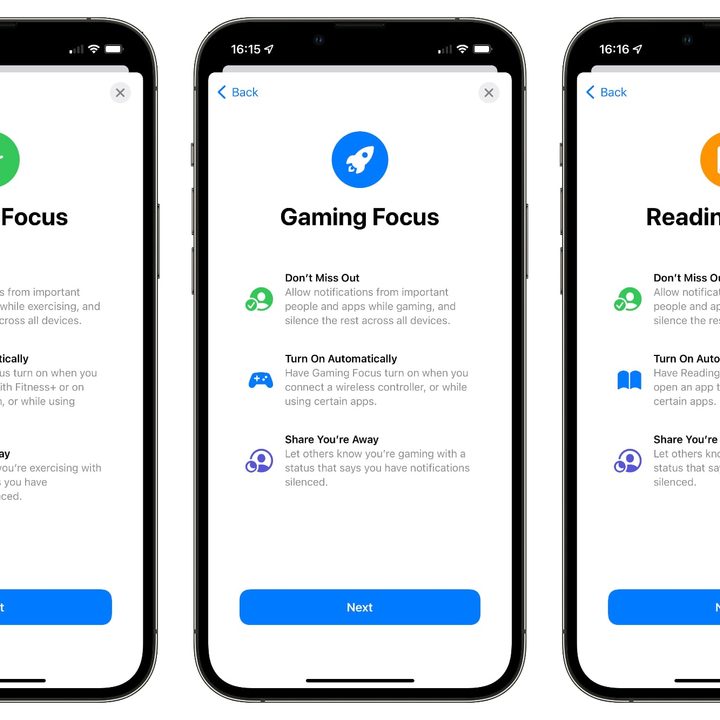
You can create a custom Focus by going to Settings > Focus and then tapping the + button in the top-right corner of the screen. From there, just follow the on-screen instructions to choose the purpose or related activity of the Focus, give it a name, and chose who will still be able to send you messages or call you.
Invite your Android friends to Group FaceTime calls


With iOS 15, you can now include just about anybody in a FaceTime call, whether they’re on an iPhone, an Android smartphone, or even just using a modern web browser on their PC. A new feature lets you create a link for a FaceTime call, much like you would do for other video conferencing services like Zoom, and then anybody you send the link to will be able to join your call just by clicking on it. Here’s how you use it:
Step 1: Launch FaceTime, and then tap Create Link (you’ll see it at the top-left of the screen).
Step 2: Next, choose how you’d like to send the link. You can choose from Messages, Mail, WhatsApp, and other apps, or even just copy it to your clipboard. You can also choose a name for the FaceTime Link, by tapping on Add Name (in green) and then typing a name before tapping OK.
Step 3: Once you’ve chosen an app through which to send the link, choose the person to whom you’d like to send it. You can repeat steps 2 and 3 for as many people as you’d like to include in the FaceTime call (iPhone and Android users alike). You can also copy the link and paste it anywhere you’d like, such as in a Facebook group or a WhatsApp conversation thread.
Step 4: After you’ve sent the link to at least one person, you’ll then be able to tap it yourself and begin the FaceTime call. To do this, open FaceTime again and tap FaceTime Link (or whatever you may have called it), which you’ll find under the Upcoming subheading. Doing this brings up the FaceTime screen, which includes a banner/sub-window at the top with the option to Join the call you created. Tap Join, which will start the call at your end and present you with a line of text (in the same banner at the top) saying that you’re Waiting for Others.
At this point, your invitees should join the call. They can do this by tapping/clicking the link you sent them. This brings up the FaceTime screen, which includes the Join button in the top-right corner. If they aren’t already a contact, they will need to enter their names. Once they’ve tapped Join, you will then receive a notification asking you to approve or decline their request to join the call.
See our dedicated guide on how to place a group FaceTime call.
Use Shared with You to keep track of everything from Messages


Shared with You is a new feature that automatically creates a new favorites folder (called “Shared with You”) for you in five native Apple apps whenever a contact sends a link via Messages. The six apps with which this feature currently works are Music, Apple TV, News, Podcasts, Photos, and Safari. In the Photos app, it helps you easily collect all the pictures that others have shared with you in one place.
For example, let’s say you or a friend comes across a really interesting website. By tapping the Share button at the bottom of the Safari browser and sending the link via Messages, the recipient will see it whenever opening a new browser tab in Safari. It will be under the Shared with You heading, below Favorites and Frequently Visited.
The same principle applies to the other four apps. For example, you can share an album (or song or artist) on Apple Music by tapping the More icon and then Share, after which you choose Messages and send it to the desired recipient. Once sent, the recipient will then see the shared album or track by tapping the Listen Now tab and scrolling down to the Shared with You section.
The Photos app offers another nice touch, too. Not only will shared photos show up in the Shared With You section, but relevant pictures will be integrated right into your Library timeline. For example, if somebody shares a set of photos from a party or concert that you were at together, your Photos app will recognize this — based on things like date, time, and location — and automatically match them up with your own photos from that same event. These additional photos will show a special icon to indicate that they’ve been shared by others, but they won’t be added to your library unless you specifically choose to do so.
Note that you can also choose which conversations are included in Shared With You from within the Messages app. Here’s how:
Step 1: Launch Messages and select a conversation.
Step 2: Tap on the person or group avatar at the top of the conversation window.
Step 3: Tap the switch beside Show in Shared with You to turn it off.
You can also pin specific items right from a Messages conversation to ensure that they show up more prominently in the appropriate Shared with You section. Here’s how:
Step 1: Go to the Messages conversation where you want to pin an item.
Step 2: Tap and hold the shared content, such as a link or photo.
Step 3: Tap the Pin button. A small yellow pin indicator will appear in the bottom left corner.
Pinned content will appear at the top of the Shared with You section in Safari and the other supported apps, as well as in a Pins section in each contact’s info page in Messages and when searching in Messages.
Highlight and use words in images via Live Text


With iOS 15, you can highlight, copy, paste, and search text that appears in images and photos. In fact, not only can you use it to search the web for text or open websites, but you can also call telephone numbers that appear in, say, signs you’ve photographed. You will need at least an iPhone XS/XR or later to use it though. Here’s what to do:
Step 1: Take a photo of the text you wish to use, but make sure it’s a clear and direct photo. Or, if you already have a photo, open Photos and select it.
Step 2: Once you’ve selected an image, tap and hold the text you wish to highlight. You’ll then be able to drag the highlighted field to ensure that all of the desired text is highlighted.
Step 3: Select one of the presented options, such as Copy, Select All, Look Up, Translate, or Share. Then proceed as desired.
Note that you should look out for the little Live Text icon in the bottom-right corner of the image. If it isn’t there, you won’t be able to highlight and use any text. In that case, try taking another image of your desired text. You don’t actually need to take a photo to highlight and use Live Text — just use the feature in the Camera’s viewfinder. Open Camera and point your iPhone at the desired text, and if it recognizes usable text, the Live Text icon will appear in the bottom-right corner.
Create tab groups in Safari


Apple has provided iOS 15 with a number of new touches for Safari, including new privacy protections and a bottom tab bar. However, probably the most useful is the ability to organize tabs into groups. By enabling this, you can browse and organize websites according to their category or purpose (i.e. work, study, hobby). Here’s how to create a group of tabs.
Step 1: Open Safari and tap the Tabs icon in the bottom-right corner.
Step 2: Next, tap the Start Page/1 [or N] Tab button at the bottom of the screen. It will have the number of tabs you currently have open next to it, as well as an arrow pointing downward.
Step 3: Tap New Empty Tab Group, before entering a name for the group (e.g. “technology,” “music,” or whatever else). If you’re already on a site or page you want to include in a new tab group, tap New Tab Group from 1 [or N] Tab.
This creates an empty tab group. Once created, you can then visit websites and pages within the new tab. Any site or page you visit will be saved to the tab group, unless you close it. You can navigate out of the tab group by tapping the Tabs icon again and selecting a new tab or different tab group (if you’ve created any others).
See our dedicated guide on how to manage Safari tabs.
Receive your daily digest via notification summaries
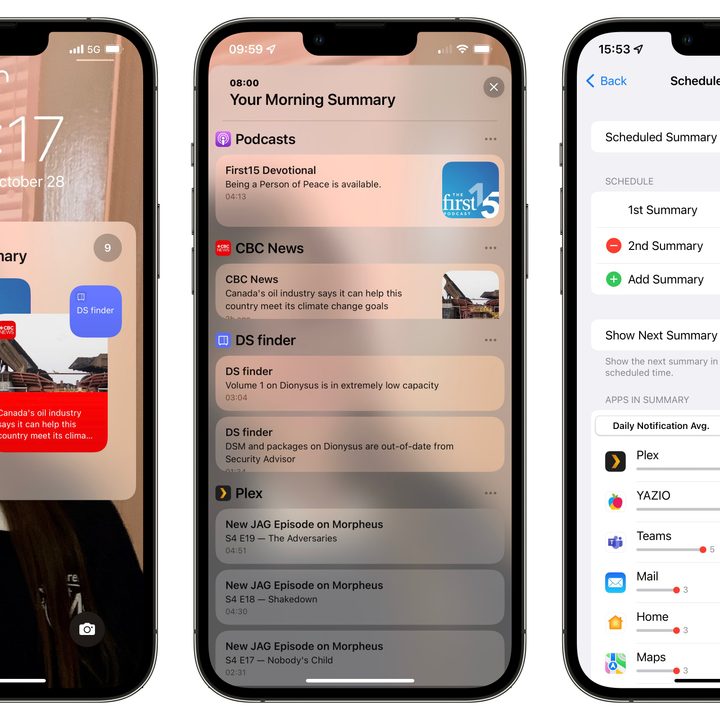
Do you often find yourself inundated by innumerable notifications? If so, iOS 15 has your back, since it’s introduced an intelligent notification summary that orders notifications according to the priority you tend to give to certain apps and contacts. Not only does the feature organize and arrange your notifications, but it sends the summary at regular intervals, which you can set yourself.
To set up a scheduled notification summary, go to Settings > Notifications > Scheduled Summary. Next, turn on the Scheduled Summary slider and tap Continue. Choose the apps that you’d like to include in the summary, and then tap [N] App. Lastly, set the desired time(s) for your summary or summaries. You can add more than two daily summaries by tapping Add Summary.
You can also send all of an app’s future notifications to your Summary directly from the Notification Center. Just swipe left on a notification, and tap Options > Add to Summary. You can also reverse this for apps that are already in a Summary by swiping left and tapping Options > Deliver Immediately.
See our dedicated guide on how to set up notification summaries.