
Below, we’ll explain how to set up Family Sharing on iOS before delving into how to use it and how to get the most out of it. This includes how to limit and control your child’s purchases, how to hide purchases you don’t want to share, and how to set up the aforementioned Apple Music Family Membership.
How to set up Family Sharing
Before you actually get started, make sure you have an active Apple ID and that you’re over the age of 18. You should also have a valid payment method either on file or at the ready, as all purchases made using this feature will use this form of payment. Lastly, make sure all your devices are running iOS 8 or later.
Step 1: On your iOS device, go to Settings > iCloud and tap Set Up Family Sharing.
Step 2: Tap Get Started, and confirm that you want to be the Family Organizer — AKA the person in charge. You’ll have to invite everyone else and provide the aforementioned payment method.

Step 3: Follow the on-screen instructions, which will ask if you agree to share your purchases. You’ll also have to enter or confirm your Credit or Debit card. Afterward, decide whether you want to enable location sharing, which lets your family members share their location and even track each other’s devices via Find My iPhone.
Step 4: That’s it! You’re now the proud organizer of a Family Sharing group.
How to invite people to join your group
Step 1: Go to Settings > iCloud > Family > Add Family Member.
Step 2: You’ll need your family member’s name and the email address associated with their Apple ID in order to add them to your account. Even children will need an Apple ID to be added. However, since children under the age of 13 cannot create one on their own, the family organizer must provide verified parental consent. Once the organizer creates the ID for his or her child, it will automatically be added to the family group.

Step 3: You can check the status of the invitation by going to Settings > iCloud > Family and looking at the status under the person’s name.
Joining a group
Step 1: If you’re on the receiving end of the invite, you can find it by going to Settings > iCloud > Invitations, or by checking your email if the invitation was sent to your email address.
Step 2: Accept the invite and confirm your Apple ID and password. Then, choose whether you want to share your own content purchases, and decide if you want to share your location. Consider enabling the latter feature if you want another way to locate your devices if they go missing, as other members will be able to find them using the Find My Friends and Find My iPhone apps.
Step 3: That’s it! You’re now part of the group and you can access shared music, videos, photos, and a wealth of other content.
Using Family Sharing
- Check your sharing status: Setting up Family Sharing means nothing if you’re not actually sharing your content with the other people in your group. To check your sharing status, go to Settings > iCloud > Family, tap your name and look over your account information under Family Purchases. Confirm your Apple ID by entering your password, and after that, you’ll be able to see if Share my purchases is on. If not, now’s the time to fix that. You can also change which account you’re sharing purchases from, but you’ll need to enter the Apple ID and password for that account to make the switch.
- Download other people’s content: There are three short and simple ways to download content being shared by other members of your sharing group, each of which depend on what type of content you’re trying to get. For Apps, go to the App Store and tap Updates > Purchased. For music, movies, and TV shows, go to the iTunes Store and tap More > Purchased. For books, open iBooks and tap Purchased. From there, select the family member’s name to see their purchases, and tap the download icon next to the item you wish to download. If you can’t see the item you want, that particular family member may have hidden it.

- Apple Music Family Membership: You sign up and pay for an Apple Music Family Membership the same way you would with an individual Apple Music Membership. The only difference being that you must choose Family Membership when joining, and you’ll be paying $15 per month instead of $10. For the extra $5, you get unlimited access to Apple Music for up to six people, including yourself. If you already have Apple Music, you can update to the family membership by going to the Music app and selecting the Profile icon in the upper-left corner. Then, tap View Apple ID > Subscriptions > Manage > Renewal Options. The family membership provides all of the same benefits as an individual membership, including unlimited listening, the option to download music for offline listening, and the ability to listen to Apple Music radio stations. Be sure to invite people to Family Sharing after getting the membership, and make sure everyone is sharing their iTunes Store purchases and has signed out and back into the Music app to apply the changes.
Family Sharing Tips
- Hiding app purchases: Apps are the only things that can be hidden using an iOS device. To hide an app, go to Updates > Purchases > My Purchases. Swipe left on the app you wish to hide, then tap Hide.

- Hiding iTunes Store purchases: For iTunes, look at the top of the window and select Account > Family Purchases. Choose Music, Movies, TV Shows, Apps, or Audiobooks at the top of the window, and then click All to show all of your purchases. Hold your cursor over the item that you want to hide and click the “X” icon in the upper-left corner. Click Hide when prompted to confirm.
- Hiding iBooks: Open iBooks and click iBooks Store. Under Quick Links on the right-hand side, click Purchased. Hold your cursor over the item that you want to hide and click the “X” icon in the upper-left corner. Click Hide when prompted to confirm.
- Unhide Purchases: In both the iTunes and iBooks Stores, go to the Account Information page, then to the iTunes in the Cloud section. To the right of Hidden Purchases, click Manage. Find the item that you want to unhide, an click Unhide to do so.

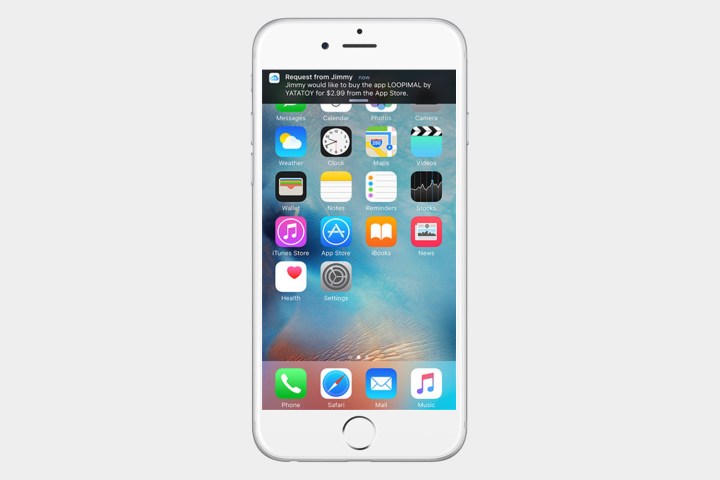
- Enabling Ask to Buy: Ask to Buy is a feature within Family Sharing that the organizer can enable in order to have the final say over what people under the age of 18 can buy. By default, it’s enabled for children under the age of 13. To enable the feature, simply go to Settings > iCloud > Family and tap the family member’s name before tapping Ask to Buy. If you turn this off after the member has turned 18, however, you can’t turn it back on.
- Approving/Declining Ask to Buy requests: Once activated, the organizer will receive a notification when a member with Ask to Buy enabled tries to buy a piece of content or install an app. If the request is approved, the organizer will need to sign in using their Apple ID and password to finalize the purchase. Another member of the group can be given permission to manage Ask to Buy requests, but only one person needs to approve the requests for the purchase to be final. To give another person these privileges, go to Settings > iCloud > Family, tap your family member, then tap Parent/Guardian.
And that’s how easy it is to set up and use Family Sharing on iOS.
Editors' Recommendations
- A big iPhone update is right around the corner
- Are you having iPhone alarm problems? A fix is coming soon
- The most common Skype problems and how to fix them
- What is NFC? How it works and what you can do with it
- 10 iPhone productivity apps you need to download right now


