
Solar eclipses, particularly total solar eclipses, are spectacular occasions. Although they aren’t actually rare, visibility depends on where you are at the time of the eclipse, which makes them feel very rare. Case in point: The next total eclipse will occur on July 2, 2019, but over the South Pacific and South America, and not visible at all within the U.S. (In case you were wondering, the next total eclipse to cross the U.S. won’t take place until April 8th, 2024.)
If you’re lucky enough to catch one, odds are you’re going to want to snap a few photos of the rare astronomical phenomenon — but this can be easier said than done. Here’s how to photograph a solar eclipse, from gear choice to safety — for you and your camera.
Extra protection
Unlike almost anything else you photograph, shooting a solar eclipse will require a bit more equipment than only a camera and a lens. To protect your camera’s delicate sensor and lens — not to mention your eyes when staring through the viewfinder — you’re going to need a solar photo filter. This is essentially a very dark piece of glass that fits over the front of your lens and is specifically designed to limit the amount of light without adding a color cast to the image.
Solar photo filters range from $20 all the way up to $250. As with most things in the photography world, you get what you pay for. High-end filters will likely be made of a more optically pure glass and therefore have less effect on the final images, while the lower-end filters will likely have some impact on the final image. That said, many of the negative qualities of a lower-quality filter can be touched up in post-production without much fuss.
If you’re wondering: Yes, it is technically possible to photograph the eclipse using standard neutral density (ND) filters. However, most solar filters reduce light by 16 to 18 stops — well above the average ND filter. This means you’ll need to stack multiple ND filters to achieve the same strength, which may reduce image quality or increase cost if you don’t already own them.
Likewise, you will also need a pair of sunglasses specifically designed for solar eclipses. Unlike your average sunglasses, they’re far stronger to ensure your eyes stay protected when looking directly at the sun. Note that eclipse glasses degrade over time, so if you have an old pair from your childhood, don’t trust them; get a new pair.
We can’t stress this enough: Do not look through an optical viewfinder or directly at the sun without proper protection. Additionally, do not keep your camera pointed toward the sun without the proper filter over the lens — even if the camera is turned off.
What to bring
On the topic of lenses, it’s ultimately up to you on what lens you decide to put on your camera. If you want a really-close-up shot of the eclipse as it happens, you’ll want a 500mm or longer lens. If you want to include a bit of foreground in the image to give context, something along the lines of a 70-200mm lens might better suit your needs. If you’re hoping to catch the entire sequence of events, a wide-angle lens might be your best option — something between 15-25mm, for example.
You’ll probably shooting with an aperture setting in the range of f/5.6, so a fast lens won’t be a necessity. Use what you have and make the most of it. Just remember to not photograph a solar eclipse without your solar filter attached to the front of your lens.
Other accessories you’ll need include a sturdy tripod and a cable or remote shutter release (not mandatory, but this will allow you to control the shutter without touching the camera — many modern cameras can be controlled via smartphone app, too). You won’t want to miss the shot because you forgot to charge a battery or format a memory card, so we also recommend having extras of those on hand.
The following video, created by Nikon for the solar eclipse in August 2017, does a great job explaining what you’ll need to capture the eclipse and what lenses might best fit your desired composition. Canon also has a website dedicated to shooting an eclipse.
Find your location
Once you have all of your equipment, next up is to figure out where exactly the solar eclipse will be visible and where you want to be in order to best compose the shot. Don’t worry, you don’t need a degree in astrophysics to determine the path of the eclipse — the good people at NASA have already done that for you. NASA’s eclipse website has everything you need, including a map detailing the paths of upcoming eclipses. You can also download the Smithsonian’s app for the August 21, 2024 solar eclipse.
Even if you aren’t in the direct path of the eclipse, known as the path of totality, you will still be afforded an impressive view within the much larger partial eclipse area. So, figure out how far you’re willing to travel to capture the eclipse, and get comfortable with the surrounding area so you’re better prepared when the event happens.
Plan on being at your desired location in advance to not only secure your spot, but also set up your equipment and play around with your settings to ensure your photos will turn out exactly as you’d like. Besides crowds, the only other obstacle you should face is weather. Unfortunately, there’s not much you can control in that regard, so it might be a good idea to have a secondary, backup location in mind that might have a better view.
When planning the composition of your photograph, don’t be afraid to get creative. We won’t all create the stunning, viral image that Ted Hesser made of the 2017 eclipse, but his story is a good example of why you should plan ahead. Rather than shooting only the sun, consider framing it within your environment. Shoot through a building or bridge, capture the silhouette of fellow star-gazers, and don’t be afraid to shoot from a lower or higher angle than everyone else. If you can, go out a day or two before and make note of exactly where the sun is at the time of the eclipse so you can plan your framing.
Sometimes, pointing your camera away from the sky can yield equally impressive results. Take advantage of the eerie light and unique shadows the solar eclipse will cast on objects. The leaves of trees will focus sunlight into crescent-shape shadows as the eclipse begins, and during totality, the entire area will look like sunset — but in all directions.
Camera settings
One of the most important things you can do is to understand what kind of settings you’ll be using when the time comes. As pointed out in the second part of Nikon’s solar eclipse video series, seen below, knowing exactly what settings you’ll need before the event will help ensure you’re not fumbling around with ISO and aperture when you’re trying to capture what is potentially a once-in-a-lifetime event.
The exact settings you use will vary depending on your location, when during the event you’re shooting, and the overall exposure you’re looking to achieve. That said, there are a few general settings you can keep in mind. The first step is to take your camera out of any automatic shooting modes, including but not limited to Program, Shutter Priority, and Aperture Priority. These work for a lot of situations, but with the quickly-changing scene of a solar eclipse, your camera will likely struggle to take into account the extreme brightness of the sun and the moments of complete darkness throughout the entirety of the eclipse. Your best bet is to shoot in the manual mode.
For the sake of simplicity, keep the white balance in the “Auto” mode but shoot in RAW. This will let you dial in the proper white balance later during post-production. As for the rest of the settings, odds are you’re going to want to shoot with a fairly small aperture — somewhere around f/8 through f/22. This will ensure everything in the scene is in focus. Shutter speed shouldn’t matter much, since your subject isn’t a fast-moving one and your camera is on a tripod, but unless you’re planning on capturing a long exposure shot, odds are you won’t want to go below 1/3oth of a second or so. This should ensure your shot is tack sharp and doesn’t have any blur.
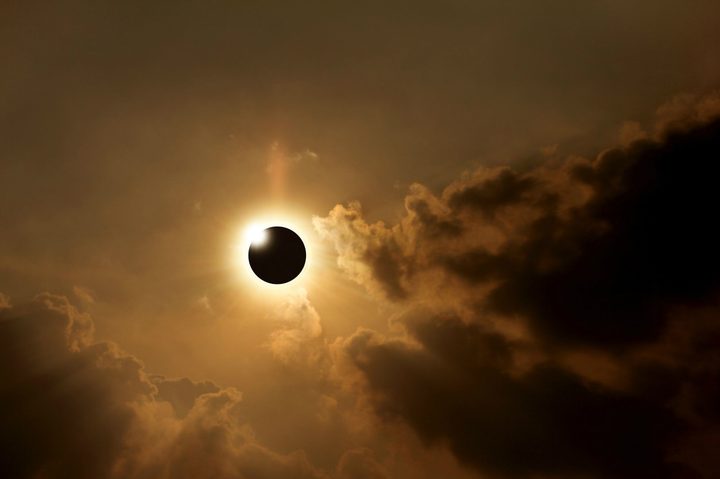
If you are in the path of totality, it is safe to remove the solar filter only during totality. (If you are not in the path of totality, it is never safe to do so — even if 99-percent of the sun is blacked out, the remaining 1-percent can cause permanent damage to your equipment and eyes.) During totality, you will have at most a few minutes to capture the sun’s corona, which is too faint to be seen through a solar filter. The length of totality varies from eclipse to eclipse, so it’s a good idea to know exactly how long totality will last for the eclipse you’re shooting, so you know when to pop that solar filter back on your lens. The August 21, 2017 total eclipse lasted just 2 minutes and 43 seconds.
If video is more your cup of tea, the same settings and rules apply. Just flip your DSLR into its video mode and expose for the sun — again, with the appropriate solar filter in front of the lens. The video should come together as the solar eclipse takes place. Keep in mind many DSLRs have 30-minute capture limits, due to unusual regulations, so be ready to stop and restart your video if you’re planning on capturing the entire event. Extra batteries and memory cards will likely prove beneficial as well, since video capture burns through both fast.
Photographing the eclipse with your phone
If you don’t have a DSLR, mirrorless, or point-and-shoot on hand, don’t worry. Even though it’s limited, the camera inside your smartphone is more than good enough. Using any number of adapters, such as this universal Gosky mount, you can connect your phone to a standard telescope and capture the action from up-close. Remember though, always have a solar filter on your telescope when viewing the sun, be it with your phone or your own eyes. (Again, it is safe to remove the filter only during totality.)
You may also want to use an app that lets you control more of the camera settings on your phone. There are even apps that let you shoot in RAW, preserving more information so you can make adjustments later and get even better results. Apps that let you manually focus might also save you some time; simply focus to infinity and wait for the eclipse. When you tap the shutter button, there will now be no delay as the camera tries to hunt for focus.
Finally, as important as the photograph is, be sure to take in the eclipse with your own (protected) eyes. It’s not every day you get to see an eclipse, so live the moment through your own lenses, not just the one attached to your camera.


