With the new year upon us, do you have any resolutions related to your PC? And no, I don’t mean cutting back on the time you spend gaming or buying an exciting new graphics card. I’m talking about the one thing most PC builders dread: cable management.
There’s no better time to clean up the cabling in your PC, and while intimidating, the whole process should actually be pretty quick — not to mention beneficial to your computer. Here are some tips to help you sort out the cables inside your PC case.
Pick up some accessories
Whether you’ve been giving the inside of your PC a side eye for a while now, or you’re planning out a new PC build and want to do cable management the right way, there are a few things to prepare ahead of time. For the latter option, where you’re getting a whole new PC, you might even want to buy components that specifically support tidy cabling — more on that later. For an existing build, the expense is pretty negligible.
The key to keeping your cables nicely organized lies in being able to tie them together neatly. To that end, stock up on zip and velcro cable ties. For the zip ties, you’ll also need a small pair of wire cutters, either for removing the excess or rearranging the tie altogether — and trust me, that will happen.
It’s generally better to have too many of these than too few. You won’t use all of them, but a 100-pack of zip ties is only around $7 to $10, so you might as well pick it up, even if that’s too much for most builds. Velcro ties are generally a little pricier but still come in packs of 50 to 100, so just get what’s readily available.
One tip that helps, especially when you’re putting everything together, is using colored cable ties. That way, you can designate specific colors for each cable type; for instance, yellow for the GPU and red for the drives. Once everything is in place, you can replace these with pure black or white or keep them if they’re all tucked away behind the motherboard.
You can also consider buying a cable sleeve (or a couple of them). These sleeves, made out of fabric or plastic, tend to be pretty easy on the eyes, and you can buy a colored one if you’re working on an aesthetic PC build. However, if you can get by without them, your build might be better off — they’re pretty bulky and encourage stacking up cables instead of routing them neatly where each cable has its own little nook.
Plan ahead
Now that you’ve got everything ready, it’s still not yet time to rush in and start zipping up cables. Instead, start by planning ahead.
Unplug everything both from the PSU and from the motherboard. If you’re working on a new build, you can slot your PSU in the right place, but there’s no need to start plugging stuff in. You’ll work your way there and plug everything in at the very end, and by then, you’ll know which cables you even need to use if your power supply is modular.
The easiest way to approach this is to start with major connections, such as the 24-pin motherboard connector, the 8-pin CPU connector, or the PCIe connector for your graphics card. Those cables are often pretty bulky, so it’s easier to get them out of the way first and try to minimize the space that they take up and route them through their designated cutouts and channels. Once you’re satisfied with these major connections, you can move on to fan and RGB headers or SATA drives as a final touch.
Before you even start doing any of this, try to plan out the optimal route for each set of cables. The goal is to minimize the visible cabling that can be seen at the front but also to keep things tidy at the back, behind the motherboard. This is especially important if your chassis doesn’t feature any extra space for the cables because it means you’ll have to avoid stacking them on top of each other at all costs, or they might not even fit.
One more thing to plan in advance for — fan and RGB headers. Both for the sake of tidiness and due to a limited number of headers on your motherboard, you might want to daisy chain these connectors, allowing each header to power up multiple fans or LEDs. However, keep in mind that each header can only support a certain number of fans — usually up to three. This is why, when buying a motherboard, it’s important to read the specs carefully and anticipate the number of splitters you might use in your particular build, both for cable management and for ensuring everything runs smoothly.
If you’re new to PC building as a whole, our guide is a good starting point that tells you where everything goes and some helpful tips to read up on if you want to avoid some of the mistakes I’ve made in my previous builds.
Not just in the front
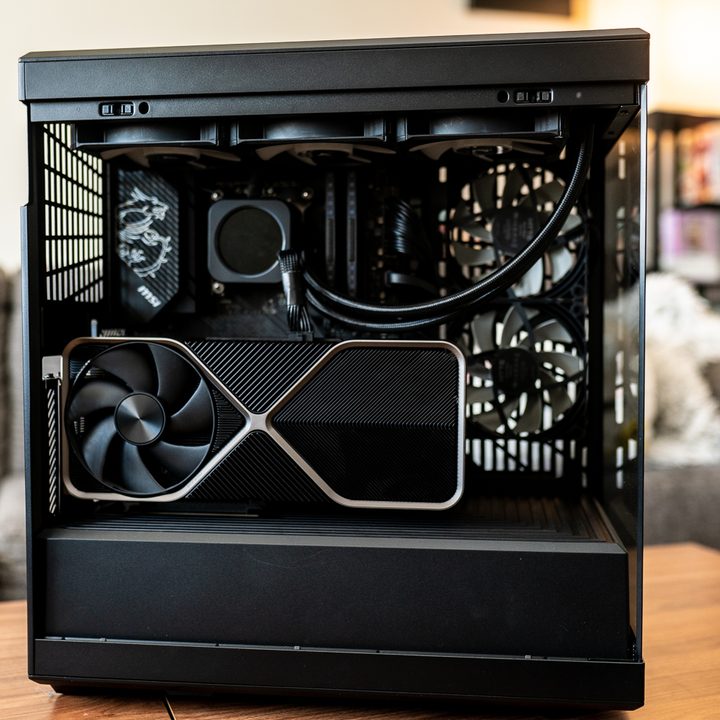
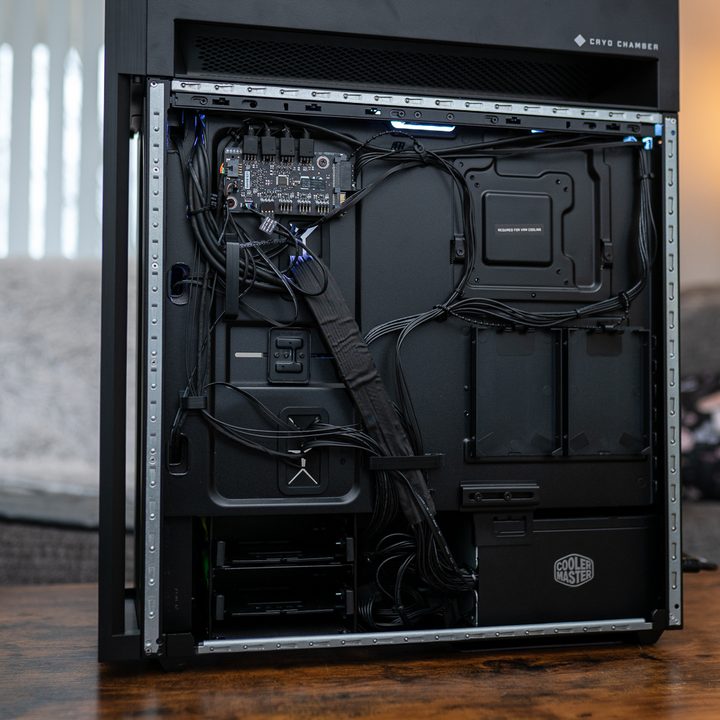
Cable management is what gives you that nice, clean look that many PC builders strive for. Your GPU, motherboard, and fans are placed front and center with minimal cabling in the way. However, it’s also possible to achieve that look while letting your motherboard and case hide away a complete mess of tangled cables. It’s the PC-building equivalent of quickly shoving dirty clothes into the closet because you have guests coming over in 10 minutes — it works, just as long as you don’t inspect it too closely.
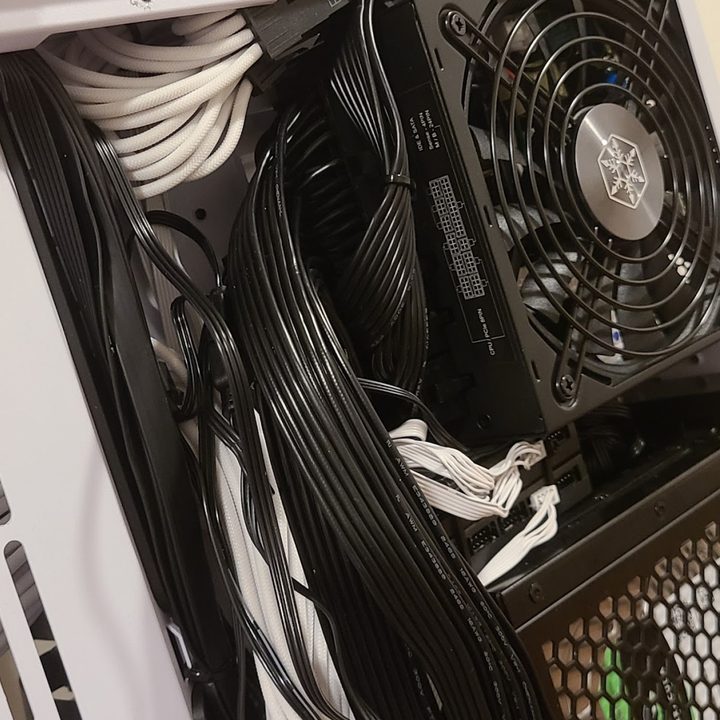
There’s no harm in adopting this halfway-done approach and calling it a day, but if you want optimal cable management that doesn’t just look nice but also contributes to ease of use and durability, it’s just as crucial to make sure it’s equally tidy behind the motherboard. Here are a few tips that can help with that.
For starters, begin by plugging components into the motherboard one by one, and avoid crossing cables. It looks bad, it adds height (which, as I’ve mentioned, can be an issue with some cases), and it makes it harder to find your way around them if you’re ever going to go back and unplug something. Route them behind the motherboard tray and use cable channels to simplify this process.
Next, ensure you’re tying your cables frequently to achieve a neat look that doesn’t take up too much space. However, make sure that it’s not so tight that the cables end up bent, as that can disturb the connection — not to mention that over-tightening with zip ties can damage the insulation or even the internal wiring. To make the process easier, start by zipping them in a couple of places just to keep the cables from tangling (which they always mysteriously manage to do), and once you’ve routed them in a way that you’re happy with, zip a few more times. Cut off the excess and rotate the tie for aesthetic purposes if you’re using zip ties.
If some of your cables are too long, fold them and zip them to make them take up less space. You’ll usually have a drive bay (or a couple) free at the end of it all, so you can, for lack of a better word, stuff the excess cables in there when you’re wrapping up — but make sure that they’re all zipped separately so that you don’t pull out a mess of knots a few months later.
Finally, once you’re ready to plug everything in, start at the bottom of the PSU and work your way up. It’s easier to reach every connector that way.
Get a modular PSU
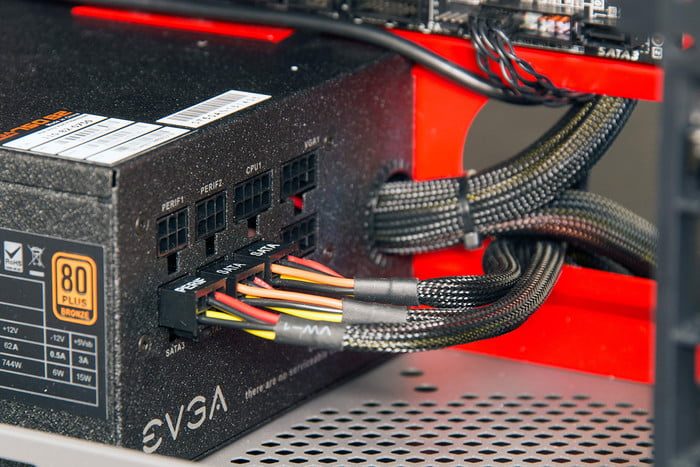
This isn’t something that you can do just with things you already have at home, but if you’re planning to buy a new PSU, picking the right model is almost like a cheat code for cable management. I don’t just mean that you need one of the best PSUs — you need one that’s modular.
Modular PSUs let you pick and choose the cables that are necessary to your build, while cheaper, non-modular models come with all cables permanently attached. Not only is that a nuisance during installation, but it also means that cable management is always going to be a little limited. After all, your PSU will have many unnecessary cables sticking out of it. It’s a good thing that many cases hide the PSU away.
Using a modular PSU makes cable routing a lot easier. You can attach the cables after it has been installed inside the case, making them easier to maneuver. The lack of extra cabling contributes to slightly better airflow. In addition, when you go back to give your PC a good clean once every few months, you’ll have fewer cables to deal with and an overall easier process.
Pick the right case

Two main factors play into buying a PC case: the aesthetic and whether it suits your particular build. However, if you’re a fan of tidy cable management, you should also consider those kinds of features when you shop for a chassis.
Start by looking for cases that offer ample space behind the motherboard tray. This space is crucial for routing and hiding cables, especially the thicker 24-pin ATX and 8-pin EPS power cables. You don’t want to force the back panel to bulge, and with a gap, even thicker cables will fit just fine.
Many modern cases take it a few steps further and offer cable routing cutouts or holes on the motherboard tray, ideally with rubber grommets. Usually placed strategically near the PSU, along the sides, and around the CPU area to make routing less of a headache. In addition, a PSU shroud is a given in many of the best PC cases, and it’s a must in any build where aesthetics matter.
Several manufacturers pay close attention to cable management features. Some of the cases that really get it right include the NZXT H510i (but also the majority of NZXT’s lineup), the Lian Li Lancool 216 , or the Phanteks Enthoo Pro 2 . They each offer a different set of cable management solutions, including things like attachment points, velcro ties, and routing options.
Buying a new case isn’t as easy as swapping out the PSU. Depending on your motherboard and the rest of your build, you might upgrade more parts than necessary. That’s why this one is easier to do when you’re planning out a new PC rather than when you’re following through o-n a New Year’s resolution to clean up your cable management.
Redoing your cable management from scratch will take you anywhere from an hour to half the day, depending on how meticulous you are and how many times you’ve done this before. That’s okay — this is one of those things where it helps to take your time and enjoy the process. At the end of it all, you’ll have a PC that looks great, has far better airflow, and is easier to manage going forward, so it’ll be worth the time it takes you to do this.