Navigating through a Microsoft Word document can be a tedious task for some. Assignments and contracts can lead to many pages that can be hard to keep track of. One solution Microsoft offers for this is a table of contents. In addition to providing an outline and general overview of the content, the feature gives the document a more professional look.
Even if you already know how to use Microsoft Word, you may not know how to create a table of contents.
Making a table of contents in Microsoft Word is actually quite simple, but it turns out that the quick way won't always give you the results you want. Still, it is worth a try. But to make sure it works effectively, regardless of which method you're using, remember to add page numbers to your Word document first.
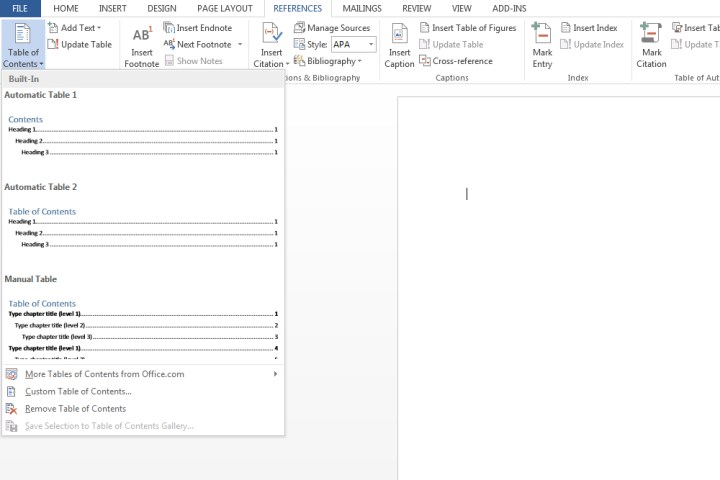
To quickly make a table of contents in Microsoft Word choose the "References" menu at the top of the window and select "Table of Contents" from the dropdown menu. Then, choose a style. A table of contents for your existing information will appear.
Not perfectly satisfied or see something missing? Our more in-depth guide below will handle all of the more complex situations you might face.
Preparing headers
Before you insert the table of contents, you will need to apply heading styles to the pages on your document, which will then be used by Word to formulate the table itself.
Step 1: Go to each page of your document and implement a heading style to the title via Home > Styles. You can also choose to apply subheadings that provide further context to a given page. Heading 1, Heading 2, and Heading 3 are the choices you can use to format headings in order to populate the Automatic Table, which is the most straightforward way to create a table of contents.
Step 2: Now use your cursor and click the area where you want to insert the table of contents. The first page is usually a suitable place for this. Click the References tab and select the Table of Contents button.

Step 3: Choose Automatic Table 1 (Contents) or Automatic Table 2 (Table of Contents), which is only differentiated by the titles each setting will apply.
Microsoft Word will now rely on the headings applied in step 1 to form the table of contents, which includes any text where Heading 1, Heading 2, or Heading 3 was applied to, as well as the associated page number.
For reference, I applied Heading 1, Heading 2, and Heading 3 for the first three header titles shown below, which gives a tiered look to the table of contents.

Updating a table of contents
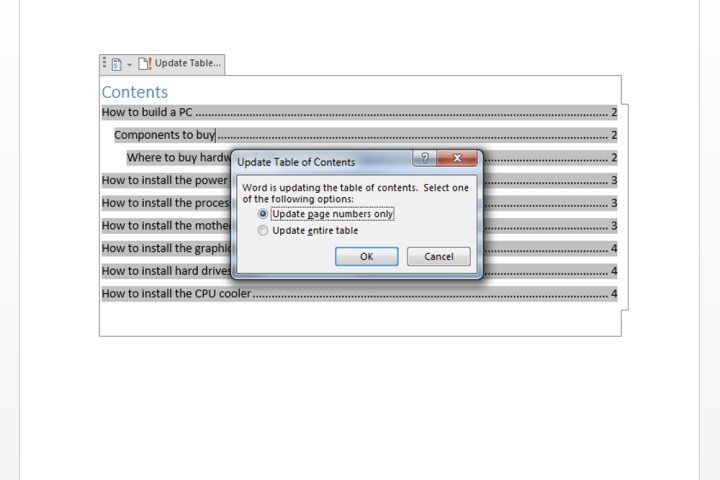
Step 1: Select the table of contents. Click the References tab and then select Update Table.
Step 2: Choose from either:
Update page numbers only: This option won't update any changes made to the headings, but rather just the page numbers.
Update entire table: This will update the table with any heading-based text that has been modified, in addition to page number changes.

Table of contents customization
Not satisfied with how the table of contents looks via the existing templates? Conveniently, there’s a way to modify the look of your table.
Step 1: Click your table. Select the References tab, choose Table of Contents, and click the Custom Table of Contents.

Step 2: Within the window that popped up, you can make various adjustments to the table, including how many levels to show, removing page numbers, and alignment changes. You can also open the Options button for further customization. Click OK when you’re done.

Step 3: If you want to apply additional formatting such as changing the appearance of the text within the table, simply highlight what you wish to change within the table, and modify the size, color, style, etc. These options are located within the Home tab.
Manually making a table of contents
Your document may be set up in a way that may make populating an Automatic Table of Contents difficult. As such, you can opt to insert a manual table instead.
Step 1: Click References, select Table of Contents, and choose Manual Table.
As its name suggests, you will be required to make all the necessary edits such as page numbers. It can’t be updated automatically. You'll need to input all the relevant details yourself.
Step 2: To further customize the manual table, click the table of contents you created. Click the Custom Table of Contents field within the Table of Contents menu.

Removing a table of contents
Click the table itself, then select the Table of Contents menu, and choose the Remove Table of Contents option. If this doesn't work, it might be useful to know how to delete the page instead.
For more useful features you can use on Microsoft Word, check out 6 things you didn’t know you could do in Microsoft Word.


