
Despite the gaming consoles scattered about the Digital Trends office, a few of us felt like it would be a great idea to introduce our coworkers to the nostalgia-inducing arcade games that are available only on a PC.
We also happened to have Intel’s Next Unit of Computing, a tiny yet surprisingly capable PC, sitting around. Rather than putting it to work with something mundane, we decided to give it a chance at glory, and set about making it the heart of a table-top arcade cabinet. Here’s how we did it.
Not just any arcade machine
The main goal of our project was to play a handful of our favorite indie games from Steam, so we knew that we would need a little more kick than a Raspberry Pi could provide, as well as a full version of Windows if we wanted complete compatibility.
The retro aesthetic has been popular lately, so these games have relatively low system requirements.
Our second goal was to make sure the whole system could be booted up by anyone who wanted to play without a lot of time or effort, which requires more than tweaking a few settings in Windows.
Finally, we wanted a system that could be self-contained, but that could also hook up to a spare projector or TV if desired.
Since the games we wanted to play were the highest barrier of entry, we started there. The games we had in mind were titles like Nidhogg, TowerFall Ascension, Samurai Gunn, Divekick, and OlliOlli. They’re all great indie games that are easy to pick up, with only a few buttons each, and high replay value.
The retro aesthetic has been popular lately, so these games have relatively low system requirements. We evaluated the highest requirements for each game, and discovered we needed at least two gigabytes of RAM, a processor clocked at 1.4GHz or higher, and integrated graphics supporting DirectX 9.
The NUC emerges
Intel’s Core i5 NUC fit this purpose admirably. It offers a Core i5-5250U and Intel Integrated 6000 graphics, making it capable of 4K video output. It isn’t a blazing fast PC, but its self-contained, cool, quiet, and packs all the necessary inputs and outputs. We also pulled out a flat panel display that was collecting dust in one of the storage closets, and re-purposed it for this project by removing the stand and grabbing a VESA mount to put in the cabinet.

Realistically, almost any newer system will work for this project, but it’s important to look at any games you want to play and then meet or exceed the recommended specs for those games.
There wasn’t much else to do in terms of prep. For simplicity’s sake, we created a new user account on our Windows installation with all user permissions, and no password, which we’ll get to later.
The cabinet
After spending some time looking at different arcade cabinet builds across the Internet, it became clear that we were going to have to create something ourselves. We have counters that run across all of the windows in the office, so we decided on an easy to move counter-top unit that would allow a nice backdrop of downtown Portland.
Thankfully there’s a bustling community of builders interested in putting together arcade cabinets that play everything from classic MAME games to the newest fighters, and it was easy to find lots of building tips and design ideas on the Build Your Own Arcade Cabinet (BYOAC) forums.


Everyone’s cabinet is going to be different, based on screen size, computer size, and number of players. The best course of action is to start with a monitor, since it’s usually the largest single piece of the build. In our case we used a 27-inch monitor from Acer because it’s an ideal size for a small arcade cabinet designed for use by up to two players. We modeled the monitor itself in Sketchup, which made it easy to build the rest of the arcade around it.
You can download our Sketchup file for your own use. Remember, though, that we modeled our cabinet after our specific monitor. A different sized display won’t fit. You might also run into trouble if you pick a 27-inch monitor with much thinner or wider bezels. Double-check the measurements before buying materials.
It’s advisible to leave at least part of the machine open for easy access.
We used medium-density fiberboard (MDF), a type of plywood, because it’s cheap, relatively lightweight, and sturdy enough for our application. Some extra scrap 2x4s were used as supports and crossbeams to reinforce the cabinet. Once everything is cut, you’ll want to lay it all out with your components to make sure everything fits together nicely.
It’s advisible to leave at least part of the machine open for easy access to the internals, should you need to fix a joystick connection or want to upgrade the PC. It will also help keep the machine lighter if you want to move it, and quieter since you won’t need any extra cooling.
We primed, then painted ours because the plywood had earned some scratches and dents during construction, and then we affixed stickers to it to make it our own.
The controls
Of course it wouldn’t be an arcade cabinet without arcade controls. The basic idea is to wire buttons and joysticks into an IO panel like an Arduino, and then plug it into the computer as if it were a keyboard, with each button sending a letter signal. In order to improve compatibility with Steam games, we used a program called X360ce to turn those keyboard button presses into Xbox controller inputs.
For our purposes, we found that a Teensy 3.1, which is similar to an Arduino, had more than enough inputs. Its simple interface is very appealing, since it makes software setup a lot easier.


When it comes to joysticks, there are a number of different ways of reading the input directions, but the two most common are 4-way and 8-way. A 4-way joystick also physically limits the actual movement of the stick to four directions, so when you’re playing a game like Ms. Pac-Man you don’t end up with dead zones in the diagonal corners. We’re mostly interested in playing modern games and some shoot-em-up MAME titles, so an 8-way joystick was our choice.
In the end, we decided that what we most preferred from them was an appealing price point, so we chose the Happ Competition buttons and joysticks. They’re affordable, well-reviewed, attractive and easy to mount. Setting up the controls with the Arduino is pretty technical, and required a bit of circuit design and soldering, but it’s worth it if you want the true arcade control experience without having to shell out for a pre-built model.
Setting up the controls with the Arduino is pretty technical.
While we won’t get into the intricacies of building and wiring a control panel, the basic explanation isn’t too complicated. The microcontroller consists of a series of numbered digital inputs, a negative (or ground) pin, and a power pin. We aren’t powering the buttons, so the first step is to run the ground through all of the negative contacts on the switches.
Each switch has two other contacts, which are normal closed or normal open. Because we want the pushing down of the button to trigger the circuit, we’ll contact the “Normal Open” contact to corresponding pin on the micro-controller. Now, whenever the button is pressed, it will connect the ground and the pin, and the Arduino code will interpret the signal as a button press.
Start by wiring everything to a breadboard, a plastic board that lets you secure wires and circuits temporarily. Once you’ve done that and find everything works, you’ll want to solder it all down to make sure no connections come loose later on.
Boot to Steam
Next we wanted to set the system up so it booted directly into Steam Big Picture Mode. In the Steam settings, underneath Interface, check the boxes labeled “Run Steam when my computer starts” and “Start Steam in Big Picture Mode.”

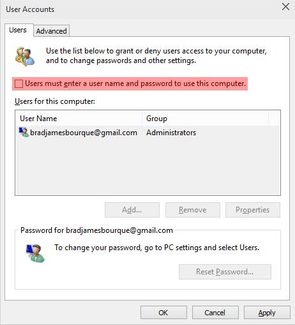
Bypassing the login screen was a bit trickier, but the setting is found by accessing the more advanced user options frame. Simply hold down the Windows key and press R to bring up the run menu. Type in “netplwiz.exe” without the quotation marks and hit enter. In the window that pops up, uncheck the box that says “Users must enter a user name and password to use this computer” and click okay. It will ask you to set a username to login to initially, where you should type the name of the new account you made, and put in the password if you set one.
Since anyone can now login to your computer without entering any credentials, we use the limited access user account as the default login, preventing any shady access to your computer, but it’s better to just use the machine as a dedicated gaming platform and not leave any sensitive information or applications on it.
 If you don’t mind seeing some of the Windows interface before Steam starts up, you can just stop here. Your computer will still boot into the standard Windows desktop for a few seconds before Steam starts, but it will work just fine. The next few steps require a bit more tinkering, and while they’re all easily reversible, they’re best put to use on a system where you don’t plan on using it for anything else for a while.
The shell is the term used to refer to the basic interface of the operating system, in the case of Windows, it includes the start menu, desktop, and Windows Explorer. By setting the system not to start up Explorer on login, you’ll just see the Windows boot screen and then the Steam Big Picture Mode interface. In order to do so we’ll have to edit your registry, which is basically the table that your computer stores a lot of pertinent information in, like who the user accounts are, where programs are stored, and the settings for pretty much every part of the operating system. It’s important to be very careful when tinkering with your registry, as editing the wrong value can force you to re-install Windows completely.
While holding down the Windows key, press R to bring up the run menu, type in regedit and hit enter to run it. In the program that opens, navigate to where Windows stores the location for Explorer, which should be under [HKEYCURRENTUSER…]. In this submenu, right click on the “WINLOGON” folder and select New, then String Value.
Emulators can boot straight from Steam, even in big picture.
For the name, enter Shell, and click [CREATE]. Right click on the Shell file you just created, and select Modify. You’ll need the path to your Steam application, which by default will be found in your Program Files folder, in the Steam folder as Steam.exe.
You can also right click on the program in your start bar and select “show application location” to have it show you to it. You can then right click on the .exe itself and take the file location from the details window of the properties.
Emulators, too!
Because we spent all this time setting up buttons and joysticks, we should also make good use of them for some non-Steam games. If you have physical copies of old games, you can make backups of them and use a program called an emulator to play the backups. By using ICE, an open-source Steam integration app, we can set up all of the emulators to boot straight from Steam, even in big picture.
On the ICE site you can find instructions for setting it up and connecting it to Steam, as well as a list of compatible emulators. By editing the config files in Notepad, you can build a list of emulators organized by the systems they’re compatible with.
The finished product
Putting together your own arcade isn’t the easiest project, but anyone with access to a few basic tools can do it. Your build may differ from ours dramatically, depending on your available components and tools, as well your own personal goals. If you want more help, the BYOAC forums are an awesome resource, as well as a great place to ask questions and get help from veterans.


