Evernote is a commitment, and requires religious use to get the full benefits. That means taking your entire paper-based filing system and converting it to digital — a time-consuming task.
The benefit is measurable, however. Notes can be saved and synced across devices and can include text, photos, voice memos, and uploaded or scanned documents. You can file notes into notebooks, and further categorize them into tags. Sharing is easy, and while the interface isn’t the easiest to learn, it is quite powerful.
Getting Started
You’ll need to set up an account to get started with Evernote. We recommend completing this process on the Web before downloading the desktop or mobile app. This way, you can get started using Evernote right away — and in some cases the apps work better as you don’t necessarily need to be online to access data.
Create an new account
Start by heading to the Evernote registration page. You can choose to use either your Google login credentials or an e-mail and password to sign in. Click Create Account and you’re done. Evernote doesn’t require that you activate your account, so it’s already ready to use.
Free accounts allows you up to 60MB of uploads, and syncing across two devices (Web access is included). Upgrading to Plus increases this to 1GB and costs $35 for the year, while Premium costs $70 per year and gives you 10GB of uploads. With both Plus and Premium, there is no limit to the amount of devices you can sync to.
(Note: While Evernote calls it “uploads,” we’ve noticed in our own use that it’s more accurate to call it bandwidth. As you sync to multiple devices, your available data will shrink. This might make it hard for many to stay with the strict confines of Evernote Basic.)
Each Evernote tier gives you more flexibility on what functionality is offered. The free account allows you to clip web pages and images, search for text inside images (a feature we’ve found extraordinarily useful), share and discuss notes, and add a passcode to your mobile apps. But we suspect many may want a bit more.
The chart below shows the difference between Plus and Premium in terms of features. We’ve colored the Basic tier features in blue so you can see the difference.
|
Plus |
Premium |
| Clip web pages and images Search for text inside images Share and discuss notes Add passcode lock on mobile apps Access notebooks offline Forward emails into Evernote Customer support via email |
Clip web pages and images Search for text inside images Share and discuss notes Add passcode lock on mobile apps Access notebooks offline Forward emails into Evernote Customer support via email Customer support via live chat Search for text in PDFs Search for text in Office docs Annotate PDFs Scan and digitize business cards Present notes in one click Browse the history of your notes See related notes and content |
To prevent any hiccups, if you are planning to use Evernote across more than one device, upgrade your plan before you start to download the app to your desktops, laptops, and mobile devices.
Use the links below to install Evernote on the device of your choice.
Creating notes
Look for the ‘+’ button on the left-side menu and click it. A new screen appears asking you to give the new note a title. Give it a title, and then click on the body field below and start typing your note. When you’re done, click Done in the upper right hand corner which takes you back to the dashboard.
On the iPhone, look for the green ‘+’ button in the center of the bottom app menu. It looks like this:

Android users, tap the green ‘+’ button on the lower right, it looks like this:

You’ll see a similar edit screen to the one we showed. So what if you want to add more than just text? If you’re using the web or desktop based versions, you can drag and drop files into notes, including photos and attachments. The various options are found in the toolbar.
 For the mobile apps, within the note taking screen, look for a ‘+’. Tap that, and you’ll get a host of options of what you can add to a particular note. Here’s an example of what you’ll find in that menu on iOS — Android users will see similar options.
Web Clips
We’d recommend you also install the Evernote Web Clipper. The extension is available for every major browser, and it allows Evernote users to save Web snapshots or entire articles while retaining all text, links and images originally embedded in the page.
|
Browser |
| Google Chrome |
| Mozilla Firefox |
| Opera |
| Safari |
| Edge |
Once installed, click the Evernote note button located in the top of your browser’s tool bar and log in using your given credentials. Click the Evernote button again, select the type of clip you’d like, what notebook you’d like it in, and add any tags. When finished making your selection, click the light-green Save button to add the Web clip to Evernote.

Editing & organizing notes
Formatting text
On the web and desktop versions of Evernote, all your formatting options are located in the toolbar.
Just like you were typing in Word, just highlight the text you need to change and use the options in the toolbar to enhance your note. On mobile versions, you’ll find an abbreviated version of the toolbar directly above the on-screen keyboard.
 Creating reminders
If you need to be reminded about a certain note, Evernote’s reminder option is pretty handy. These alarms are synced across all devices, so setting an alarm on one device will automatically set them up on others.
Look for an alarm clock icon that looks like this: 
This icon is found in the toolbars of the web and desktop apps, or by sliding a note left from the screen where all the notes are listed. Tapping or clicking that icon will bring up another menu, where you’ll need to tap Notify Me. From here, select either Tomorrow or In a Week if that fits your needs, or a specific time and date you want to be notified.
Creating tags
Tagging may be one of the most basic things you can do, but it’s also one of the most useful when it comes to sifting through a laundry list of chosen topics. Tags are essentially ideas that serve as identification words, allowing you to quickly bundle similar notes under a specified banner topic.
In Evernote web and desktop, you’ll want to look for an icon that looks similar to a price tag. On the web version you’ll need to click it, but on the desktop software you’ll need to click in the white space beside the icon. On mobile versions of Evernote, look for the tag icon on Android, and the ‘info’ button (a letter i) within the note taking screen.
After entering your tag, type a comma, and it will save the tag automatically to your note.
Creating notebooks
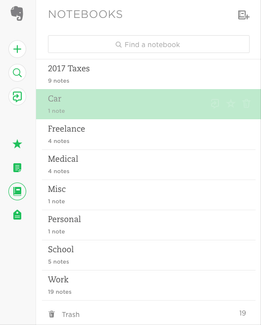
Like the aforementioned tags, notebooks help organize notes under a banner topic or common thread. Once created, simply drag and drop notes into their respective folders.
For each platform, the process varies slightly, but it isn’t too difficult to master. Web users will need to click the Notebook icon in the left side menu, and then the icon at the top right of the menu that appears. Desktop users similarly will want to click Notebook on the left side menu, and then New Notebook at the top of the menu.
Android users can find the New Notebook option by sliding the menu out by swiping from the left of the screen and selecting Notebooks, while iOS users can find the option from the dropdown menu at the top of the main screen of the app.
Sharing notes
Evernote boasts quite a bit of individual appeal, but that doesn’t mean you can’t share your notes and notebooks with family, friends, and colleagues.
 Both the web and desktop versions contain a share button that is located on the top right of the note window. Click it to show the sharing menu. Pictured to the left is the web version, which allows you to share the note.
The desktop version looks slightly different and gives more options, including sharing an entire notebook. If you’d like to share socially, use the Post Public Link To option. In either mobile version, click the share button (three dots in Android, a box with an upward arrow in iOS) to share your notes.
Tips & tricks
It’s nearly impossible to cover every evolving nook and cranny of Evernote, let alone the cornucopia of features and specifics tailored exclusively for the differing platforms it runs on. That being the case, we’ve outlined a few general tips and tricks below for making the most of Evernote regardless of your device. I doubt they’ll make you an note-taking expert right off the bat, but consider them the second level of Evernote once you’ve mastered the basics of creating, tagging, organizing and sharing your notes.
Keyboard shortcuts
Keyboard shortcuts are the bee’s knees when it comes to intuitive commands for navigating software. That being said, Evernote’s time-saving shortcuts let you carry out common functions, such as creating new notes and tags, without ever having to switch between your mouse and keyboard. Below are some the most useful and commonly utilized shortcuts, currently available on Mac OS X and Windows desktop platforms.
| Mac OS X | Windows | |
| New note | Command + N | Control + N |
| New tag | Control + Command + T | Control + Shift + T |
| New notebook | Command + Shift + N | Control + Shift + N |
| Save note | Command + S | Control + S |
| Close note | Command + W | Control + W |
| Print note | Command + P | Control + P |
| Search notes | Option + Command + F |  + Shift + F + Shift + F |
| Sync | Control + Command + F | F9 |
| Quit | Command + Q | Control + Q |
Utilize other Evernote apps
Although Evernote’s flagship product is Evernote (duh), the company also offers a few other pieces of note-taking and productivity software that function rather flawlessly in conjunction with Evernote. For instance, products like Skitch offer additional tools for editing and annotating Evernote photos (Mac and iOS), and Scannable offers iOS users an easy way to import documents into the software. Finally, if you have an iPad — and especially an iPad Pro with Apple Pencil — be sure to purchase Penultimate on the App Store. The app allows for you to doodle handwritten notes, and seamlessly integrate them into your notebooks.
Encryption
It’s a good rule of thumb not to digitally share precious notes and notebooks you deem sensitive. However, we recommend adding a level of encryption if you choose to do so for whatever reason. Simply highlight the portion of the note you wish to encrypt and press Command + Shift + X (Mac) or Control + Shift + X (Windows) to bring up the encryption preferences. When prompted, create a case-sensitive passphrase and an accompanying hint that other users must enter in order view the previously-specified portion of the note.
Scan documents
Not all Evernote notebooks consist of digital documents. It’s not a bad idea to scan and save physical documents, such as research papers and receipts, so you can digitally access them later as you would a actual file cabinet. The mobile Evernote app even includes a dedicated document mode when using the app’s camera functionality, thus allowing users to quickly frame and snap a quick photo of a particular document.
Email yourself
Few people know that all Evernote accounts comes bundled with a complimentary email address. Once you locate your designated email address — viewable within the main Evernote settings — directly email any audio clips, snapshots, and any other notes you want to saved to that account. Once received, the notes will be automatically be deposited and saved as new notes in your default Evernote notebook.
Article originally published on 2-2-2014. Updated on 5-26-2017 by Ed Oswald: Updated to reflect current versions of software and to add instructions for all platforms.