Google Docs is a cloud-based Google product with all the features you need to create, edit, and share documents. Google offers a suite of apps designed for users who work online. Integration with Google Drive’s cloud storage capabilities allows you to access and work on your documents from anywhere.
Switching to Google Docs can be a daunting task since there are a lot of new features to discover, and the document editing interface might look unfamiliar.
You can get started with Google Docs by following a few simple steps, and learning more about the different features of this tool will help you become a Google Docs expert in no time.
Step 1: Setting up your Google account
Using Google Docs requires you to sign up for a Google account. It’s free to do so, and your account provides you with access to Gmail, Google Maps, and YouTube, as well as the entire Drive suite.
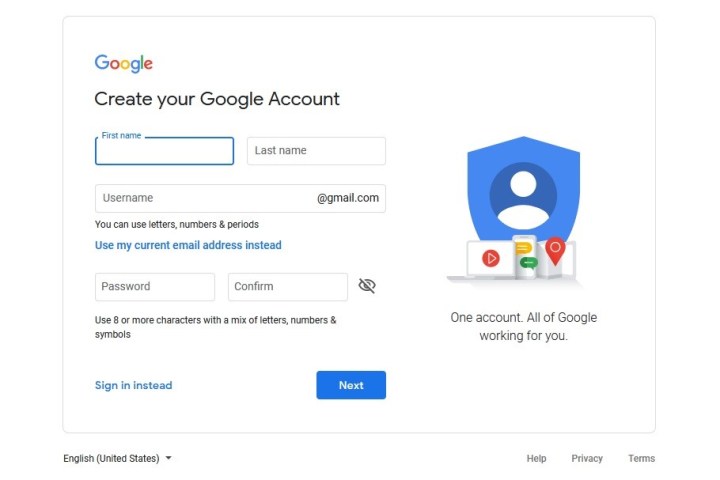
To create a Google account, navigate to the sign-up page. Enter your information and follow the on-screen prompts. Congratulations! You now have a Google account. If you already have an account, just log in as you normally would.
Step 2: Launching Google Docs
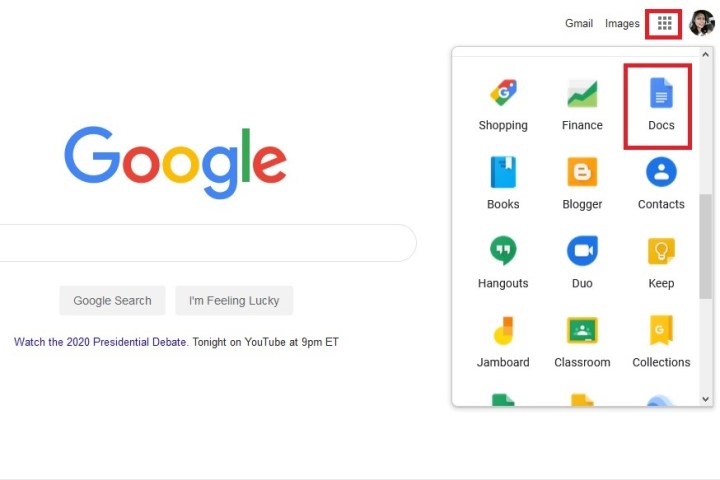
There are several ways to access Google Docs, depending on your device. You can download the app from the App Store or Google Play, or click the Google Apps icon in the upper-right corner of the Google home page (represented by nine dots). You must then click the Docs button — you may have to scroll down within the menu that pops up or click More From Google in that same pop-up menu to see it.
Alternatively, you can navigate to Google Drive and select Google Docs within the My Drive drop-down menu at the top, or select Google Docs after you’ve clicked New on the left-hand side of the page. The last option is to navigate directly to Google Docs. Once you’ve launched the web app, you’ll be ready to create a document.
Step 3: Creating a document
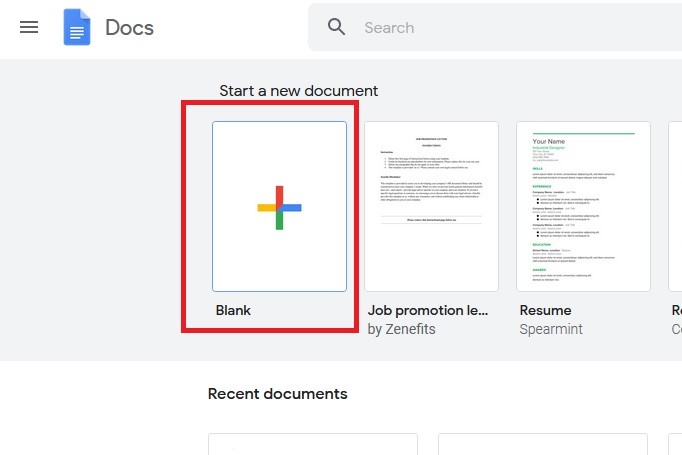
To make a new document, click the blank page with the multicolored Addition sign inside it, which is located on the upper-left side of the main Google Docs page. If you can’t find this icon, scroll up to see it or scroll down to click the multicolored Plus Sign icon in the lower-right corner of your screen. Once you do that, the aforementioned blank page icon with the multicolored addition sign will pop up again at the top of your screen. Click on that to open a new document.
If you are creating a document from Drive, selecting Google Docs after hitting New will automatically create a blank document. If you click the small, right-facing Arrow next to Google Docs, you can even choose to create a new document based on a provided template. There are a variety of templates to choose from, including résumés, business letters, and a selection of third-party templates. You can even upload an existing .doc or .docx file to your Drive by clicking New > File Upload.
Step 4: Start working
Once you’ve created a document, you can get to work. Click Untitled Document in the upper-left corner to add a title to your document. You can also adjust the font type, text size, and much more via the Toolbar at the top of the page. If you can’t see your title or the menu bar at the top of the page, those options may be hidden. If that’s the case, click the downward-facing Arrow in the upper-right corner to display them.
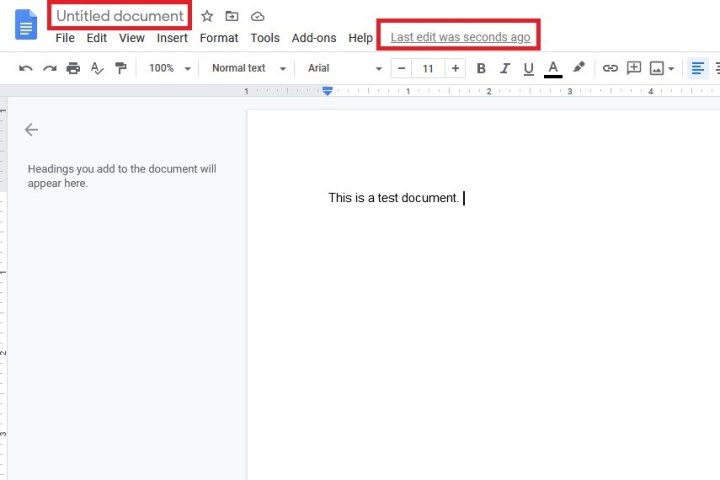
Since you’re working within your browser, any changes made to your document will be saved automatically. If you look to the right of your document’s title at the top of the screen, you should either see Saving… or Saved to Drive. Wait for the second message to appear before exiting out to ensure all your work has been saved. To show the version history of the doc at hand, click on the Last Edit Was [number of seconds/minutes/hours] Ago link that is to the right of the Help menu button at the top of your screen. You’ll then be taken to a screen that shows you different edited versions of your document that you can choose to restore.
How to share your stuff
To share your documents with other people, click the blue Share button in the upper-right corner of the doc you wish to share. The button will be wedged between your picture — assuming you’ve added one to your Google account — and the Open Comment History icon, which looks like a cartoon speech bubble. Afterward, invite other users by entering the appropriate email addresses in the resulting window and clicking Done.

People you share with can either edit, view, or comment on a document depending on what permissions you grant them. This can be changed by tapping the drop-down menu directly to the right of the email address field once you’ve added someone. In this menu, you can mark someone as a Viewer, Commenter, or Editor.
If you want to share the document with people using something other than email, click Copy Link at the bottom half of the Share With People and Groups window. A link will be copied to your clipboard. Your document may have defaulted to a restricted level of privacy. This means that only people added to your document can open the link you send them. If you want to change the privacy level of the document so that it can be accessed by anyone who has the link, you can do so by clicking the blue Change to Anyone with the Link hyperlink, which is also located in the lower half of the Share with People and Groups window.

Once you do that, you’ll be taken to a window that lets you copy a shareable link to your document or further customize your document’s permissions by letting you choose what people can do with the document once they receive a link to it. You can do this by clicking on the drop-down menu (that is to the right of the Anyone with the Link option) and then choosing Viewer, Commenter, or Editor from the menu.
Use the comment function
With Google Docs, you can watch in real time as other people make changes to a document. By clicking the Open Comment History button in the upper-right corner of your screen, you or anyone else who is in the document can start a discussion about your project. You can also see which users are currently looking at the document using the series of circles located to the left of the Open Comment History button. If no one besides you is looking at a given page, nothing will appear here.
You can also set each document so that you receive notifications for all comments added to the document, for only comments that refer to you, or no notifications at all. Notifications can be a helpful tool for collaborating with large groups of people. It’s ideal when working with a group that’s not in the same physical space. If, for some reason, you don’t want users to have the option to add comments to a given document, you can also change the editing mode (more on that in the next section).
Get to know the various editing modes
The editing mode drop-down menu (located on the right side of the screen under the Share button) lets you view and edit your document in a variety of ways. Your three main choices are: Edit the file yourself (Editing), suggest changes for another contributor to make (Suggesting), or view or print the document (Viewing). If you’re familiar with Microsoft Word, the Suggesting feature functions similarly to Track Changes. The tool will spotlight suggested edits in a noticeable hue throughout the document. Other contributors or editors can either approve or deny these suggestions as they create the final draft. Aside from the Suggesting feature, you can track a document’s revision history through File > Version History > See Version History.
Try out a different document type
Google Drive contains multitudes. Google Slides is a challenger to Microsoft PowerPoint, but much like Docs does, it opens the door to collaboration from multiple contributors. Google Sheets is Microsoft Excel’s rival when it comes to creating and editing spreadsheets.
Google’s suite of productivity web apps is a free and fierce competitor to Microsoft 365. It isn’t as thorough or comprehensive, but at no charge, users can access these apps to create and save content online with elaborate collaboration. Users are able to log in to their Google account to access their saved Docs, Sheets, and Slides files on any device, anywhere in the world, as long as they have internet access.
Editors' Recommendations
- These are the 10 best gaming PCs I’d recommend to anyone
- How to take a screenshot on a Mac
- How to clean a laptop keyboard without damaging the keys
- How to change your Zoom background on Mac and Windows
- How to clean a laptop screen without scratching it