Not everyone builds their home office around video calls. And if your home office also doubles as your bedroom, kitchen, or is tucked away in a cluttered corner of your basement, you’ll be glad to know that Zoom lets you hide your surroundings from your co-workers. One way the software does this is by letting you change your Zoom background, allowing others in the chat to see you while swapping out your environment for something more professional.
Want to make use of the cool feature? In this guide, we’ll go over how to change your Zoom background using both built-in images and custom images uploaded by the user. We also cover how to blur your Zoom background, in case you want something a bit more low-key, along with how to add filters for something more fun.
Step 1: Access your Zoom settings

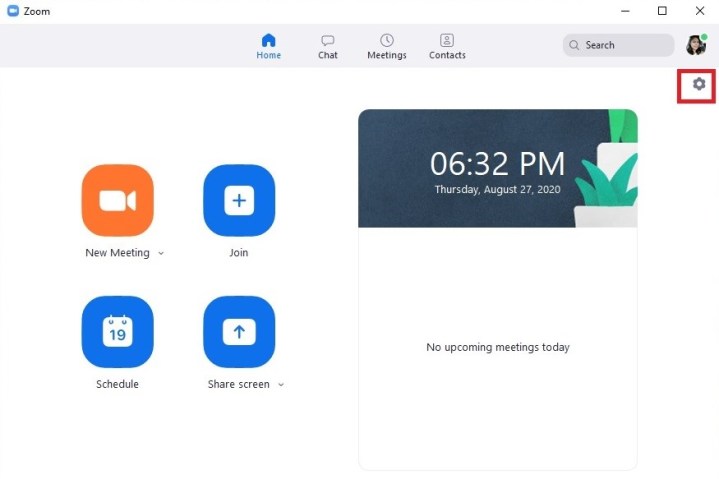
To set your virtual background in Zoom, you must first access the Zoom app’s settings. To do so, open the Zoom desktop app and click on the gear-shaped Settings icon. This icon is located in the top-right corner of the app’s main menu screen. It should be just under your profile picture icon.
Step 2: Select Background & Filters from the settings menu

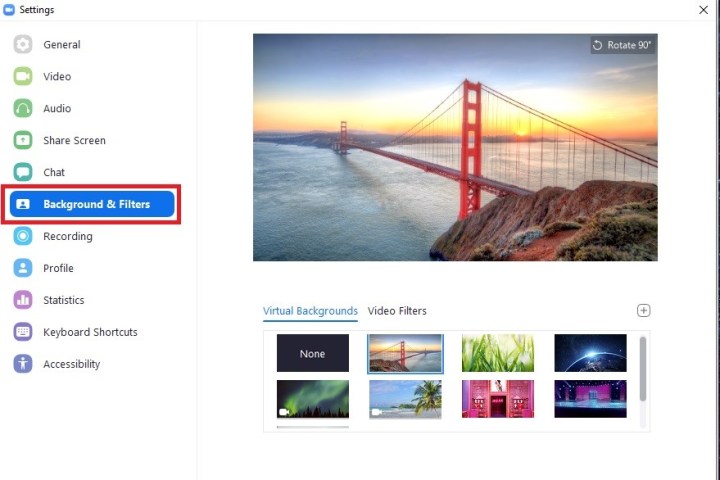
Once you’re in the Settings menu, select the Background & Filters option from the menu on the left side of the screen. This will open up a sub-section of the Settings menu on the right side of the screen. Here is where we’ll choose a background. You can also add video filters in this section, but we’ll get into that later on in this guide.
Step 3: Preview and choose your virtual background

To choose a virtual background, make sure that the Virtual Backgrounds tab is selected. This way, you can browse Zoom’s limited collection of preset video and image backgrounds. If you want to preview one of these backgrounds, simply click on its corresponding thumbnail icon, and it should immediately appear in the preview screen toward the top of your window. It’s important to note that if you want to see how your virtual background will appear while you’re in a video call, you’ll need to turn on your webcam while you’re previewing these backgrounds. That way, the preview screen will show a livestream of your face in front of the background instead of just the background itself.
You’re also not limited to using Zoom’s preset virtual backgrounds. You can add your own images and videos by clicking on the Plus Sign icon next to Video Filters. A drop-down menu will appear, giving you two options: Add Image or Add Video. Choosing either will open your PC’s File Explorer so that you can select an image or video file from your computer. Once you’ve picked a background, simply exit the Settings menu. Zoom will automatically save your selection.
If you don’t want to add a virtual background but simply want to make your actual background less noticeable or just hide it a bit, you can also blur your background. To do so, just navigate to the same Virtual Backgrounds tab in the Background & Filters section of the Zoom settings menu, and choose the Blur thumbnail option.
It’s also worth mentioning that Zoom’s Virtual Background feature is optimized to function better with the use of a green screen. You can use the feature without a green screen, but if you have one, the quality is expected to be better. If you plan on using a green screen, be sure to tick the box next to the phrase I Have a Green Screen in the Background & Filters settings page to get the most out of your virtual background.

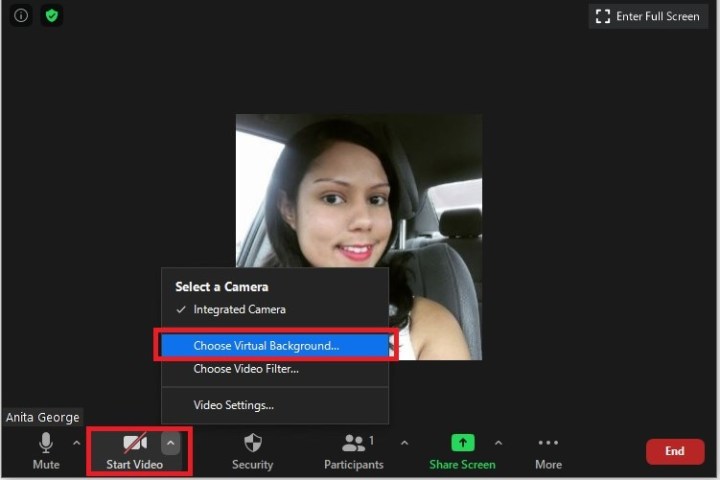
Note: You can set your virtual background while you’re in a meeting as well. To do so, click on the upward-facing arrow within the Start (or Stop) Video Camera icon. In the menu that appears, select Choose Virtual Background. This will take you to the same Background & Filters menu from earlier.
More fun: How to add a filter to your Zoom video
Virtual backgrounds aren’t the only way to jazz up your Zoom meetings. Your backgrounds can also be adorned with a wide variety of preset Zoom filters. Here’s how to use them:
Step 1: Access the Background & Filters section of the Zoom Settings menu, as we did earlier.

Step 2: Select the Video Filters tab, and a wide selection of Zoom preset filters will pop up on your screen. Select a filter’s thumbnail to preview what a filter would look like on your screen, and a preview will appear in the preview screen at the top of your window. For some of the image filters, the software requires your face to display correctly on screen, so they won’t appear unless your webcam is on. For example, the pizza hat filter won’t show up until it can see a head on which it can place the hat.
Step 3: Once you decide on a filter, close the Settings menu. Your chosen filter will appear automatically on screen the next time you join a Zoom meeting.
Note: Like virtual backgrounds, users have the ability to change or add a filter while a meeting is underway using a similar process. Click on the upward-facing arrow in the Start (or Stop) Video Camera icon. A menu will appear on your screen. Select Choose Video Filter, and Zoom will take you to the same Background & Filters location in your Settings menu to pick your filter.
Editors' Recommendations
- You’re going to hate the latest change to Windows 11
- How to take a screenshot on a Mac
- How Vision Pro tech could come to the Mac
- How to clean a laptop keyboard without damaging the keys
- How to change the default apps on a Mac


