Zooming in on something to get a better look on a Windows 11 computer is easier than you think. You don’t actually have to hunt for a magnifying glass icon. In this guide, we’ll show you how to zoom in and out of your Windows PC screen with some simple keyboard shortcuts, display settings, and a few quick steps for using Magnifier, a native Windows app that enlarges your screen.
How to zoom in on Windows: Using display settings
If you’re interested in zooming in or enlarging all your apps at once and the desktop, you might want to try adjusting your display settings. Here’s how:
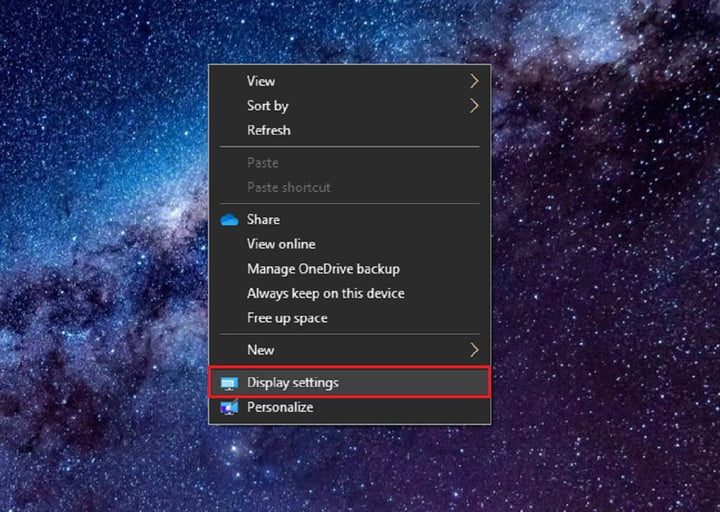
Step 1: Right-click on the desktop background itself. On the menu that appears, select Display Settings.
Step 2: Under the header Scale and Layout, select the drop-down menu underneath the phrase Change the Size of Text, Apps, and Other Items.
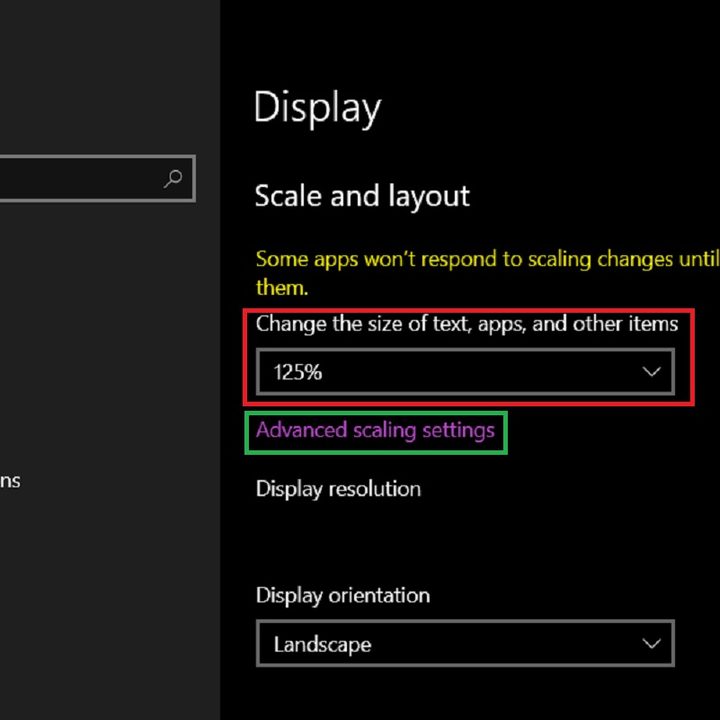
Step 3: From the drop-down menu that appears, select 125%. The change in size should be immediate, although Windows warns that some apps may not reflect the changes “until you close and reopen them.”
Step 4: You can also enter your own custom scaling size if you select Advanced Scaling Settings instead of the drop-down menu, but you’ll have to sign out of your PC and sign back in for the custom size to take effect or if you want to turn off the custom size as well.
Note that any changes you make will affect all Windows apps. Some may not launch correctly unless the correct display settings are restored.
How to enlarge screens: Using keyboard shortcuts
Some apps like web browsers, the Photos app, or Microsoft Teams, will let you use a few keyboard shortcuts to zoom in, zoom out, or even reset the zoom level (usually back to 100%). These shortcuts may not work on all apps, and when we tested them, we found that they don’t really work on the Windows desktop itself. But in those situations, you should be able to just adjust your display settings (as we described above in the previous section) or use the Magnifier app (as we describe below, in the section following this one). Here are the keyboard shortcuts you should know:
Zooming in: Ctrl + the Plus/Equal Sign Key
Zooming out: Ctrl + the Hyphen/Underscore Key (which is directly to the left of the Plus/Equal Sign Key)
Resetting the zoom level: Ctrl + 0 (the zero key)
How to enlarge screens: Using Magnifier
The Magnifier app lets you have a bit more flexibility with how you zoom in on your Windows PC screen. With Magnifier you can enlarge your whole screen or just parts of it. When you take a screenshot in Windows 11, the zoomed section will be captured. Here’s how to get the Magnifier running and how to change its viewing options.
How to run Magnifier
You can start the Magnifier app in three ways: Either with a keyboard shortcut, searching for the app in the desktop search box, or by clicking through your Windows 11 Settings app.
Keyboard shortcuts
The keyboard shortcut for starting Magnifier is the Windows Key + the Plus/Equal Sign Key. When you want to turn off Magnifier you can just use the Windows Key + Esc.
Using the desktop Search box
You can also open the Magnifier app via the desktop’s Search box. Just type the word “Magnifier” in the search box located to the right of the Start menu button. Then select the app when it shows up in the search results that appear. To turn it off, just select the X on the app’s toolbar.
Using the Settings app
If you don’t want to use the keyboard shortcuts, you can also click through the Settings app to turn it on. Here’s how:
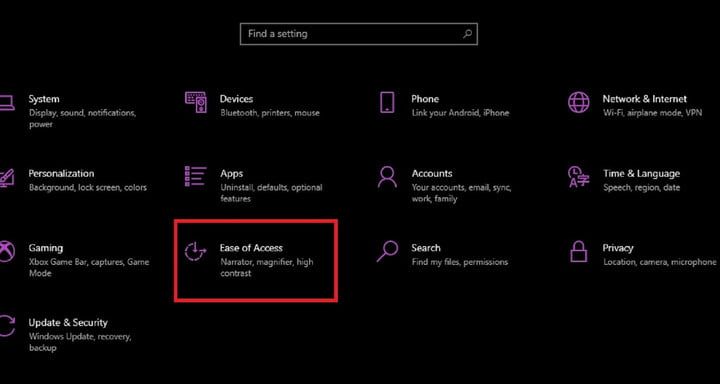
Step 1: Go to the Settings app. Select the Start button and then click on the Settings app gear-shaped icon.
Step 2: Select Ease of Access.
Step 3: On the left side menu, select Magnifier.
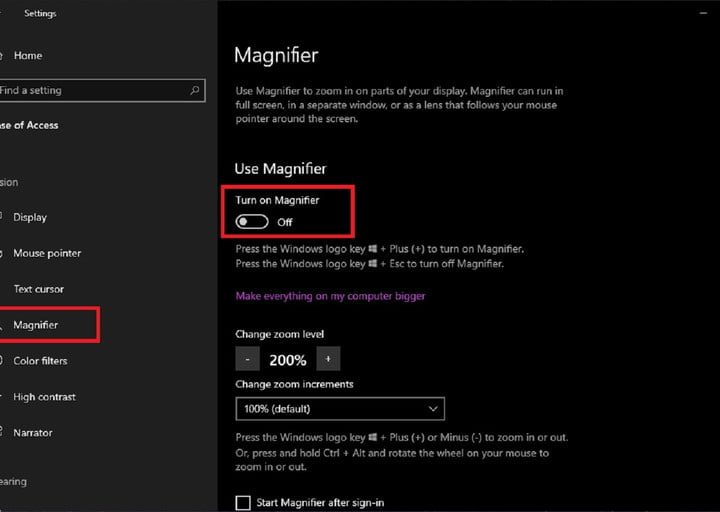
Step 4: Under the phrase Turn on Magnifier, switch the toggle button to the On position. Tap the toggle button again if you want to turn it off.
How to change its viewing options
Magnifier has three viewing modes: full screen, docked, and lens. “Docked” means the app will run in a stand-alone window. Lens mode is just when the app runs as a lens that follows your mouse pointer. To select a mode, you’ll use a keyboard shortcut that corresponds with it:
For Docked: Ctrl + Alt + D
For Full Screen: Ctrl + Alt + F
For Lens: Ctrl + Alt + L
If you’re not sure which one you want to use yet and want to preview them a bit, you can rotate through them using this shortcut: Ctrl + Alt + M.
Need to know how to zoom in on a non-Windows PC? Be sure to check out our guide on how to zoom in on a Mac.