
Harvestella beginner’s guide: 11 tips and tricks

Harvestella is a quirky new life sim from Square Enix. Besides chatting up the locals and running a farm, you’ll also be tasked with delving through dungeons to unravel a mystery that’s threatening the world. Juggling all those responsibilities isn’t easy — and newcomers might find themselves overwhelmed after just a few hours with the game.

If you’re looking for a few pointers to help you manage your time, here are some beginner tips and tricks for Harvestella.

Further reading

Plan out your day

A Harvestella player looking at a mysterious glowing object in the background.
Image used with permission by copyright holder

Harvestella breaks up the action using a day/night cycle. Just about every action you do will whittle away the clock, and it’s in your best interest to plan out your schedule before leaving the farm. You’ll eventually figure out a rhythm that helps keep you on task, but beginners should find this template to be a good starting point:

  • Check mail
  • Water crops
  • Manage your inventory
  • Determine which quest you’ll be working on
  • Head back home
  • Craft new items
  • Sell items in your Shipping Box

Of course, this routine will change depending on where you’re at in the story — but these are all tasks that should be at the front of your mind during the beginning hours of Harvestella.

Activate fast travel points

A player activating a Motus Monolite in Harvestella.
Image used with permission by copyright holder

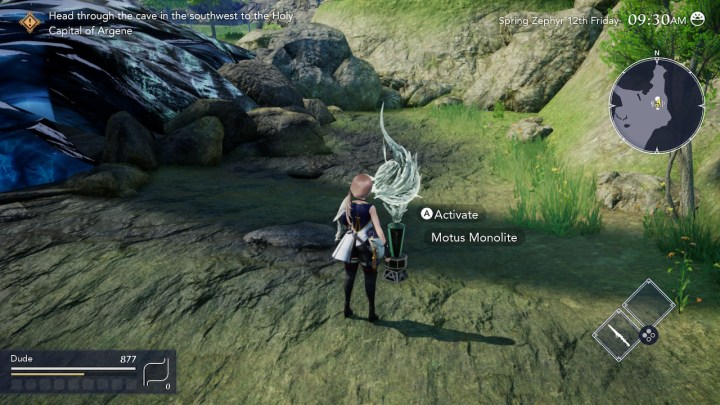
Surprisingly, not all fast travel points (called Motus Monolites) are activated automatically. Instead, you’ll need to manually approach and interact with them — and forgetting to do this could cost you a significant chunk of time. Backtracking in dungeons is fairly common, but Motus Monolites effectively act as checkpoints, letting you bypass previous sections and quickly jump to the good stuff. So if you see those weird orbs sticking out of the ground, sprint over as fast as you can and activate them.

Repair bridges and ladders

Much like Motus Monolites, bridges and ladders serve as checkpoints in Harvestella’s dungeons. Ladders can be repaired without any resources (although they eat up some time), while bridges require a Repair Kit. Once fixed, you can use them to quickly navigate a map without having to rely on a Motus Monolite.

Remember to farm

A large farm in Harvestella.
Image used with permission by copyright holder

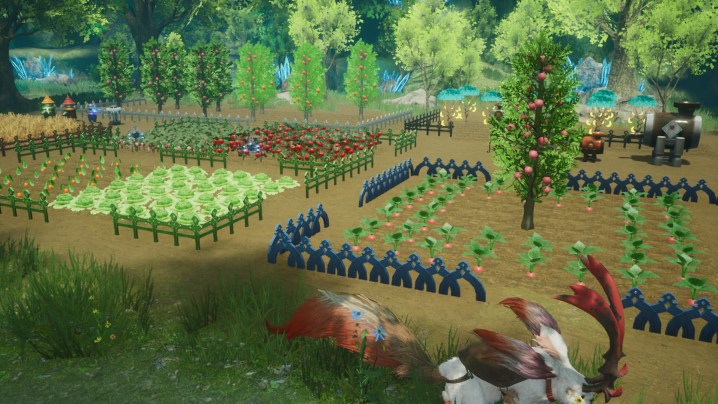
With so much going on at the start of the game, it can be easy to forget that you’ve got a farm to run. Planting, watering, and upgrading your homestead often takes a backseat to adventuring in Harvestella, but you’re putting yourself at a disadvantage if you don’t start farming early. Not only is selling crops a great source of income but many of your plants can also be used in delicious recipes to help you out on the battlefield.

Crafting is key

Early in the game, you’ll unlock the ability to craft new items. One of the first important items you’ll craft is a Return Bell, which teleports you directly back to your farm. This can be a huge lifesaver, as it can be used to quickly get home if you find yourself in a sticky situation or if the day is about to end. You’ll eventually gain access to even more exciting gear, so be sure to stock up on resources as early as possible and keep an eye on what items are available to build. In case you missed the tutorial, crafting is done inside your house at Bird’s Eye Brae.

Seasons run for 30 days

At the end of each 30-day season, you’ll be met with a single day of Quietus. This day will result in the loss of all your crops — so plan your harvest accordingly. There’s nothing worse than filling your entire field with plants, only for Quietus to kill them before they’re fully grown.

Test out every available job

The Job menu in Harvestella.
Image used with permission by copyright holder

Jobs grant you unique skills that can be used to slay monsters more efficiently. Most enemies come with their own set of weaknesses and resistances, and learning how to take advantage of these is the key to victory. The Chloro Gel, for example, is weak against Fire and Slash attributes, while it’s resistant to Wind attacks. By switching to a Job that offers Fire and Slash attacks, you’ll carve through them in no time. Weaknesses can be found in the Encyclopedia tab in the Pause menu. To use an unlocked Job, simply assign it to your character on the Party tab in the Pause menu.

Don’t button mash in combat

A Harvestella player engaged in combat.
Image used with permission by copyright holder

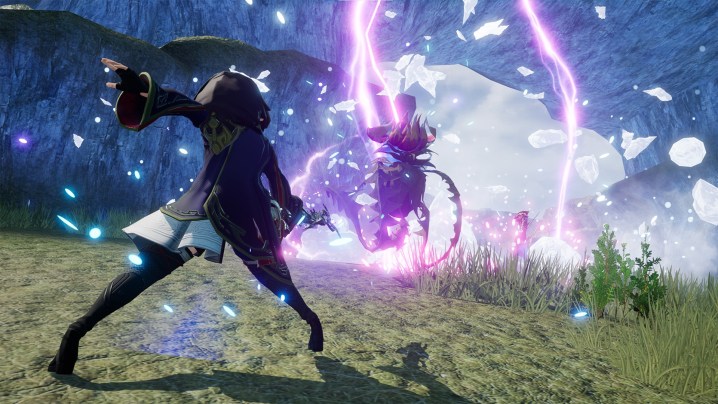
All of your Job Skills have a cooldown timer associated with them. Because of this, button mashing is often a bad move when in combat. Instead, only use Job Skills that correspond to your target’s weakness and leave the other Job Skills untouched. Also, keep in mind that once you switch away from a Job, there will be a brief delay before you can switch back to it — making rapid Job switching a bad tactic.

Chat with the locals

Farming and dungeon crawling will take up most of your time in Harvestella, but don’t forget that there’s a social sim element of the game to enjoy. Heading into town and chatting with the locals can often lead to lucrative side quests and some great dialogue options — so don’t be afraid to “waste” a day meandering around and getting to know your neighbors.

Pack plenty of consumables

As a new player, you’ll often find yourself running out of health or stamina before the end of each day. If that’s the case, make sure you’re loading up on consumables. Some of these can simply be found in the wild, while others must be cooked up at your home. Be sure to bring a wide variety of items, as you’ll want to be able to restore your health or stamina as needed. You’ll also want to keep an eye on your hunger gauge, as you’ll naturally restore stamina if your character isn’t hungry.

Take breaks

A player taking a break with Aria in Harvestella.
Image used with permission by copyright holder

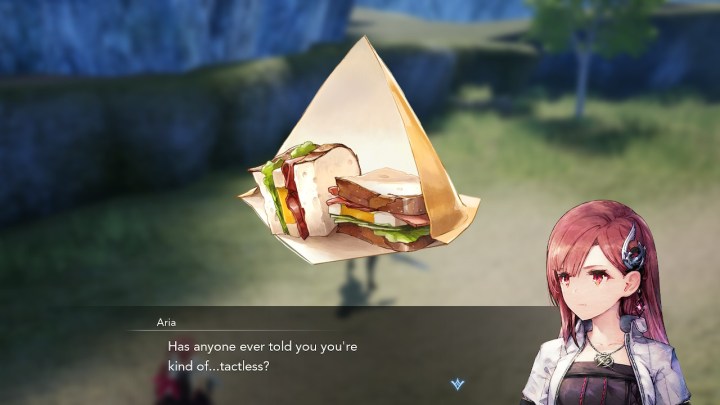
Yes — you should take breaks from playing Harvestella, but this tip is specifically about taking breaks at Motus Monolites. This option is unlocked after a few hours of plugging through the main quest, and it lets you plop down with your party at a Motus Monolite to have a quick snack. Doing so will unlock intriguing dialogue options and grant bonus effects for your meals, such as better stamina or health regen. This is especially useful before a boss fight, as they tend to pose a bigger threat than your usual mobs.

Editors' Recommendations

Jon Bitner
Jon Bitner is a writer covering consumer electronics, technology, and gaming. His work has been published on various websites…
All Chronolith locations and rewards in Final Fantasy 16
A chronolith trial pillar glowing in the sunlight.

Every Final Fantasy game changes up the battle system in one way or another. Final Fantasy 16 isn't the first to have real-time, action-focused combat, but is by far the most polished and refined one. The story is by no means secondary, but for the first time players are able to really express themselves through the various combos and abilities you can pull off. Square Enix recognized this and included special combat trails called Chronolith Trials. These are somewhat similar to the special missions you can find in games like Devil May Cry 5 where you are faced with a unique challenge for a reward. As tough as these challenges are to beat, finding them is also a bit of a chore. Hop on your Chocobo and follow our lead to find all the Chronolith locations in Final Fantasy 16. 
What are Chronolith Trials?

Chronolith Trials are unique combat trails that put you into an arena that spawns waves of enemies. There will always be three rooms that each spawn three waves of enemies, plus a boss at the end. You're on a timer, and can only use a designated Eikon with predetermined abilities. By pulling off Battle Techniques, including Precision Dodge and Ability Finishes, you can extend your time. If you're quick enough to beat all the enemies without running out of time, you'll earn a special accessory as a reward. There are seven in total, and completing them all will also unlock the final Wall of Memory item you need to complete that collection.
All Chronolith Trial locations
Phoenix
In Greensheaves in Rosaria, fast travel to Martha's Rest and exit to the north. Follow the path east and you will find it just before the path leading to Rhiannon's Ride.

Read more
Final Fantasy 16 Renown explained: what is Renown and how to earn it
Final Fantasy 16's cover showcasing its protagonist infront of two demon summons.

Every JRPG, and even games with RPG elements, likes to introduce new systems into the mix for you to learn and interact with. Most of the mechanics in Final Fantasy 16 will be familiar, like sidequests, upgrading gear, and unlocking abilities. However, later on, the game will introduce you to the Renown system once you take control of the Cursebreakers. This occurs once you reach the main hub of the game called Cid's Hideaway after going through the main story until you reach A Chance Encounter. While you might be feeling content ignoring this new mechanic and just pushing on with the main story, there are plenty of reasons to learn it. Here's a simple explanation of how the Renown system works in Final Fantasy 16.
What is Renown and how to earn it

Without spoiling much, after Clive takes on a certain mantle and is in charge of Cid's Hideaway, the Renown system will automatically be put into effect. This is meant to represent how much inspiration and support Clive has earned from the people of Valisthea in his cause and fight against the Blight. You can see how much Renown you currently have by visiting the Patron's Whisper and talking to Desiree.

Read more
Final Fantasy 16 Timely Accessories: what they are and how to equip them
Screenshot of the main character from Final Fantasy 16 fighting an enemy.

Traditionally, Final Fantasy titles don't come with difficulty options. As the series has grown leading up to Final Fantasy 16, Square Enix has started to add some options to make the game more accessible to players. Considering this latest entry is more action-heavy than any that has come before, with advanced moves like perfect dodges and parries, these tools are more necessary than ever for longtime fans who prefer a more traditional JRPG experience. While the Timely Accessories can't turn this action game into a turn-based one like older entries, it can at least give you enough of an edge to feel comfortable getting through combat so you can enjoy the deep and complex story. Let's go over what these Timely Accessories are and how to equip them in Final Fantasy 16.
What are Timely Accessories?

Timely Accessories in Final Fantasy 16 are basically your difficulty modifiers, but instead of being menu options, they're items. These types of items have become a bit more common in the last few years and include the Chicken Hat from Metal Gear Solid V. This time, there are five different accessories that you can pick from, each of which modifies the game in different ways to give you an edge in combat. Here are all five of the Timely Accessories and what they do:
Ring of Timely Evasion
When equipped, Clive will automatically evade attacks, as long as the attacks can be evaded.
Ring of Timely Focus
When equipped, time slows before an evadable enemy attack strikes Clive. There's no effect when equipped with the Ring of Timely evasion.
Ring of Timely Strikes
When equipped, complex ability combinations can be executed by simply pressing the Square button.
Ring of Timely Assistance
When equipped, pet commands will be executed automatically based on Clive's actions.
Ring of Timely Healing
When equipped, healing potions will automatically be used when Clive's HP falls below a certain threshold. More common healing items like potions will be used before rarer ones like high potions.
How to equip Timely Accessories
When you first begin Final Fantasy 16 you will need to choose between Story and Action Focused modes. These technically also serve as your difficulty selection, but it's really just a simplified way of enabling the Timely Accessories. Regardless of which difficulty you choose, you will always have access to all these accessories and can switch at any time while playing (as long as you are not currently in combat).

Read more