Need to keep your cattle or imprisoned villagers alive and contained in Minecraft? The best way to keep them in check is to build a high fence or wall so that nothing can escape. We show you how to make a fence in Minecraft along with gates and walls.
We added walls to this guide because, like fences, they’re waist-high by default. Once you start stacking walls, the resulting structure isn’t completely solid — there are openings between each post, creating what resembles an open castle. You can use a wooden gate to enclose the walled structure.
What you need

Wood – Go find yourself a batch of trees and chop them down. Your lumberjack skills will result in little blocks of wood logs (Survival Mode) scattered across the terrain that you need to gather. You can use any tool to chop down trees — even your fist — except for a sword.

You can also use any type of wood to build your fence, though you’ll want to stay consistent for appearance. Here are your wood choices:
- Acacia
- Birch
- Crimson
- Dark Oak
- Jungle
- Oak
- Spruce

Clay – You need this for Brick Walls. Clay resides underwater. The blocks are mostly gray speckled with various gray hues.
Other Bricks and Stones – If you don’t want a Brick Wall, you can use other ingredients. Some of these you can find naturally while others require crafting:
- Andesite
- Blackstone
- Cobblestone
- Diorite
- End Stone Brick
- Granite
- Nether Brick
- Sandstone
- Stone Bricks
Let’s start by creating a wood fence!
Create Wood Plank blocks

First, you need Wood Planks built from any log you collect from trees. You can use stripped wood too.
Step 1: Open your inventory (shown above) or Crafting Table.
Step 2: Place one (1) Wood block into the crafting grid.
Step 3: Drag the resulting four (4) Wood Plank blocks down into your inventory.
Step 4: Repeat these steps to get all the Wood Plank blocks you need.
Create Warped Wood Plank blocks (Java Edition only)
You’ll need these if you want to create a Warped Wood Fence in the Java Edition. The only ingredient here is Warped Stem logs, which you can gather from the Warped Forest in the Nether.
Step 1: Open your inventory or Crafting Table.
Step 2: Place one (1) Warped Stem log block in any square. You can use stripped wood too.
Step 3: Drag the resulting four (4) Warped Wood Plank blocks down into your inventory.
Step 4: Repeat these steps to get the Warped Wood Plank blocks you need.
Create Sticks
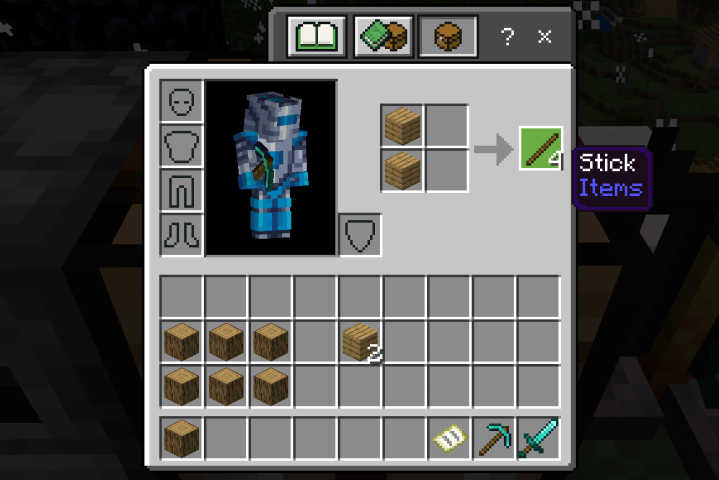
Here’s the second ingredient you need to create a fence.
Step 1: Open your inventory (shown above) or Crafting Table.
Step 2: Place one (1) Wood Plank block in any square in the top row.
Step 3: Place one (1) Wood Plank block directly below in the second row, as shown above.
Step 4: Drag the resulting four (4) Sticks down into your inventory.
Step 5: Repeat these steps to get the Sticks you need.
Create a Wood Fence
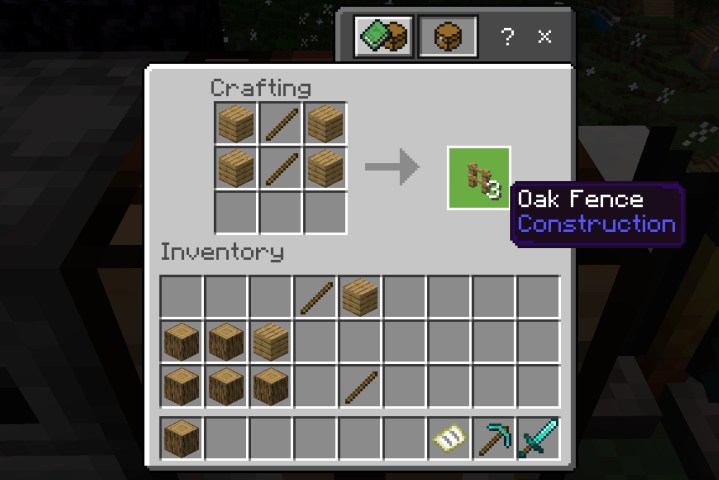
You can use any Wood Plank block to build a fence, even the Warped Wood Plank blocks in the Java Edition as instructed earlier.
Step 1: Open your Crafting Table.
Step 2: Place one (1) Wood Plank block each in the top and middle square in the left column.
Step 3: Place one (1) Stick each in the top and middle square in the middle column.
Step 4: Place one (1) Wood Plank block each in the top and middle square in the right column.
Step 5: Drag the resulting three (3) Fences down into your inventory.
Step 6: Repeat these steps to get the Fences you need.
Create a Wood Gate

You can certainly jump over your new fence, but wouldn’t it be easier to simply walk through a gate? Sure it would.
Step 1: Open your Crafting Table.
Step 2: Place one (1) Stick each in the top and middle square in the left column.
Step 3: Place one (1) Wood Plank block each in the top and middle square in the middle column.
Step 4: Place one (1) Stick each in the top and middle square in the right column.
Step 5: Drag the resulting Fence Gate down into your inventory.
Step 6: Repeat these steps to get the Fence Gates you need.
Create a Nether Fence

Now let’s get real and venture down into the Nether to get the ingredients we need to create a Nether Fence. You’ll need Netherrack to create a Nether Brick, which in turn makes a Nether Brick Block. Both are required to make a Nether Fence.
While colors are hard to see down below, Netherrack is a mixture of red hues ranging from brown to light pink, as shown above. You need a pickaxe to mine this skull-patterned ore.
There are three stages to building a Nether Fence. First, we need bricks. That means you need the Furnace and fuel.
Part 1: Create Nether Bricks

Step 1: Open your Furnace.
Step 2: Place Fuel in the bottom square. This can be Coal, Charcoal, Wood — anything you have that burns.
Step 3: Place a Netherrack block in the top square.
Step 4: Drag the resulting Nether Brick down into your inventory.
Step 5: Repeat these steps to get the Nether Bricks you need, or simply place more than one fuel and Netherrack block into the squares. The furnace will continue to create Nether Bricks until the resources are depleted.
Part 2: Create Nether Brick Blocks
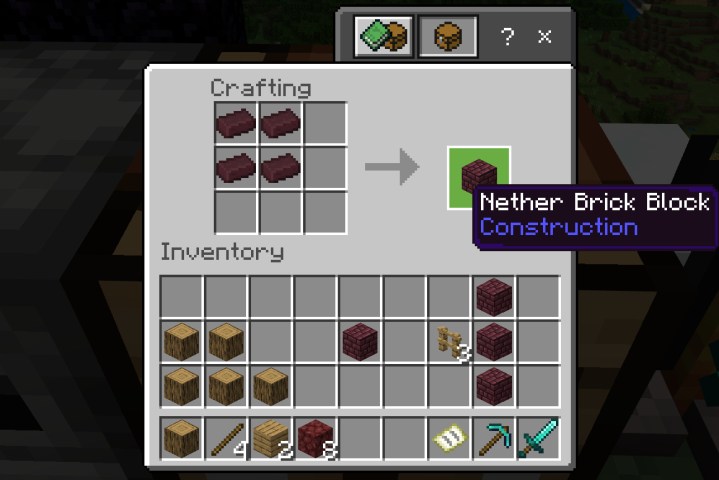
Simple bricks won’t be enough. We’ll need to cram some together to make blocks.
Step 1: Open your Crafting Table.
Step 2: Place one (1) Nether Brick each into the top and middle square in the left column.
Step 3: Place one (1) Nether Brick each into the top and middle square in the middle column.
Step 4: Drag the resulting Nether Brick block down into your inventory.
Step 5: Repeat these steps to create all the Nether Brick blocks you need.
Part 3: Create the Nether Fence

Finally, with both Nether Bricks and Nether Brick Blocks in hand, we can finally create the fence.
Step 1: Open your Crafting Table.
Step 2: Place one (1) Nether Brick Block each into the top and middle square in the left column.
Step 3: Place one (1) Nether Brick each into the top and middle square in the middle column.
Step 4: Place one (1) Nether Brick Block each into the top and middle square in the right column.
Step 5: Drag the resulting six (6) Nether Brick Fences down into your inventory.
Step 6: Repeat these steps to create all the Nether Fences you need.
Since we’re playing with Nether, why not learn how to create a Nether Brick wall too? Again, they’re low like Fences with protruding posts but are solid throughout.
Create a Nether Brick Wall

Step 1: Open your Crafting Table.
Step 2: Place one (1) Nether Brick Block each into all three squares in the bottom row.
Step 3: Place one (1) Nether Brick Block each into all three squares in the middle row.
Step 4: Drag the resulting six (6) Nether Brick Walls down into your inventory.
Step 5: Repeat these steps as necessary.
Now let’s journey down the rabbit hole even further and learn how to make a standard Brick Wall. Again, they’re waist-high with protruding posts and a solid build.
Create a Brick Wall
This requires three parts: Create bricks, create Brick Blocks, and then the actual Brick Wall. To make bricks, you need Clay which resides underwater.
Part 1: Create a Brick

Step 1: Open your Furnace.
Step 2: Place Fuel in the bottom square. This can be Coal, Charcoal, Wood — anything you have that burns.
Step 3: Place one (1) Clay chunk in the top square.
Step 4: Drag the resulting Brick down into your inventory.
Step 5: Repeat these steps to create more bricks, or simply insert multiple Fuel and Clay into the Furnace grid. The Furnace will continue to make Bricks until the resources are depleted.
Part 2: Create a Brick Block

Now we need to create Brick Blocks because this game is all about crafting.
Step 1: Open your Crafting Table.
Step 2: Place one (1) Brick each into the top and middle square in the left column.
Step 3: Place one (1) Brick each into the top and middle square in the middle column.
Step 4: Drag the resulting Brick Block down into your inventory.
Step 5: Repeat these steps to get all the Brick blocks you need.
Part 3: Create a Brick Wall

Finally, we can make the Brick Wall!
Step 1: Open your Crafting Table
Step 2: Place one (1) Brick Block each into the three squares in the top row.
Step 3: Place one (1) Brick Block each into the three squares in the middle row.
Step 4: Drag the resulting six (6) Brick Walls down into your inventory.
Step 5: Repeat these steps to get all the Brick Walls that you need.
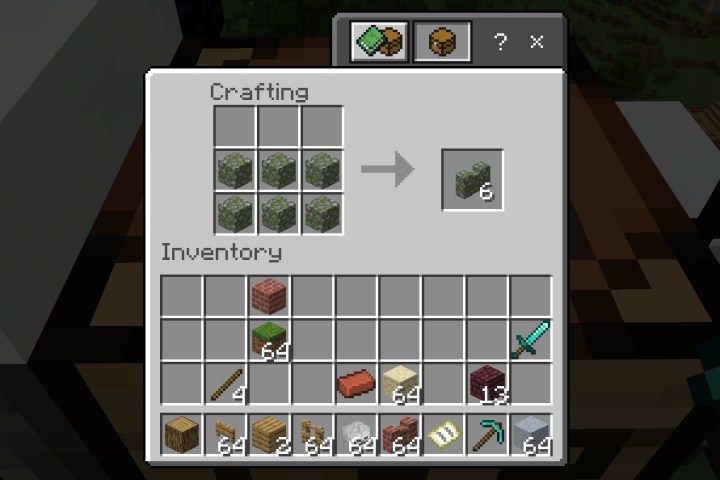
Note: You can replace the Brick Blocks in Step 2 and Step 3 with Andesite, Blackstone, Cobblestone, Diorite, End Stone Brick, Granite, Sandstone, or Stone Bricks. You can also use Mossy and Red variants, like Mossy Cobblestone.
As shown above, you can fill Row 2 and Row 3 of the crafting grid to create Walls in addition to the Row 1 / Row 2 method in our instructions. The point is to have two connected rows filled with blocks.
That’s a lot of crafting right? Now we can place it all in the Overworld.
How to place a Fence or Wall

Step 1: Make sure your Fence or Wall is in the Hotbar and selected for your Main Hand.
Step 2: Look directly at the ground where you want to place the first Fence or Wall.
Step 3: Perform the following to place your first Fence or Wall:
- PC – Right-click on the target area.
- Console – Press the Left Trigger button while facing the target area.
- Mobile – Tap on the target area.
Step 4: For both the Fence and Wall, all you will see is a single post, as shown above. Target the next block and place your second Wall or Fence. You’ll now see two posts joined by two horizontal planks (wood), as shown below, or a lower wall (bricks).

Step 5: Continue to add a Fence or Wall portion until you create an enclosed area.
Tip: If you want to throw up a Fence or Wall quickly. simply keep the Left Trigger or Right-Click mouse button down while moving. You’ll fire off blocks like a machine gun.

Step 6: To add a Wood Gate, demolish one Fence or Wall block and replace it with a Wood Gate block. You can open the gate by performing the following:
- PC – Right-click on the Wood Gate.
- Console – Press the Left Trigger button while facing the Wood Gate.
- Mobile – Tap on the Wood Gate.

Stack a Fence or Wall
Your Fence or Wall doesn’t need to remain waist-high. Instead, you can “stack” these blocks to create a higher container for your captured animals or villagers.
Step 1: With your Fence or Wall currently selected in the Hotbar, target a corner post, and perform the following:
- PC – Right-click on the Wood or Wall post.
- Console – Press the Left Trigger button while facing the Wood or Wall post.
- Mobile – Tap on the Wood or Wall post.
Step 2: You’ll now see the Wood or Wall post doubled in height, as shown below. Follow the previous steps to build your Fence or Wall like normal, only you’re on a higher level.

The result is a Fence or Wall that reaches to the top of your virtual head. Don’t build a second-level Fence or Wall block directly over the entrance — you won’t fit through the opening given you’re two blocks high. Instead, build a third-level Fence or Wall block “awning,” as shown below. Unfortunately, we forgot to add a Skeleton Skull to the awning before taking the screenshot…

Here’s a Wandering Trader appreciating our Brick Wall building skills. Notice we added a Wood Gate to enclose this space.