
How to solve molecular identification puzzles in Spider-Man 2

The character of Spider-Man is only half of what makes him so interesting. Peter Parker, the man behind the mask, is just as vital to the story as his alter ego in Spider-Man 2. Just as he is in the comics and the first game, Peter is a scientist by trade, and Miles Morales is following in his footsteps in many ways, which is the perfect excuse to introduce some new science-focused puzzles into the game. One new puzzle has you examining different scenes to try and work out what exactly happened so you can determine the materials that were left behind. This puzzle is thrown at the player rather quickly and without much explanation, so we’re here to brush up your molecular knowledge so you can solve these with ease.

How to solve molecular identification puzzles

A 3d molecule in spider-man 2.
Sony Interactive Entertainment

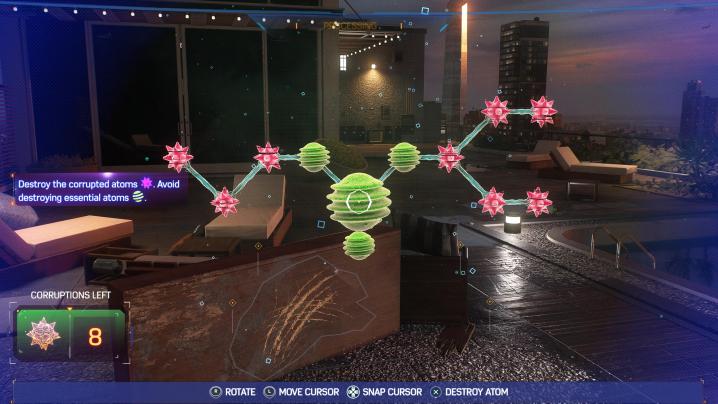
When you first start off ,you will be shown a 3D model of some molecule with green, red, and sometimes yellow nodes. Your goal is to remove all the red nodes without destroying any of the green. Yellow can be left or destroyed.

To solve the puzzle, you can cycle through each node to target and select which you want to destroy. However, you aren’t just blasting the one you target, but any that node is directly connected to. So if you target a red node that is connected to one or more green nodes, they will get destroyed as well and you will fail the puzzle. The trick is to either break nodes one removed from a green, or you can even cause a chain reaction by severing the link to an entire section of the molecule, which willbreak them all. When in doubt, just look at which nodes are enlarged when you highlight one. Any that are will be broken as a result of your shot, so pick your shot wisely!

Editors' Recommendations

Jesse Lennox
Jesse Lennox loves writing, games, and complaining about not having time to write and play games. He knows the names of more…
All nursery rhyme solutions in Alan Wake 2
Alan Wake sitting at a desk with a typewriter.

Alan Wake is a famous writer, but neither he nor the new protagonist Saga are known for being particularly fond of nursery rhymes. Whether or not you fall into that category as well won't matter because Alan Wake 2 hides some very valuable rewards behind puzzles disguised as these small children's poems. Solving them involves a little bit of exploration, deductive reasoning, and then putting all the right pieces in place. This is one of the many optional cases in the game, and these rhymes are hidden across all the major zones in and around Bright Falls. If you're stumped on any of these nursery rhyme puzzles, here are all the solutions in Alan Wake 2.
All nursery rhyme answers
There are 17 total nursery rhyme puzzles to find and solve in Alan Wake 2, broken up into all the different major locations. Whenever a puzzle involves placing dolls, make sure you pick up the dolls after solving it because they are needed for other puzzles in that area as well.
Cauldron Lake nursery rhymes

The first rhyme puzzle you will come across is in the campsite you can access after the flooding has been removed. Cross the bridge and look immediately to the left. The solution is to take the Crow doll off the table and place it on the drawing of the sun.

Read more
Where to find all inventory upgrades in Alan Wake 2
Saga stands in front of an evidence board in Alan Wake 2.

While the first Alan Wake game certainly had plenty of scares and horror in it, the mechanics were not as strictly of the survival horror variety. Alan Wake 2 has gone fully in this direction, however, with a much darker tone, disturbing imagery, and restrictive combat mechanics that sustain the tension when The Taken attack.

Aside from limited ammo, low health, and tough enemies to bring down, a key aspect of survival horror games is an inventory system. The first game let you hold essentially as much ammo, batteries, and weapons as you wanted in each chapter, but the sequel introduces a grid system that will look familiar to Resident Evil fans. Just like Resident Evil, your inventory starts off quite small, but you can see there is plenty of space for it to grow. There are specific items hidden in and around Bright Falls that can let you expand your carrying capacity, but many are well hidden in dark corners. Here are the locations of every inventory upgrade in Alan Wake 2.
All inventory upgrades

Read more
All stash locations in Alan Wake 2 and how to open them
Alan drenched in green light in Alan Wake 2.

FBI agent Saga Anderson and her partner, Alex Casey, are called into Bright Falls to investigate a murder committed by a strange group calling themselves the Cult of the Trees. These dangerous cultists are your main enemy in Alan Wake 2, and they put up quite a fight despite mostly using basic tools as weapons. They seem mindless and primitive, but the fact that they have a series of Cultist Stashes hidden all around the world suggests otherwise. These treasure troves are very well hidden, and they're protected with a small puzzle to try and prevent those who may stumble upon one from grabbing all the goodies inside. You'll find yourself short on supplies essentially all the time in Alan Wake 2, so scooping up some extra ammo and batteries is always welcome. Here is where you can find all the Cultist Stashes in Alan Wake 2 and how to open them.
All Cultist Stash locations
There are a total of 21 Cultist Stashes to find and unlock in Alan Wake 2. Each zone has its own set to find, and they all have different puzzles you need to solve to open them. None are missable, but some can't be obtained until you make story progress or get specific tools.
Bright Falls Cult Stashes

The first Cult Stash you can find comes as soon as you reach the town of Bright Falls for the first time. Instead of going straight to your destination down the block, turn around and head toward the dead end. Behind the truck will be a big locked box. To open this one, all you need to do is play a little game of Simon Says. The keypad will flash three buttons in a sequence that you simply need to repeat to open the box and grab the loot.

Read more