A few weeks back we showed you how to make some sleek wall frames that put your favorite record covers on display. This week we have a handsome stand where you can keep the rest of your collection. We made ours from a thick slab of exotic hardwood called bubinga, but practically any kind of wood will look great with this minimalist, flip-friendly design. And thanks to our painstakingly simplified build process, this stand is incredibly easy to make and only requires a small number of tools. Here’s everything you need:
Tools and Materials

- Hardwood slab (roughly 1 inch thick, 10 inches wide)
- Miter Saw (capable of cutting 10-inch boards)
- Jigsaw
- Pencil
- Clamps (x2)
- Sandpaper
- Teak oil
Step-by-Step Build Process
Step 1: Get some wood and cut it to create your four pieces
You can embark on this project in one of two ways: either start with multiple smaller boards of the same thickness, or use one large board and chop it up to create the pieces you need.
We went with the latter option and started with a single hardwood board, roughly 1 inch thick and 10 inches wide, though a slightly thinner or narrower board would work too. If you’re going this same route and using one board for the whole project, you’ll need a slab that’s at least 60 inches in length. We began by chopping our pieces to rough length using our trusty miter saw, and then cut them to width on a table saw — but don’t worry if you don’t have access to a table saw. The beauty of this project is that you can make all the same cuts with a jigsaw (though you’ll likely end up with rougher edges that will need more sanding).
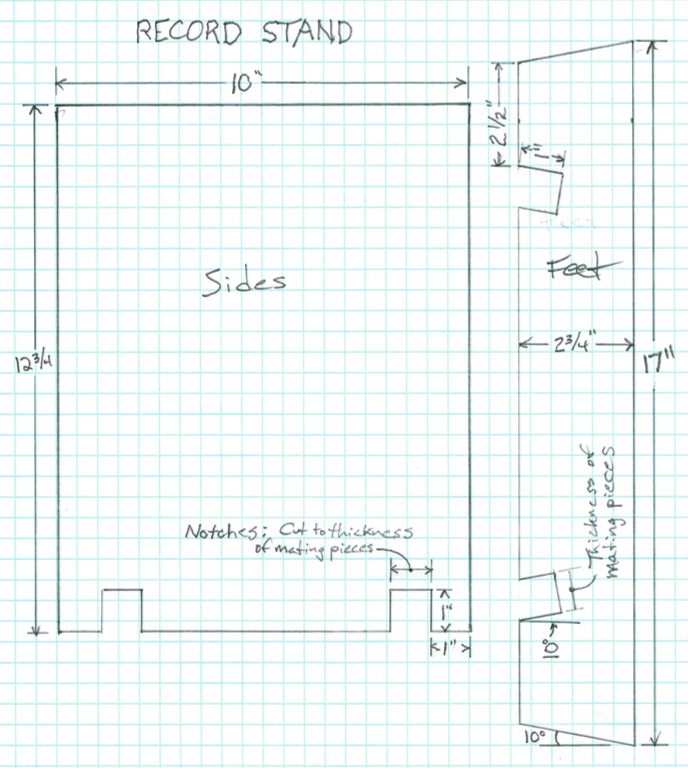
Don’t feel like jigsawing everything yourself? An alternative is to take the drawing below to your local hardwood retailer and ask if they will crosscut your pieces to rough length and “rip” them to the exact widths you need. Once that’s done, you can do the rest of the project with simpler tools. Most independent lumber stores will be more than willing to make cuts for a small charge. A decent handsaw will cut out all the parts too — with a healthy dollop of elbow grease, of course.
Step 2: Mark where your notches will go
Once you have the basic rectangles cut, the rest is fast and easy. The stand is held together by intersecting notches in the pieces — a tried-and-true method that not only lends itself to an easy setup, but also allows you to break down the rack in seconds if necessary. Best of all, we did all the dirty work for you and came up with some surefire tricks to that’ll ensure you end up with notches that fit together perfectly.
As you’ll see in the video above, we started by trimming the ends of the base boards (aka the “feet”) at 10 degrees on the miter saw. Then we made a couple of key landmarks for the notches and set them about 2.5 inches in from the top edge. Now the fun part begins.
The first trick is to use the angled ends of the feet as layout tools, helping you pencil in the notches at the same 10-degree angle, but facing in the opposite direction. After you’ve penciled the outside edge of each notch, it’s time for the next trick.
The key to nailing the width of the notches is using the actual workpieces to lay them out. Knowing that all the parts came from the same board, we knew they were all the same thickness. So we used one of the feet to lay out the last line on each of the notches, lining up the foot with the first line we laid out and using a very sharp pencil to trace the other side of the board. Presto, perfect notch.
Step 3: Use your jigsaw to cut the notches
It’s now time to bust out your trusty jigsaw: a small but powerful tool that can make all kinds of cuts, both straight and curved. What makes your jigsaw even trustier is an upgraded blade. For this project, we recommend picking up a jigsaw blade designed specifically for making smooth cuts in hardwoods. They typically cost just a few bucks, and will provide drastically better results.

To make the square notches, we started by cutting straight down each side of the notch, along the inside edge of each pencil line, and then pulled back to make curved cuts that removed the waste from the middle. One straight cut across the bottom finished the job. Don’t sweat the bottoms of the notches — they’ll be hidden when the rack is assembled, so they don’t have to look perfect.
Before you put the saw away, give your pieces a quick test fit. If any of your notches are a little too tight, feel free to take a thin slice off the inside edge with the jigsaw and try again. The great thing about this rack is that the intersecting notches don’t have to be perfect for the whole thing to be solid and stable.
Step 4: Sand it smooth and bevel the edges
The board we bought for this project was already surfaced smooth, so its faces only needed a bit of sanding to get them ready for an oil finish. Our saw cuts on the edges, however, needed extra work.
In both cases, we backed up our sandpaper with a wood block, alng with some self-adhesive cork shelf liner stuck on it to even out the pressure. The sandpaper simply wraps around the block. A block is critical for even sanding, and helps you keep edges flat and crisp.
On both the edges and faces of the board, I started with 120-grit paper, and then moved up through 150- and 220-grit, wiping away the dust each time. Oily, exotic woods like bubinga can be very irritating to your airways, so we recommend wearing a dust mask while you sand.
The last important touch when sanding is to break all the edges and give them more of a bevel. This makes a project look more finished and is friendlier to the hand as well. We did this with 150-grit paper wrapped around the block and the block held at an angle to the edge (roughly 45 degrees). Then we just counted our strokes in order to get a light, even bevel along every last edge and corner. Eight or 10 strokes usually does the trick.
Step 5: Throw on some finish and make it shine
To finish the job, we suggest applying a couple coats of Minwax Teak Oil. Just shake the can, apply it liberally with cotton rags or paper towels, wipe off the excess, and let the parts stand somewhere to dry overnight.
You’ll need to smooth the surfaces between each coat of oil you apply, but here’s another awesome trick for that: Tear some big pieces off a brown paper bag and use them to buff the surface to a soft sheen. Also be sure to buff off any excess oil that has worked its way back out of the pores in the wood. This method works wonderfully, both between coats and after the final one has dried.
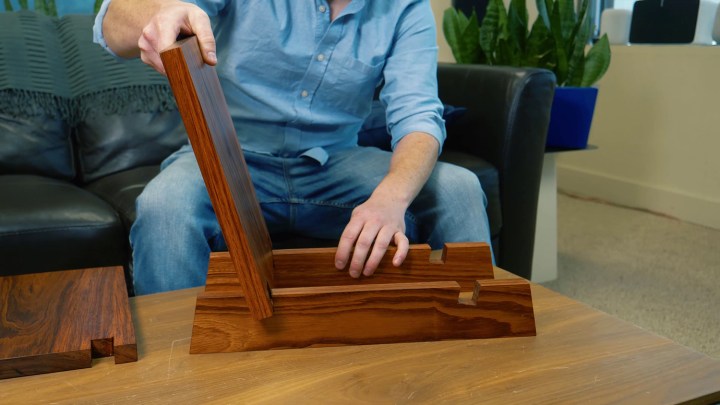
Step 6: Assemble the stand
Putting this stand together is insanely simple. Just place your foot boards on a flat surface, with the angled notches facing upward. Next, space them out a bit and place your wider boards on top so that the notches come together. Voila! You’re done. Now all that’s left is to put your new record rack someplace where everyone can see it and load it up with your best albums. It’s pretty much guaranteed to get oohs and aahs from your houseguests.
“Oh that? Yeah, I made it myself.”