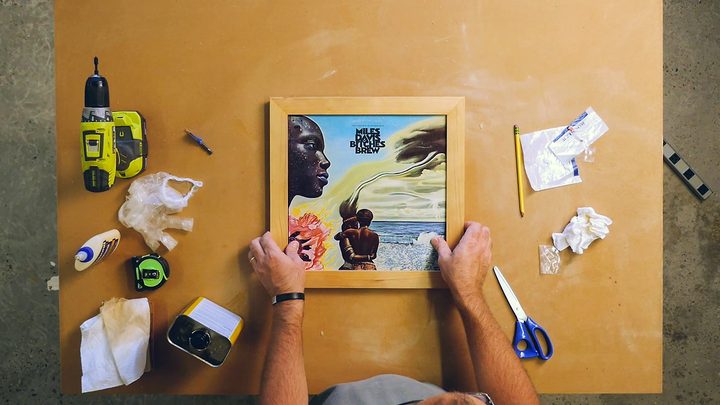
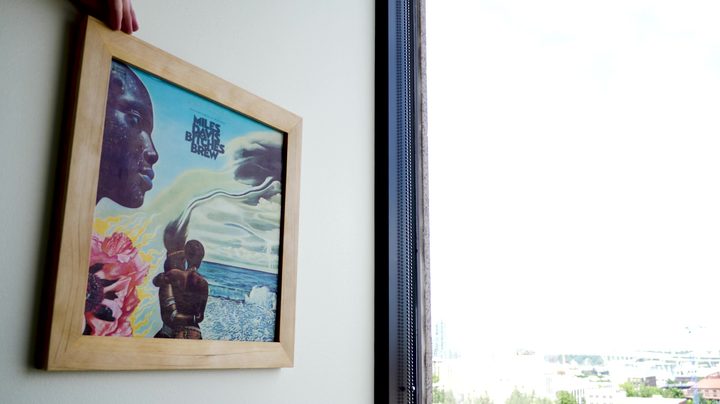
One of the great things about vinyl records, other than the warm embrace of analog audio, is the large-format artwork on their covers. Why hide those iconic album covers in a milk crate when you can give them the spotlight they deserve, in a sleek wood frame on the wall? These frames are so simple you can make them in twos or threes for more impact. Better yet, the album covers can be slipped in and out of the frames without moving them off the wall. So when you want to change up the look or listen to a favorite disk, you can switch records out in seconds.
Make it with simple tools
You can make this project with just a few basic tools. If you have a table saw and the skill to use it safely, you can do everything with that one tool — but owning such a major machine isn’t necessary, as we prove in the above video. You can cut the backing board with an inexpensive circular saw, guided by a straight piece of wood clamped on the workpiece. As for the thin strips, you can cut them off with a handsaw and some careful layout with a square, but a miter saw makes it easier to make precise 45-degree cuts for clean miter joints in the most visible part of the project. Just add a few clamps, and you’ll be ready to tackle this basic but totally brag-worthy project.
Materials needed
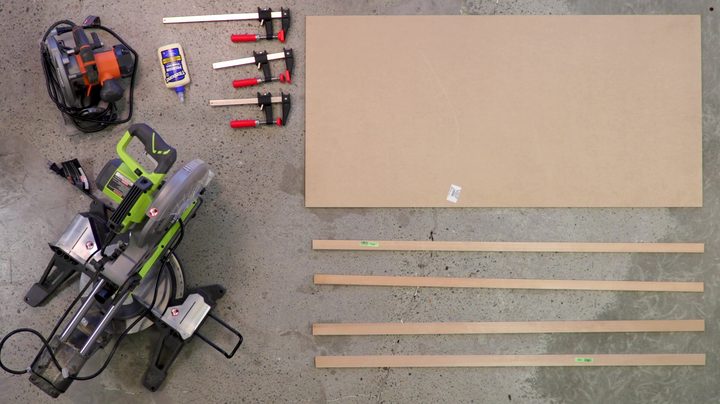
- Base (backing board), MDF, 1/4 in. thick by 15 in. wide by 14-3/4 in. tall
- Pocket strips, solid wood, 1/4 in. thick by 1-1/8 in. wide, in two lengths: 2@14-3/4 in. and 1@12-3/4 in.
- Frame strips, solid wood, 1/4 in. thick by 1-3/8 in. wide, each 14-7/8 in. from mitered tip to mitered tip
- 2 Extra-Thin Flush Mount Brackets, 1 in. x 1 in.
- Wood glue
- Clamps
- Sandpaper
- Finishing oil
That’s it! It’s so cheap and easy you have no excuse not to build at least two of these badboys for your living room.
Step-by-step instructions
- Figure out the dimensions of the backing board, based on the width of your wood strips and the 12-1/2-in.-wide pocket you need for the record cover.
- Cut the backing board to size from 1/4-in. MDF or plywood. Use a circ saw and cutting guide or simple fence to do this. A tablesaw will work even better if you have one.
- Cut the three strips that form the pocket around the record cover. Start with the two side strips that run top to bottom, glue and clamp them on, and then figure out the right length for the bottom strip and attach that one too. Let the glue dry for 30 minutes at least, or an hour if you can, before attaching the top (outer) frame.
- Cut the frame strips to length, making sure the angles and lengths are all the same (see tips above).
- Apply glue to the tiny joint areas, and use blue painter’s tape to pull all the miter joints together at once. Apply the tape front and back so the frame stays flat as it dries. Give it an hour or two for the glue to firm up if you can, before clamping it onto the pocket assembly and completing the project.
- Use a block and some 120-grit paper to sand all the joints level and pit a tiny bevel on all the edges and corners of the outer frame.
- To this outer, mitered frame to the parts below, first put a record cover in the pocket for reference, so the outer frame covers its edges evenly. Then smear some glue on the pocket strips, lay the outer frame down on top, and adjust it side to side and up and down before putting some weights on the top to act as clamps.
- Finish sanding with 150- and 220-grit paper, and then apply one or two coats of any oil finish, like Watco oil or Minwax Tung Oil finish. Just flood it once with a rag and wipe off the excess.
- If the surface feels rough after the last coat of oil dries, try rubbing it with some brown paper from a grocery bag. That’s an easy way to smooth any finish.
- Drill little pilot holes and screw wall hangers on the back, making sure the screws are the right length so they won’t won’t pop out the front!
- Find a high-visibility spot and turn your favorite vinyl into classy wall art.
Make your clamps go farther
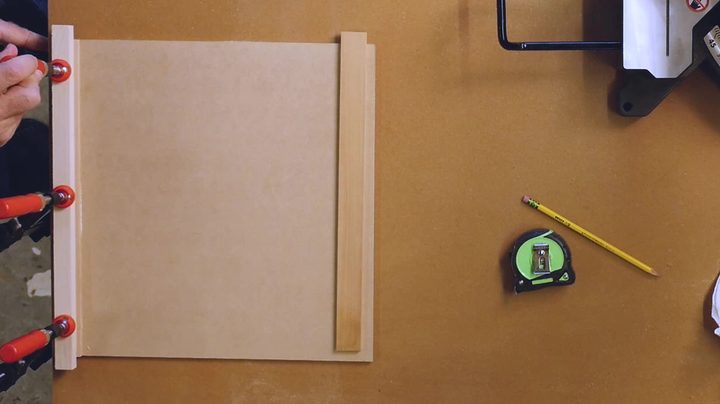
If you look closely, you’ll pick up a lot of pro clamping tips in the above video. First off, you’ll notice that I placed thicker, narrower strips of wood over the thin pocket strips I was gluing and clamping down. Those thicker pieces are not glued down; they are there to spread out the clamping pressure so we can use fewer clamps and still get a great bond along the full length of the strip.
Then there’s the painter’s tape we used to clamp the miter joints (see below), then there is the sand bags we used to clamp down the outer frame onto the pocket below. When clamping down that mitered frame, we could have used a pile of normal wood clamps to get good pressure along all the long pieces, but clamps are pricey. Also, the sand bags make it easier to align that outer frame and clamp it right there without it shifting around. By the way, you can DIY these weight bags by pouring cheap sand into one-gallon Ziploc baggies.
Bonus tip: Always spread glue out evenly after squirting it on. Your finger or a little brush are great tools. You want the glue surface to be as large as possible for a strong bond.
A range of materials will work
The materials for this project are all available at your local home center, and you don’t have to use exactly what we used. You’ll need a piece of thin MDF or plywood for the backing board, and two sizes of thin wood strips, which are available at 1/4 inch thick, and in various widths. Three of the narrower strips go on the backing board to create a pocket with an open top edge, and then four wider ones are mitered together to create a beautiful frame that goes on top. The strips for the outer frame need to be a little wider than the pocket strips, so they overhang them a little on both the inside and outside edges. That way, you won’t see the outside edges of the backing board and pocket strips, and the album cover will be held in place at the same time.
If you can’t find strips that are the exact width as ours, don’t sweat it. It’s all about making a pocket that fits the record cover, and an outer frame that just hides the edges. Standard albums are 12.25 inches (12 1/4″) across, so you need to create an inner pocket that is roughly 12.50 (12 1/2″) wide. So depending on the width of your strips, you can just size the backing board to get the right size pocket with the strips you have.
We don’t show wall hangers in the video, but almost any type will do. See below for the hangers we used, as well as a complete list of the other materials, and their final sizes. Refer to the project sketch down below for the whole picture.
How to cut and assemble flawless miter joints

The most challenging part of this project is the 45-degree miter joints in the thin outer frame. If you nail them, they deliver a sleek, professional look. But if the length of any of the pieces varies, or each angle isn’t a perfect 45 degrees, you’ll get gaps in these very visible joints. Here’s how to nail the miters.
Your miter saw is the star here, plus a roll of blue painter’s tape. You can also cut these miters on a table saw, or with a handsaw, but we highly recommend that you invest in a miter saw at some point. You’ll use it for woodworking, DIY projects, and home renovation for the rest of your life.
To nail the 45 degree angle, we made some test cuts with our miter saw, then checked them with the 45-degree side of a combination square. Luckily, our saw was accurate from the jump, but all saws allow some way to adjust the angle settings. Read the manual if you run into trouble.
To nail the length of each strip, we first cut one end of every strip at 45 degrees and then set up a work stop on the end of the miter saw. This is nothing more than a long strip of wood screwed on behind the fence, with a block of wood screwed to it to catch that first pointy end we just cut. That end goes against the stop, and then I switch the saw over to the opposite 45-degree setting to cut the second end, with the tip-to-tip length guaranteed every time.
The coolest thing you’ll learn on this project is how to use basic blue painter’s tape as a clamp, for creating clean miter joints in thin pieces that would be hard to assemble with traditional clamps. Apply some glue to the tiny end surfaces on these mitered pieces, then pull strips of blue tape across all the joints, front and back. Painter’s tape has some built-in stretch, so it can actually pull the joints together while the glue dries. It’s one of our favorite low-tech tricks.