Windows Update is sometimes underestimated as a cornerstone of your system’s integrity and security. Not only does it keep your PC healthy and current, but it also delivers new features from time to time to keep the platform fresh and relevant. However, Microsoft’s updates don’t always roll out as smoothly as the company intends.
Here, we’ll show you how to get Windows Update working again when it fails and what to do if it looks like an update is causing problems.
Manage automatic updates
You can’t permanently turn off automatic updates in Windows 10, but you can manage when your machine installs an update and reboots your PC. That way, you can at least make sure your machine doesn’t restart during your workday or at an inconvenient time.
Change your active hours
Step 1: Click on the Notifications icon on the taskbar followed by the All Settings tile in the Action Center.
Step 2: Select Update & Security.
Step 3: The Windows Update category should open by default. Click Change Active Hours.
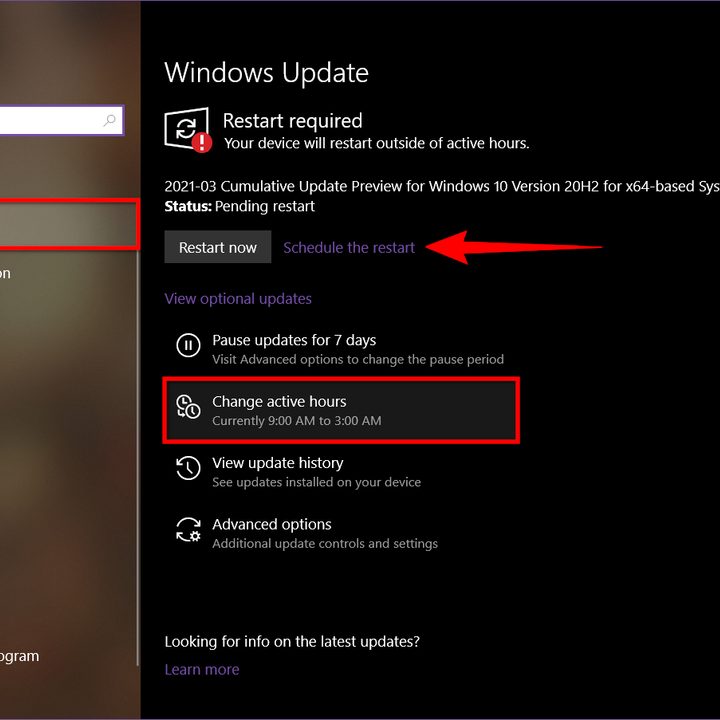
Step 4: You should see the current active hours displayed under a toggle. Click the Change link.
Step 5: Set the start time and the end time, as shown below, and then click the Save button. The maximum length is 18 hours.

Reschedule a system reboot
If Windows 10 already scheduled a restart to finish installing an update, you can change the time and day to better fit your schedule. Here’s how:
Step 1: Click on the Notifications icon on the taskbar followed by the All Settings tile in the Action Center.
Step 2: Select Update & Security.
Step 3: The Windows Update category should open by default. Click on the Schedule the Restart link next to the Restart Now button.
Step 4: Click on the toggle to enable your custom schedule.
Step 5: Pick a time and a day and you’re good to go.
Pause Updates
If you’re having specific issues, the problem may not be with your PC specifically. Instead, a problematic update may be causing issues across multiple devices that Microsoft needs to fix. Here’s how to pause updates for up to 35 days:

Step 1: Click on the Notifications icon on the taskbar followed by the All Settings tile in the Action Center.
Step 2: Select Update & Security.
Step 3: The Windows Update category should open by default. Click Advanced Options.
Step 4: Click on the downward-facing arrow next to Select Date in the Pause Updates section.
Step 5: Select a date on the drop-down list.
Note: This only applies to “quality” updates, aka cumulative fixes. This does not apply to “feature” updates because they are not automatically installed.
Run the Windows Update Troubleshooter
Microsoft knows that, sometimes, updates (like the infamous Windows 10 May 2019 update) can bring along a few unwanted issues, so it has a Windows Update Troubleshooter. This tool will look for any obvious problems that may be keeping Windows Update from functioning correctly. If it can, the troubleshooter will fix them automatically or at least let you know what is causing the issue.

To access the Windows Update Troubleshooter, do the following:
Step 1: Click on the Notifications icon on the taskbar followed by the All Settings tile in the Action Center.
Step 2: Select Update & Security.
Step 3: The Windows Update category should open by default. Click on the Troubleshoot tab listed on the left.
Step 4: Click Additional Troubleshooters listed on the right.
Step 5: Click Windows Update.
Step 6: Click the Run the Troubleshooter button.
The troubleshooter won’t solve every problem, but it’s a great place to start and will usually provide useful information even if it can’t offer a fix.
Check your installation error code
If your general update or feature update fails or causes problems, it will often give you an error code. The codes don’t tell you much by themselves, but they include a lot of useful info if you hop online and consult Microsoft’s guide on the matter. Below, we’ve included a table highlighting some of the more common errors.
| 0x80073712 | A file needed by Windows Update is likely damaged or missing. |
| 0x800F0923 | This might indicate that a driver or other software on your PC isn’t compatible with the upgrade to Windows 10. For info about how to fix this problem, contact Microsoft support. |
| 0x80200056 | This could mean that the upgrade process was interrupted because you accidentally restarted your PC or signed out of your PC. Try upgrading again, and make sure your PC is plugged in and stays turned on. |
| 0x800F0922 |
This error might mean that your PC couldn’t connect to the Windows Update servers. If you’re using a VPN connection to connect to a work network, disconnect from the network, turn off the VPN software (if applicable), and try to upgrade again. The error could also mean there isn’t enough free space in the System Reserved partition. You might be able to fix this problem by using third-party software to increase the System Reserved partition size.
|
| 0xC1900208 – 0x4000C | This could indicate that an incompatible app installed on your PC is blocking the upgrade process from completing. Check to make sure that any incompatible apps are uninstalled and then try upgrading again. |
|
0xC1900200 – 0x20008
0xC1900202 – 0x20008
|
This may signify that your PC doesn’t meet the minimum requirements to download or install the upgrade to Windows 10. |
|
0x80070070 – 0x50011
0x80070070 – 0x50012
0x80070070 – 0x60000
|
This likely indicates that your PC doesn’t have enough space available to install the upgrade. Free some space on the drive and try again. |
This guide is designed specifically for Windows 10. Error codes may not mean the same thing in other versions of Windows.
If all else fails, these quick fixes might do it

If our instructions up until now haven’t resolved your issues, then it’s time to go back to the tried-and-true methods, the tricks that have been solving update errors since the update was first invented. Here are a few options that may work for you.
Restart your computer
This is a surprisingly effective method that will solve a host of computer issues — and it often works for Windows Update errors too. When you encounter an error message, restart your machine and try to rerun the updates. If you haven’t run Windows Update for some time, then you might have to repeat this process several times before all updates have been installed.
However, don’t just restart the machine. Turn it off for a few moments so the RAM is cleared of any nefarious code, then turn the machine back on. Data in RAM doesn’t stick around when there’s no power, so you have a clean slate when you boot back into Windows.
Do you have enough disk space?
One scenario in which updates may fail is when your system drive is running out of space. Double-check that you have at least 10GB free. If you don’t, perform a disk cleanup to remove files. Here’s how:
Step 1: Type Disk Cleanup into the taskbar’s search box and select the resulting app.
Step 2: Use the downward-facing arrow to select the drive you need to clean — presumably, it’s the C Drive — then click OK.
Step 3: Specify the type of file that you want to remove and select OK. Try to stay away from important system files, however.
Alternatively, third-party software like CCleaner can be great for freeing up extra space on your system. For more information on this topic, check out our more complete guide on managing Windows 10’s storage space.
Is malware causing the issue?
Malware can affect essential files and services, so it’s vital to run a scanner. If you don’t have antivirus software, look at our favorites for Windows-based computers.
Contact Microsoft Support
If you’re out of options, contact Microsoft support. Visit their contact page and start a chat, request a callback, or make a call. You can also ask the community, which can be useful if there’s already a forum on the issue.