Is your computer sluggish, taking ages to respond to a simple request? Have you run your antivirus software to ensure that your machine is clean of malware? In that case, it might be that your hard drive is full of little-used programs and years-old files, taking up space and slowing down Windows 10’s performance while contributing nothing.
Read on to learn more about how Windows 10 Storage menu and Storage Sense can help you trim the dead weight from your hard drive and improve system efficiency.
What is the Windows 10 Storage menu?
Designed to be a hub connecting all your data management features, the Windows 10 Storage menu has many features allowing you to review and alter files quickly and programs to reorganize and open up additional space. While this feature is extremely convenient, it also means you can mess up or lose your data very easily if you don’t know what you are doing. Learn about Windows 10 storage first (don’t worry, it’s easier than it looks). We’ll start with the most basic of steps, namely where to find Storage in Windows 10.
Cortana and the search menu are happy to help and take you directly there if you search for “storage.” If you prefer a more traditional way, head over to Settings > System > Storage.
When you first bring up Storage, it seems to be a basic description of your drives, how much data they are using in GBs, and how much free space remains. We’re all used to seeing this part — but the real magic happens when you select one of your drives and open up a whole new set of options, including the ability to dive deeper into what’s taking up your disk space and delete any data you decide you don’t need.
How to configure and run Storage Sense
Storage Sense is a great Windows tool that will auto-delete temporary files and empty your recycle bin and download folders. If this is your first time using this option, select Configure Storage Sense or run it now at the top of the Storage menu.

From the next menu, you can set when Storage Sense will run, when and if recycle bin files and downloads will be deleted, or select Clean Now to perform a cleaning based on the current menu settings. Note that the default setting for your Downloads folder is “Never” and should remain as such unless you are confident that there’s nothing you need before deleting everything.

How to manage your hard drives manually
The Storage menu features a usage window in which you can see where most of the data on your computer is kept. Note that there several sections here, including Apps & Features, Documents, Pictures, Temporary files, and Other. Select any of these to bring up a detailed list of what is taking up space on your hard drive and where’s it’s located. Apps & Features typically contain the lion’s share of dead weight, making it a good place to start if you want to clear out disk space.
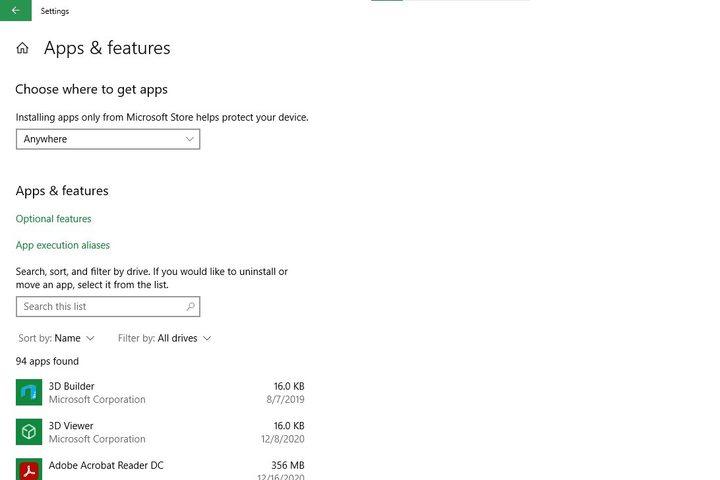
You should ensure that you truly do not want the apps you are eliminating, but you’ll see that ridding your storage space of unused apps, games, and large files will make a huge difference in performance and free up room for the software you will use. You can peruse the list of apps and features, search for specific apps by name or sort them according to size and location, or sort them by Name, Size, and Install date.
If you want to get rid of an app, click on it to bring up an instant Uninstall button, which works for all apps on your computer, not just those downloaded from the Windows Store. Also, note the button at the top of the window names Optional Features. These are extensions and plugins used in software all over your computer that you may not need. That said, they are negligible in size, so clearing them out isn’t worth the trouble.
Other tricks in Storage
- Find out what’s important/unnecessary: Remember a couple of paragraphs up, when we talked about sorting options for your apps? You can do this with any drive section in Storage, which is really useful for seeing at a glance what software is taking up most of your storage space — and whether you need to have it. Also, note that you can refresh each drive once you delete something to see how your action affects the current space.
- Automated storage decisions: All the way at the bottom of the first Storage menu, locate the Change Where New Content Is Saved button. Here, you can control exactly where new apps, docs, music, pictures, and videos will be saved. This allows for extensive future control over how your data is divided for easier storage clearing and better data management.
Third-party option: CCleaner
If you’d rather not deal with Windows 10’s options for managing space on your hard drive, CCleaner is an excellent freemium option for the average PC owner. CCleaner will analyze both internal and external hard drives and provide users with a breakdown of the largest folders and files taking up space. Additionally, this software will send this list to your PC so that you can inspect and deliberate on which items should stay or go. Other features include the ability to delete files from within CCleaner and organize data by file type to determine which extensions are bloating your hard drive, and new software updates are frequently released.