It doesn’t take much for your hard drive to become cluttered or disorganized. With family photos, large documents, or other files, you can quickly run out of storage. A practical space-saving and organizing solution is to archive some of these files by “zipping” them.
Zipping a file isn’t unique to Windows 11. Many computer systems allow you to archive documents, but depending on the program you have, it might work differently.
ZIP a single file

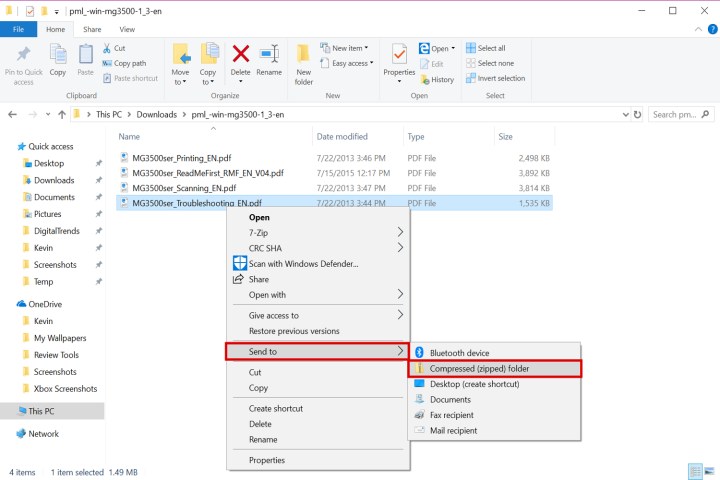
If you have a single file that is taking up a lot of storage space, such as videos, this method may be for you. Zipping the file will reduce its overall size and make it easier to handle along with the rest of your data. Here’s how you can get started.
Step 1: Locate File Explorer on the Windows 11 or Windows 10 taskbar (the folder icon).
Step 2: Locate the file you want to compress.
Step 3: Right-click on the file.
Step 4: Select Compress to on the menu (Send To in Windows 10).
Step 5: Select ZIP in the next menu (Compressed (Zipped) Folder on Windows 10).
Step 6: Rename your new ZIP file, and press the Enter key.
ZIP multiple files

This method is useful for cramming multiple files in one neat package and can make sending large files easier as well as freeing up unused disk space that you can use more productively.
Step 1: Locate File Explorer on the Windows 11 taskbar (you can also press the Windows + E keyboard shortcut).
Step 2: Locate the files you want to add to a single ZIP file.
Step 3: Select all files by holding down the mouse button and dragging the pointer across the screen. Your mouse will create a blue selection box. All files within this box are highlighted with a light blue color.
Step 4: Release the mouse button and right-click on the light- highlighted files.
Step 5: Select Compress to on the menu.
Step 6: Select ZIP in the next menu.
Step 7: Rename your new ZIP file, and press the Enter key.
ZIP an entire folder

If you want to compress multiple files in a single folder, this is the method you choose. When unpacked, all files will unload in a folder created during the compression process.
Step 1: Locate File Explorer on the Windows 11 taskbar (the folder icon).
Step 2: Locate the folder you want to add to a single ZIP file.
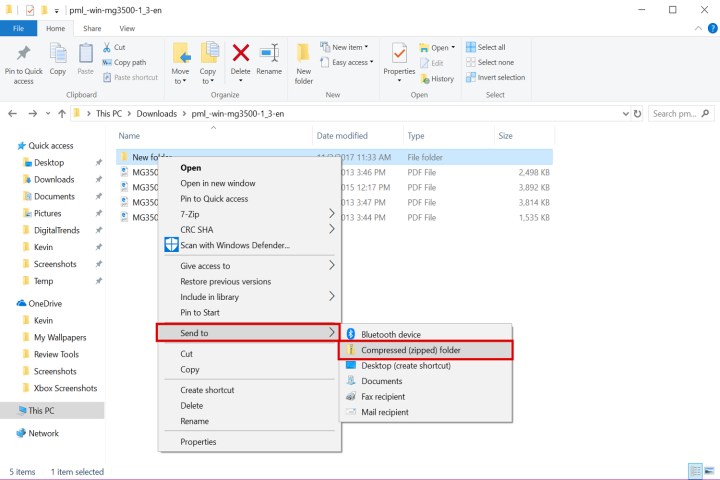
Step 3: Right-click on the folder.
Step 4: Select Compress to on the menu.
Step 5: Select Zip in the next menu.
Step 6: Rename your new ZIP file and press the Enter key.
Unpack a ZIP file

The Windows file explorer has several tricks, and once you’ve learned how to zip a file up, you’ve only learned half of what you need because you have to know how to unzip files as well.
Windows 11 compiles files and zips them up using lossless compression algorithms. These algorithms will fully compress your files so you can easily store or email them; once the file is in its new destination, it can be decompressed back to its original size and quality. The original information is intact. This process requires the system to recognize patterns and recode them quickly within the file to limit repetitions. You can follow the steps below to unzip ZIP files safely:
Step 1: Click on File Explorer, also known as the folder icon, located on the Windows 11 taskbar.
Step 2: Find the file you want to zip.
Step 3: Right-click on said file.
Step 4: A menu will pop up. Select Extract All.
Step 5: Another window will appear. There, you will pick the location you want Windows 11 to unload the files in. Click Browse.
Step 5: After narrowing down the new location, click Select Folder.
Step 6: Finally, click Extract.
At that point, Windows 11 will do the work for you. The OS will scan the compressed file and restore each file to its original size. The decompressing actions will take several minutes to ensure the computer is correctly reading the files’ patterns. After a short wait, you will be able to open the file as if it were the original.
If you need to organize your files better, it’s worth learning how to partition your hard drive or SSD in Windows.


