
- How to set up a Microsoft account — or not
- How to make Windows 10 yours with personalization
- How to use Windows Update to get the latest PC security features
- How to secure your Windows 10 PC
- How to set up your Windows 10 User Account Control
- How to enable Cortana on your Windows 10 PC
- How to clear your Windows 10 PC of clutter and bloatware
- How to install useful apps on your Windows 10 PC
- Switch out of Windows S mode
- Did you miss anything?
We’ve amassed a codex of everything you need to know and do to get your new PC up to speed. Here’s how to set up a new computer quickly and easily.
How to set up a Microsoft account — or not
Before you decide to create a new Microsoft account, you should be aware that you might already have one. If you have an Xbox Live account, an Outlook email account, a OneDrive account, or even a Skype account, then you already have a Microsoft account. While you can use these accounts to set up your new PC, it’s not going to make a massive difference in your Windows 10 experience if you don’t.
Using a Microsoft account is a little more secure because it allows you to receive notifications related to your PC. Also, it’s much more accessible in the long run. If you forget your password, you can always reset it online or from a different device.
If you don’t want to use a Microsoft account, open your Start menu and click Settings (the gear icon right above the power icon on the bottom left).

Click Accounts, then select Sign in with a local account.
If you do want to use a Microsoft account, select Sign in with a Microsoft account from the same menu.

Once you’re signed in to your Microsoft account, if you opted to use one, tuning your security settings can be done by clicking Manage my Microsoft account. Select Security & Privacy on the navigation bar of the webpage that pops up.

How to make Windows 10 yours with personalization
Before we get to any of the other critical security and driver updates, we need to make sure you can tolerate looking at your new PC. That means picking a wallpaper and adjusting your display scale. Windows 10 comes bundled with a standard array of wallpapers, and for this step, we’re just going to use one of the defaults.
Right-click your desktop and click Personalize. From the window that pops up, just choose one of the available wallpapers or hit Browse to open one you downloaded — then select an image that’s at least as big as your monitor’s native resolution.

If it’s not exactly the same resolution, don’t fret. Down where it says Choose a fit, you can decide how Windows should fit your chosen image to your display — stretching it might look a little weird, but it will fit your screen at least.
Now that you have selected a wallpaper, it’s time to check on your display scale. Just like before, right-click on your desktop, but this time click Display Settings. If your text and icons seem a little too big and stretched out, you might want to turn your scale down. Similarly, if everything is tiny and hard to see, turning it up should take care of that. The default options for text, apps, and other items are 100% and 125% magnification, though custom settings and toggling whether Windows automatically scales apps can be found under Advanced scaling settings. However, it is worth noting that this scaling feature only works with apps updated to take advantage of it, whereas older applications may not change size.

Next, click on Advanced display settings and make sure that your resolution is set to the maximum available for your display. If it isn’t, then your text, windows, and pretty much everything will look pixelated and weird.

After upping your screen resolution, you might have trouble reading smaller text on your display, which can be an issue if you have a big (1440p or 4K) display. In which case, your best bet is to increase your display scale to compensate. That way, images, videos, and multimedia will display properly, but you’ll also be able to keep your text and display elements nice and large.
While you’re in there, take note of what your display’s resolution is. That’s the number you want to keep in mind when you’re looking for wallpapers in the future.
How to use Windows Update to get the latest PC security features
Now you will need to decide how often you want your PC to check for, download, and install updates. You need to keep Windows updated to keep your PC secure and operating properly, and setting aside time for your PC to keep itself up to date is the first step.
In the Settings app (you can always search for “settings” in the taskbar if you can’t find it), click on Update & Security. From here, you can check for updates manually and decide when your PC will download and install updates on its own. Under Change active hours, you can tell your PC what times of day you’re typically using it, so Windows Update will download and install updates outside of those hours.

So if you tell your PC your active hours are 9 a.m. to 5 p.m., it’ll only download and install updates outside of those hours. Under Restart options, you can also determine when your PC will reboot itself to install updates, instead of bugging you when you’re trying to work.

Similarly, you can determine whether or not Windows Update should update other apps, and if you want to let Windows Update log in by itself to finish the setup process under Advanced options.
If you’re a little daunted by all the options and settings here, just set them up as follows:
- Set active hours to 8 AM and 11 PM.
- Under Advanced options, check both boxes.

That’s it. Windows Update should take care of itself from here on out.
How to secure your Windows 10 PC
Another way that your PC will take care of itself is by periodically scanning for malware, and Windows Security does an admirable job at keeping your PC secure.
Let’s make sure it’s enabled. Open your Settings menu, then click through to Update & Security. On the left, click on Windows Security, and the Protection Areas menu will open with a series of buttons and toggles to change your security settings. Make sure that Limited Periodic Scanning, Real-time Protection, Cloud-based Protection, and Automatic sample submission are all enabled.

It’s also a good idea to have a separate anti-malware solution installed. These are some of our favorite free options.
How to set up your Windows 10 User Account Control
While we’re here, let’s take a look at the User Account Control or UAC. The UAC is the system that pops up those windows every time you try to install an app or game. Though annoying, it keeps your system safe by ensuring a program can’t install itself in the background without permission. Open your Start menu and type user account control and select the first result.

In this menu, you can change how frequently the UAC system will notify you when apps try to make changes to your PC. You should only mess with these settings if your apps or games are giving you trouble. For the most part, it never hurts to get a pop-up when an app wants to make changes to your PC, so keep this setting at the second bar from the top. This way, your PC will notify you when apps try to make changes but won’t bug you when you try to make changes.

How to enable Cortana on your Windows 10 PC
Before we get into fun stuff like installing apps and games, you have one more big decision to make: Do you want an A.I. to live inside your computer?
Microsoft’s A.I. assistant, Cortana, is integrated into Windows 10 by default, and it’s pretty handy. It can control video and audio playback, set reminders, tell you the weather, answer questions, and even tell jokes. When it’s enabled, all you have to do is say “Hey Cortana,” then tell it what to do.
If you’ve had enough of these so-called smart assistants, just move right along. Its voice feedback is off by default, so you don’t have to necessarily worry. But if you want your PC to behave like Apple’s Siri and Amazon’s Alexa, then read on.
First, click on the little circle on your taskbar, the one right next to your Start menu. The circle is the button for accessing Cortana. Unlike Siri, you don’t have to interact with it using your voice.
You can type questions and commands right into the little box that pops up, which is a nice little addition. But what we’re looking for here is the gear icon on the left — click on it, and the settings menu will pop up.
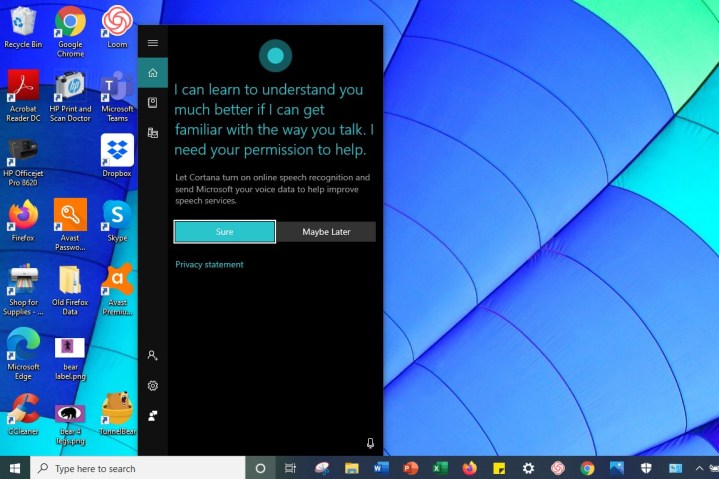
There are a lot of options here, but all we’re going to worry about is letting Cortana hear you. Click the little toggle button under Hey Cortana to let her respond to your voice whenever you say “Hey Cortana.” Farther down, you’ll find options for fine-tuning her performance, but for now, just enabling it is enough to get you started.

Even if you don’t enable Cortana, you can use the Windows Search bar to find files, websites, and other information. This function, though tapped into by Cortana if it’s turned on, is not part of Cortana. It’s also one of the best ways to find files, applications, and other information you’ve misplaced.
How to clear your Windows 10 PC of clutter and bloatware
Okay, so we’ve set up your basics, and we’re almost ready to get started on the fun stuff. But first, let’s take out the trash. Click your Start menu and type the word Uninstall. The first result that should pop up from your search is Add or remove programs. That’s the one we want, so click it and let’s get started.

The Windows 10 Uninstall or change a program window that pops up contains a list of every application and game installed on your PC. What we’re looking for here is “bloatware,” which is applications that don’t serve any purpose but manufacturers include to promote their products and try to get you to use their software — even if you don’t need it.
The problem with bloatware is it can make your PC slower, it can take up unnecessary amounts of space, and in some cases might even gather data on your usage habits without your express consent.
There are two ways to get rid of bloatware. You can do it manually if you’re confident you can spot bloatware and remove it safely, or you can do it automatically with tools like PC Decrapifier and Bulk Crap Uninstaller.
If you’re going to do it manually, here are a few pointers. On the Programs and Features window, sort the apps by name, and look for anything that starts with the name of your PC manufacturer (Dell, Toshiba, Razer, etc.).
Standard Dell bloatware, for instance, includes applications like Dell Stage, Dell Digital Delivery, and Dell DataSafe. Make a list of these and then open them to see what each does. Sometimes the apps are useful. For example,
While we’re tooling around in settings, let’s disable hidden files. There will come a day when you’ll need to dig into your PC’s file structure and access the AppData or Windows files, and when you do, it’s going to be simpler if your hidden files are easy to access.

Click your Start menu and just type the word hidden. The setting we’re looking for will pop right up. Click on Show hidden files and folders, then in the window that pops up, just click Show hidden files, folders, and drives. All done!
How to install useful apps on your Windows 10 PC
Next up, we’re going to cover some of the most useful apps your PC should have, and that’s going to put a lot of them in direct competition. First up, it’s time to pick a browser. A year ago, we probably would’ve just told you to download Google Chrome and call it a day, but the browser landscape has changed. You not only have more options than ever, but a few of them are also pretty good.
We have put together a precise breakdown here, where we compared the pros and cons of Chrome, Firefox, Vivaldi, and Microsoft Edge and put them all through a series of tests. Chrome is still one of the best browsers, but there are other stable alternatives to keep in mind.
If you haven’t already done so, now is the time to install safety software like an antivirus client, the right backup solution, and a password manager. Once your safety software is taken care of, you can install whatever else appeals to you – messaging applications, image editing apps like GIMP or Photoshop, games via Steam, GOG, and the Epic Games Store, you name it. You can download these apps directly from the developer’s official website or use trusted online stores like Microsoft Store or Steam for safe app downloads.
Switch out of Windows S mode

Windows S mode is a lightweight version of Windows 10 that’s designed to run smoothly and safely on very portable devices. You can find it on Surface tablets and small
One of the biggest problems that users have with Windows S is that the only apps you can install are the ones from the Microsoft store. If that’s not convenient for you, you can permanently switch out of S mode, which is sort of like unlocking your phone. To do this, go to Settings, choose Update & Security, and select Activation. Look for the section that says Switch to Windows 10 Home/Pro, and select Go to Store immediately beneath.
The Microsoft Store will now pop up and give you an option to switch out of S mode. Select the Get button to start the process. Keep in mind that this is permanent.
Did you miss anything?
Before shutting down, use Ninite to see if there are any apps you still need to install. Ninite lets you select the applications you want to download or upgrade and installs or updates them all at once, saving you time. Use it to grab Java runtimes, productivity tools, messaging apps, and other programs you need. Ninite obtains the most popular software on the market and efficiently groups it together for you, making your life that much easier. This handy tool makes the days of perusing questionable websites to chance risky downloads a thing of the past.
Good luck with your new PC!
Editors' Recommendations
- Wholesale laptop deals: How to buy cheap computers in bulk
- The best laptop brands for 2024
- Windows 11 tips and tricks: 8 hidden settings you need to try
- Best 14-inch laptops for 2024: tested and reviewed
- How to take a screenshot on a Mac


